
Switching to a tankless water heater is one of the smartest upgrades you can make for your home in 2026. You get endless hot water, lower energy bills, and a unit that lasts up to 20 years.
The catch is that installation is not a simple swap-and-plug job. In this guide, I will walk you through exactly how to install a tankless water heater, whether you are working with gas or electric.
You will learn what tools to gather, how to prepare your space, the step-by-step process for both fuel types, and the safety rules that keep your family protected. I have spent years studying home improvement projects and talking to licensed plumbers, so I will also tell you when it is smarter to hire a professional instead of going DIY.
Before you touch a pipe or wire, you need to understand what makes a tankless unit different from the big tank in your basement. A tankless water heater does not store 40 or 50 gallons of hot water.
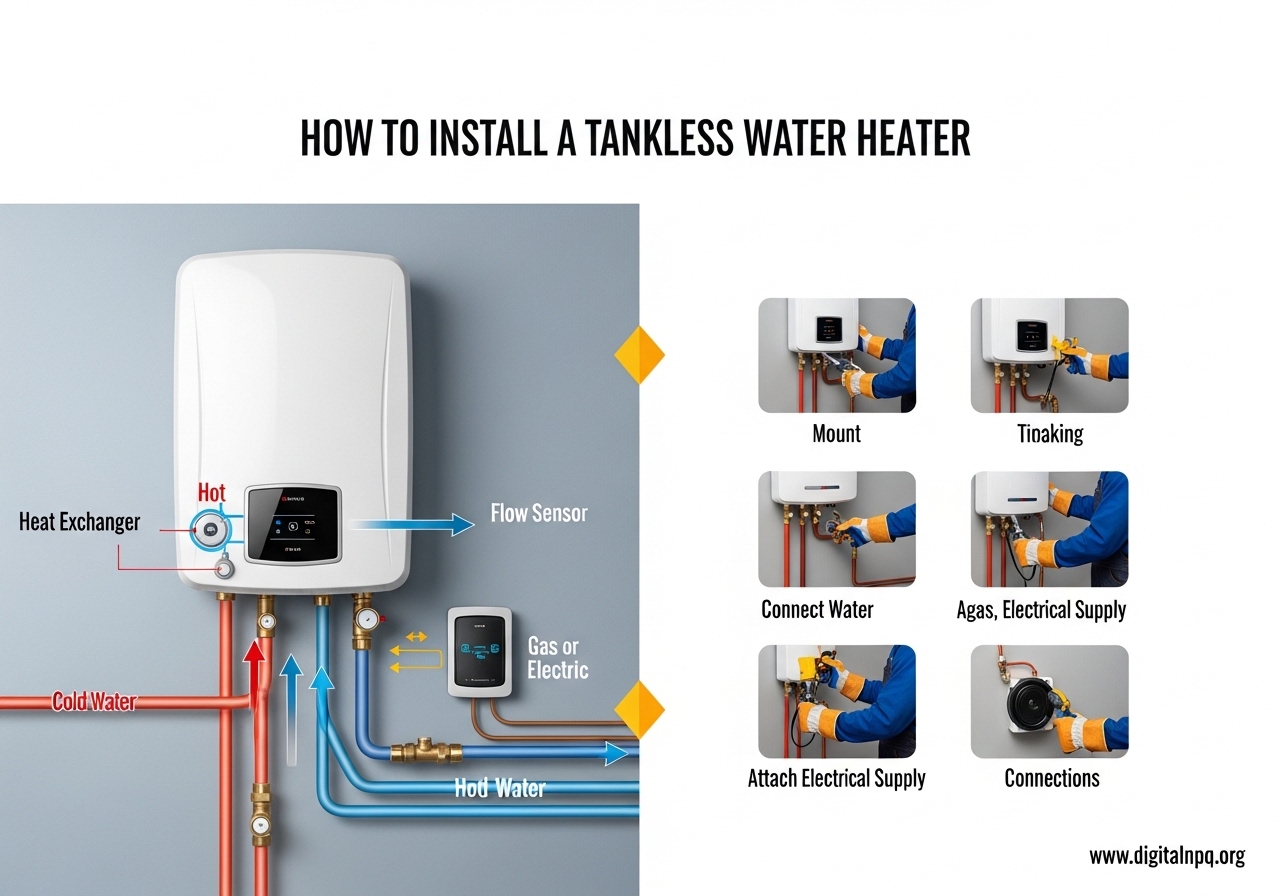
Instead, it heats water on demand as it flows through the unit. When you open a hot faucet, a flow sensor detects movement and activates either a gas burner or electric heating elements.
Water passes through a heat exchanger and exits at your set temperature within seconds. Because there is no tank of water sitting around losing heat, you avoid standby energy loss entirely.
The result is higher efficiency and a compact unit that mounts on your wall. Most homeowners choose tankless because the long-term savings are real.
A gas condensing tankless heater can operate at a UEF rating above 0.90, while traditional tank heaters often sit below 0.65. The compact design also frees up floor space.
The downside is that installation requires more planning than a simple tank replacement. You may need to upgrade your gas line, add a new venting system, or run heavier electrical wire.
That is why the preparation phase matters just as much as the installation itself.
How Does a Tankless Water Heater Work?
Understanding the inner mechanics helps you install the unit correctly and troubleshoot problems later. Inside every tankless water heater is a heat exchanger made of copper or stainless steel.
When cold water enters the inlet, the flow sensor sends a signal to the control board. On a gas unit, the board opens the gas valve and fires the burner.
On an electric unit, it energizes the heating elements. The water wraps around the heat exchanger coils and exits hot at the outlet pipe.
Gas models use a much higher BTU input than a standard tank heater. A whole-house gas tankless unit can demand 150,000 to 200,000 BTU per hour.
That is why the gas line must be sized correctly, often requiring an upgrade from a half-inch line to a three-quarter-inch or one-inch line. Electric models pull serious amperage too.
A whole-house electric tankless heater can require a 60-amp to 133-amp breaker. That means you may need a sub-panel or a service upgrade from your utility company.
The flow rate, measured in gallons per minute (GPM), determines how much hot water you can use at once. A bathroom faucet might use 1.0 GPM.
A shower uses 2.0 to 2.5 GPM. If you want to run two showers and a dishwasher simultaneously, you need a unit rated for at least 6.0 GPM.
Always check the manufacturer’s spec sheet for temperature rise at your target GPM. In colder climates, the incoming water is colder, so the unit works harder to reach 120 degrees.
This reduces the effective GPM. Sizing the unit correctly is the first step toward a successful installation.
Gas vs Electric: Which Tankless Water Heater Is Right for You?
Your existing fuel source usually dictates the choice, but it is worth comparing both options before you buy. Gas tankless water heaters generally offer higher flow rates and lower operating costs in most regions.
They are ideal for whole-house applications and large families. However, they require venting, a combustion air supply, and often a gas line upgrade.
The installation is more complex and more expensive. Electric tankless water heaters are easier to install.
They do not need venting or combustion air. They are smaller and lighter, making them great for apartments, condos, and point-of-use applications like a single bathroom or kitchen.
The main limitation is the electrical load. If your panel cannot handle the amp draw, the cost of an electrical upgrade can outweigh the savings of the unit itself.
Electric models also tend to have lower peak GPM output compared to gas. Here is a quick comparison to help you decide.
Gas units cost more upfront but save money over time if natural gas is cheap in your area. Electric units cost less to buy but may cost more to run depending on local electricity rates.
Gas needs stainless steel or category-III venting, which adds $200 to $600 to the project. Electric needs dedicated copper wiring, which adds $300 to $1,200 depending on the distance from your panel.
If you already have a large gas line near the installation location, gas is the better choice. If your panel has open breaker slots and you only need to serve one or two fixtures, electric is simpler and faster.
Pre-Installation Preparation and Tools You Need
Preparation prevents the mistakes that turn a weekend project into a week-long headache. Start by reading the manufacturer’s installation manual cover to cover.
Every unit has specific clearances from walls, windows, and doors. Every unit has specific venting requirements.
Skipping the manual is the fastest way to void your warranty and create a safety hazard. Next, check your local building codes and permit requirements.
Most municipalities require a permit for water heater replacement, especially if you are altering gas lines or electrical circuits. Call your local building department and ask what they need.
Some areas require a licensed plumber or electrician to sign off on the work. Others allow homeowner permits for DIY installs.
Either way, an inspection protects your home insurance and resale value. Choose your installation location carefully.
The unit should be mounted on a sturdy wall that can handle the weight. Gas units can weigh 60 to 80 pounds.
Electric units are lighter but still need secure mounting. The location should be close to your gas line or electrical panel to minimize runs.
It should also be close to your existing hot water trunk line. Keep the unit away from bedrooms and living spaces if possible.
Gas units produce noise from the burner and fan. Consider freeze protection if you live in a cold climate.
Indoor units in unheated garages or basements may need a drain pan and freeze-prevention kit. Now gather your tools.
For both gas and electric installations, you will need a drill, level, tape measure, pipe wrench, adjustable wrenches, tubing cutter, and screwdriver set. For gas, add a gas leak detector solution or a digital gas leak detector.
You also need a venting kit rated for your BTU output, a pipe thread sealant approved for gas lines, and a condensate drain kit if you have a condensing unit. For electric, add a voltage tester, wire strippers, and a fish tape for pulling wire through walls.
You also need the correct gauge wire based on the amp draw. For plumbing, you need copper pipe or PEX tubing, isolation valves, a pressure relief valve, Teflon tape, and pipe fittings.
You may also need an expansion tank if your local code requires one for tankless systems. One of the biggest pain points I see from homeowners is gas line sizing.
If your existing line is half-inch and your new unit needs a one-inch line, you cannot just adapt the connection. Undersized gas lines starve the burner and cause incomplete combustion.
That creates carbon monoxide risk and poor performance. Measure the total distance from your gas meter to the unit and use the manufacturer’s gas pipe sizing chart.
If you are unsure, call a licensed plumber to verify. The same applies to electrical wire gauge.
A 120-amp unit run 50 feet from the panel needs much thicker wire than a 60-amp unit run 10 feet. Check the NEC ampacity charts or hire an electrician to confirm your plan.
How to Install a Gas Tankless Water Heater Step by Step
Gas installation is the more complex of the two routes, but it is absolutely doable if you have mechanical experience and respect for safety. Plan for a full day of work.
If you need to run new gas pipe or venting, it may stretch into two days. Do not rush.
Gas leaks and carbon monoxide are not forgiving.
Step 1: Turn Off the Gas and Water Supply
Shut off the main gas valve at your meter. Shut off the cold water supply to your existing water heater.
Open a hot faucet somewhere in the house to release pressure in the lines. If you are replacing a tank heater, connect a garden hose to the drain valve and empty the tank completely.
Step 2: Remove the Old Water Heater
Disconnect the gas line using two wrenches to avoid stressing the fittings. Disconnect the hot and cold water lines.
Disconnect the venting if it is a gas tank heater. Remove the old unit and dispose of it according to local regulations.
Many areas require recycling at a designated scrap facility.
Step 3: Prepare the Mounting Location
Hold the mounting bracket or template against the wall at the recommended height. Most manufacturers want the unit mounted with the bottom of the unit at least 12 inches above the floor.
They also require sufficient clearance on all sides for service access. Use a level to mark the bracket holes.
Drill into studs if possible. If you must mount to drywall or masonry, use heavy-duty anchors rated for the unit weight plus water pressure stress.
Step 4: Install the Gas Line
Run your gas pipe from the meter or branch line to the unit location. Use black iron pipe or corrugated stainless steel tubing (CSST) if permitted by your local code.
Never use standard copper or PVC for gas. Install a gas shutoff valve within three feet of the unit.
Install a sediment trap, also called a dirt leg, before the unit inlet. This catches debris and moisture that could damage the gas valve.
Apply pipe thread sealant approved for gas on all threaded joints. Do not use standard Teflon tape unless it is explicitly rated for gas.
Once assembled, pressurize the line with air and test for leaks with a manometer or approved leak detection fluid. Wait at least 10 minutes to confirm no pressure drop.
Step 5: Connect the Water Lines
Install isolation valves on the cold inlet and hot outlet. These let you descale or service the unit without shutting off water to the whole house.
Connect the cold water supply to the inlet marked “Cold.” Connect the hot water line to the outlet marked “Hot.”
If you are using PEX, make sure the fittings are compatible with the unit’s inlet threads. Many units use MNPT connections.
Use plumber’s tape on threaded joints. Install a pressure relief valve on the hot water side if the unit does not have one built in.
Check your manual to confirm.
Step 6: Install the Venting System
Gas tankless heaters produce exhaust that must be vented safely. Non-condensing units use category-III stainless steel venting.
Condensing units use PVC or polypropylene venting because the exhaust is cooler and acidic. Follow the manufacturer’s venting chart for diameter and maximum length.
Most venting runs horizontally through a side wall or vertically through the roof. Use a wall thimble to maintain clearance from combustibles.
Install a vent termination cap with a screen to prevent insect entry. Maintain the required distance from windows, doors, and air intakes as specified by local code and the manual.
If you are venting through the roof, use a proper roof flashing kit. Seal with silicone rated for high temperatures.
Step 7: Install the Condensate Drain
Condensing gas units produce acidic condensate that must be drained. Install a condensate drain line from the unit to a floor drain or pump.
Some codes require a neutralizer filter to raise the pH before draining into a standard plumbing system. Check your local requirements.
Use tubing rated for acidic condensate. Do not run condensate into a pipe that could corrode.
Step 8: Connect the Electrical Power
Even gas units need a standard 120-volt outlet for the control board, fan, and ignition system. Plug the unit into a grounded outlet.
Do not use an extension cord. If the outlet is not nearby, hire an electrician to install a dedicated receptacle.
The unit must be grounded properly.
Step 9: Set the DIP Switches and Temperature
Some units have DIP switches inside the cover for altitude adjustment, gas type, or modulation settings. If you live above 4,000 feet elevation, you may need to adjust the switches for thinner air.
Set the output temperature to 120 degrees Fahrenheit unless local code requires 115 or 125. Higher temperatures increase scalding risk and energy use.
Step 10: Turn Everything On and Test
Open the cold water isolation valve slowly to pressurize the unit. Check every plumbing connection for leaks.
Turn on the gas supply and test all gas joints again with leak detection fluid. Restore power to the unit.
Follow the manufacturer’s startup sequence. Run a hot water faucet and verify the unit ignites, the fan spins, and hot water flows within a few seconds.
Check the exhaust temperature at the vent termination to confirm the burner is firing correctly. If you smell gas at any point, shut off the supply immediately and call your utility company.
How to Install an Electric Tankless Water Heater Step by Step
Electric tankless installation is more straightforward than gas because you skip venting and gas lines. The electrical work is the critical part.
If you are not comfortable working inside a panel, hire an electrician for that portion. You can still save money by doing the plumbing and mounting yourself.
Step 1: Turn Off the Power and Water
Shut off the circuit breaker that feeds your existing water heater. If you have multiple breakers for an electric tank, turn them all off.
Use a non-contact voltage tester to confirm the wires are dead. Then shut off the cold water supply to the tank and open a hot faucet to relieve pressure.
Step 2: Drain and Remove the Old Unit
Connect a hose to the drain valve and empty the tank. Be careful, the water is hot.
Once drained, disconnect the electrical wires inside the junction box. Label them with tape if you are not familiar with the layout.
Disconnect the hot and cold water lines. Remove the old tank and dispose of it properly.
Step 3: Mount the New Electric Tankless Unit
Electric units are compact and lightweight. Hold the unit against the wall at the manufacturer-recommended height.
Mark the mounting holes, drill, and secure with screws into studs or heavy-duty wall anchors. Keep the unit within a reasonable distance of your electrical panel to minimize wire runs.
Leave at least 18 inches of clearance on the sides and top for service access.
Step 4: Run the Electrical Wiring
This is where precision matters. Determine the total amp draw from the unit’s nameplate.
A whole-house unit often needs three dedicated 40-amp or 50-amp breakers. Run the appropriate gauge wire from the panel to the unit.
For a 50-amp circuit, you typically need 6-gauge copper wire. For a 60-amp circuit, you may need 4-gauge.
Run individual home runs from the panel to the unit’s terminal block. Do not daisy-chain other loads on these circuits.
Connect the ground wire to the unit’s grounding lug. Connect the hot wires to the labeled terminals.
Double-check every connection. Tighten securely.
If your unit has a junction box, use the correct strain relief connectors. Replace the cover on the panel and the unit.
Step 5: Connect the Water Lines
Install isolation valves on the cold inlet and hot outlet. These valves are essential for future maintenance and winterization.
Connect the cold water supply to the inlet. Connect the hot water line to the outlet.
Use plumber’s tape on threaded connections. Install a pressure relief valve if required.
Some electric tankless units have a pressure relief valve built in. Others require an external one.
Check the manual. Install an expansion tank if your local code mandates it for tankless systems.
Not all areas do, but some plumbing inspectors require them.
Step 6: Set the Temperature and Test
Most electric units have a digital display or a dial on the front panel. Set the temperature to 120 degrees.
Open the cold water isolation valve slowly and check for leaks at all fittings. Restore power at the breaker.
Turn on a hot water faucet. The unit should activate within one to two seconds.
Verify the water temperature at the faucet with a thermometer. If the water is too cool, check that the flow rate is within the unit’s rated capacity.
If the flow is too high, the unit cannot heat the water fast enough. If the breaker trips immediately, shut off power and check your wire gauge and terminal connections.
Step 7: Inspect and Document
Once the unit runs correctly, take photos of the installation. Document the model number, serial number, and installation date.
Register the warranty with the manufacturer. Schedule a building inspection if your permit requires it.
Keep the manual and warranty paperwork in a safe place. If you hired an electrician, ask for a copy of their work documentation.
Safety Warnings and Code Compliance
Installing a water heater is not the same as installing a bookshelf. Mistakes can flood your home, start a fire, or poison your family with carbon monoxide.
Take every safety rule seriously. I have seen forum posts from homeowners who tried to skip permits and ended up with no hot water, a failed inspection, and a voided warranty.
Do not be that person.
Carbon Monoxide Risk
Gas tankless heaters produce exhaust containing carbon monoxide. Incorrect venting is the leading cause of poisoning in residential installations.
Always use the venting specified by the manufacturer. Never adapt dryer vent or standard HVAC ducting.
Never vent into a chimney shared with a fireplace unless an inspector approves it. Install a carbon monoxide detector in the same room as the unit and another near the bedrooms.
Test the detector monthly.
Gas Leak Testing
Test every gas joint after assembly. Test again after the first firing.
Test again a week later. Small leaks can migrate and collect in enclosed spaces.
Use a commercial leak detection solution or a digital combustible gas detector. The soap bubble method works in a pinch, but a digital detector is more reliable.
If you find a leak, shut off the gas, disassemble the joint, clean the threads, reapply sealant, and retighten.
Electrical Grounding
Electric units must be grounded to a proper grounding electrode. Do not rely on the neutral wire for grounding.
Use a dedicated ground wire run back to the panel. If your home has older wiring without a grounding system, you need an electrician to bring the circuit up to modern code.
A floating ground can cause the control board to malfunction and create shock risk.
Local Code Requirements
Building codes vary by state, county, and city. Some areas require seismic strapping for wall-mounted units.
Some require a drain pan underneath. Some mandate temperature and pressure relief valves in specific locations.
Some prohibit PEX tubing within a certain distance of the unit. Call your building department before you start.
Schedule the rough-in inspection before you close up walls. Schedule the final inspection before you call the job done.
A passed inspection is your proof that the installation is safe and legal.
When to Call a Professional
Be honest about your limits. If you have never sweated copper pipe, hire a plumber.
If you have never added a breaker to a panel, hire an electrician. If you need to upgrade your gas meter or run a new gas line from the street, your utility company must do that work.
Forum users consistently report that the $1,500 to $3,500 they paid for professional installation was worth it for the peace of mind. If you do hire a professional, verify their license and insurance.
Ask for references. Get a written quote that breaks out labor, materials, permits, and inspections.
Be wary of anyone who quotes over the phone without seeing your setup.
How Much Does It Cost to Install a Tankless Water Heater?
Cost is one of the biggest concerns for homeowners. The tankless unit itself ranges from $500 to $2,500 depending on the brand, flow rate, and efficiency.
The installation is where the real variability lies. I have seen homeowner quotes on forums ranging from $1,900 for a basic swap to $3,900 for a full gas line upgrade and venting run.
Electric installations are usually cheaper. If your panel can handle the load and the unit mounts near the old tank, you might spend $800 to $1,500 on labor.
If you need a panel upgrade, add $1,000 to $2,500.
Gas installations cost more because of the venting and gas line work. A simple replacement with existing adequate gas and venting might cost $1,200 to $2,000 in labor.
If you need a new gas line, add $500 to $1,500. If you need a new vent through the roof, add $300 to $800.
Condensing units need a condensate drain, which adds $100 to $300 if a drain is not nearby. Permits and inspections add $50 to $300 depending on your municipality.
DIY saves labor costs but you still buy materials and permits. A DIY gas install might cost $1,000 to $2,500 in parts and fittings.
A DIY electric install might cost $600 to $1,200 if you do not need a panel upgrade.
Over the long term, tankless heaters save money. Energy Star estimates that a gas tankless heater saves the average family about $108 per year compared to a gas tank heater.
An electric tankless saves about $44 per year compared to an electric tank. The longer lifespan also matters.
A tankless unit lasts 20 years or more. A tank heater lasts 10 to 15 years.
Those savings add up, but they do not erase the upfront cost immediately. Plan to stay in your home for at least five years to break even on the installation investment.
Maintenance Tips to Keep Your Tankless Heater Running Longer
Most competitors stop at installation and leave you hanging. I am going to give you the maintenance schedule that keeps your unit running for two decades.
Tankless heaters are low maintenance, but they are not no maintenance. Hard water, in particular, is the silent killer of heat exchangers.
Annual Descaling
If you live in an area with water hardness above 7 grains per gallon, descale your unit once a year. The scale buildup insulates the heat exchanger and reduces efficiency.
Eventually, it can clog the unit and trigger error codes. Connect a pump and a bucket of white vinegar or commercial descaling solution to the isolation valves.
Circulate the solution for 45 minutes to one hour. Flush with clean water.
This is a 90-minute job that costs under $30 in supplies. It can save you a $1,000 heat exchanger replacement.
Filter Cleaning
Most units have a small inlet filter screen that catches debris. Remove and clean it every six months.
A clogged filter reduces flow and can cause the unit to overheat or shut down. If your unit does not have a built-in filter, consider installing an external sediment filter on the cold line.
Freezing Protection
If your unit is in an unheated garage, basement, or outdoor closet, freezing is a real risk. Most units have a freeze-protection electric heater inside the casing, but it only works if the unit has power.
If you lose power during a winter storm, the unit can freeze and crack the heat exchanger. Install a drain valve on the lowest point of the unit and the piping.
If a hard freeze is forecast and you lose power, shut off the water and drain the unit. Outdoor units need a freeze-protection kit with insulated covers and pipe wrap.
This is a content gap most competitors ignore, and it can save you thousands in cold climates.
Vent Inspection
Once a year, inspect the vent termination for obstructions. Leaves, nests, and snow can block the exhaust.
Check for corrosion at the vent joints. On condensing units, check the condensate drain for clogs.
A blocked drain can back up and damage the unit.
Error Codes and Documentation
Keep the manual handy. When a unit throws an error code, the manual tells you exactly what sensor triggered it.
Common codes include flame failure, overheating, low flow, and exhaust blockage. Many problems are simple fixes like cleaning a filter or resetting a switch.
If you get a code you do not understand, call the manufacturer’s support line before you call a service technician. They can often walk you through a reset in minutes.
Frequently Asked Questions
Can I install my own tankless water heater?
Yes, you can install your own tankless water heater if you have intermediate plumbing and electrical skills. Gas installations are more complex due to venting and gas line requirements. Many homeowners handle the mounting and plumbing themselves but hire a licensed plumber for gas lines and a licensed electrician for panel work. Always pull the required permits and schedule inspections.
What is the downside of a tankless water heater?
The main downsides are higher upfront cost, potential need for gas or electrical upgrades, and the cold water sandwich effect. The upfront installation can cost $1,500 to $3,900 depending on the scope. Some units also have a minimum flow rate to activate, which means a slow trickle from a faucet may not trigger heating.
How much does it typically cost to install a tankless water heater?
A typical professional installation costs between $1,500 and $3,900. A simple electric swap near an adequate panel might cost $800 to $1,500. A gas installation with venting and gas line upgrades can cost $2,500 to $3,900. DIY installations reduce labor costs but still require permits, materials, and inspections.
Do you need special plumbing for a tankless water heater?
You do not need completely special plumbing, but you may need upgrades. Many installations require larger gas lines, isolation valves, pressure relief valves, and possibly an expansion tank. The water lines themselves are usually standard copper or PEX. The drain lines for condensing units must handle acidic condensate.
How long does it take to install a tankless water heater?
A professional installation typically takes 4 to 8 hours for a basic swap. A DIY installation with no major upgrades takes 6 to 10 hours. If you need to run a new gas line, upgrade an electrical panel, or install new venting, the project can take 1 to 3 days.
Can you install a tankless water heater in a mobile home or RV?
Yes, you can install a tankless water heater in a mobile home or RV, but sizing and clearance requirements are stricter. RV units are usually small electric or propane models rated for 1.0 to 2.0 GPM. Mobile home installations must follow HUD standards and local code. Outdoor freeze protection is especially critical for RVs and mobile homes.
Final Thoughts
Learning how to install a tankless water heater takes time, patience, and a healthy respect for gas and electricity. If you read the manual, pull the right permits, and use the correct tools, you can absolutely handle this project.
The reward is endless hot water, lower utility bills, and a system that outlasts any tank heater on the market. If you are unsure about gas line sizing, electrical load calculations, or venting runs, there is no shame in calling a licensed professional.
The money you spend on expert labor is insurance against leaks, fires, and carbon monoxide risk. Plan your installation carefully, follow the steps in this guide, and enjoy the comfort of on-demand hot water for the next two decades.