
Why Cleaning Your HoMedics Humidifier Matters
Your HoMedics humidifier is an essential appliance that adds moisture to your indoor air, helping you breathe easier and maintaining comfortable humidity levels in your home. Whether you own the popular TotalComfort Ultrasonic series or another model, regular cleaning is crucial for both your health and the device’s performance.
Over time, mineral deposits from tap water accumulate inside the water tank and base unit. More concerning, bacteria and mold can develop in the warm, moist environment inside your humidifier. When you run the unit without proper cleaning, these contaminants get dispersed into the air you breathe, potentially causing respiratory issues, allergies, or asthma symptoms.
Beyond health concerns, a dirty humidifier works less efficiently. Mineral buildup on the transducer (the component that creates the mist) reduces mist output, while a clogged filter can cause the unit to overwork or shut down entirely. By learning how to clean your HoMedics humidifier properly, you’ll extend the appliance’s lifespan, maintain optimal performance, and ensure the air in your home stays healthy and clean.
Tools and Supplies Needed
Before you begin cleaning your HoMedics humidifier, gather the following supplies to ensure a thorough and efficient cleaning process:
- White vinegar – The most effective natural cleaning solution for dissolving mineral deposits
- Mild liquid dish detergent – For regular maintenance cleaning
- Soft-bristled brush – To scrub interior surfaces without damaging delicate components
- Microfiber cloth – For drying and polishing exterior surfaces
- Q-tips or cotton swabs – For cleaning hard-to-reach areas around the transducer and hinge floats
- Distilled water – To rinse and fill the tank (prevents mineral buildup)
- Small bowl or container – For mixing cleaning solutions
- Rubber gloves – Optional, for hand protection
Having these supplies ready before you start will make the cleaning process smooth and thorough. Using distilled water instead of tap water going forward will also significantly reduce mineral buildup and extend the time between cleanings.
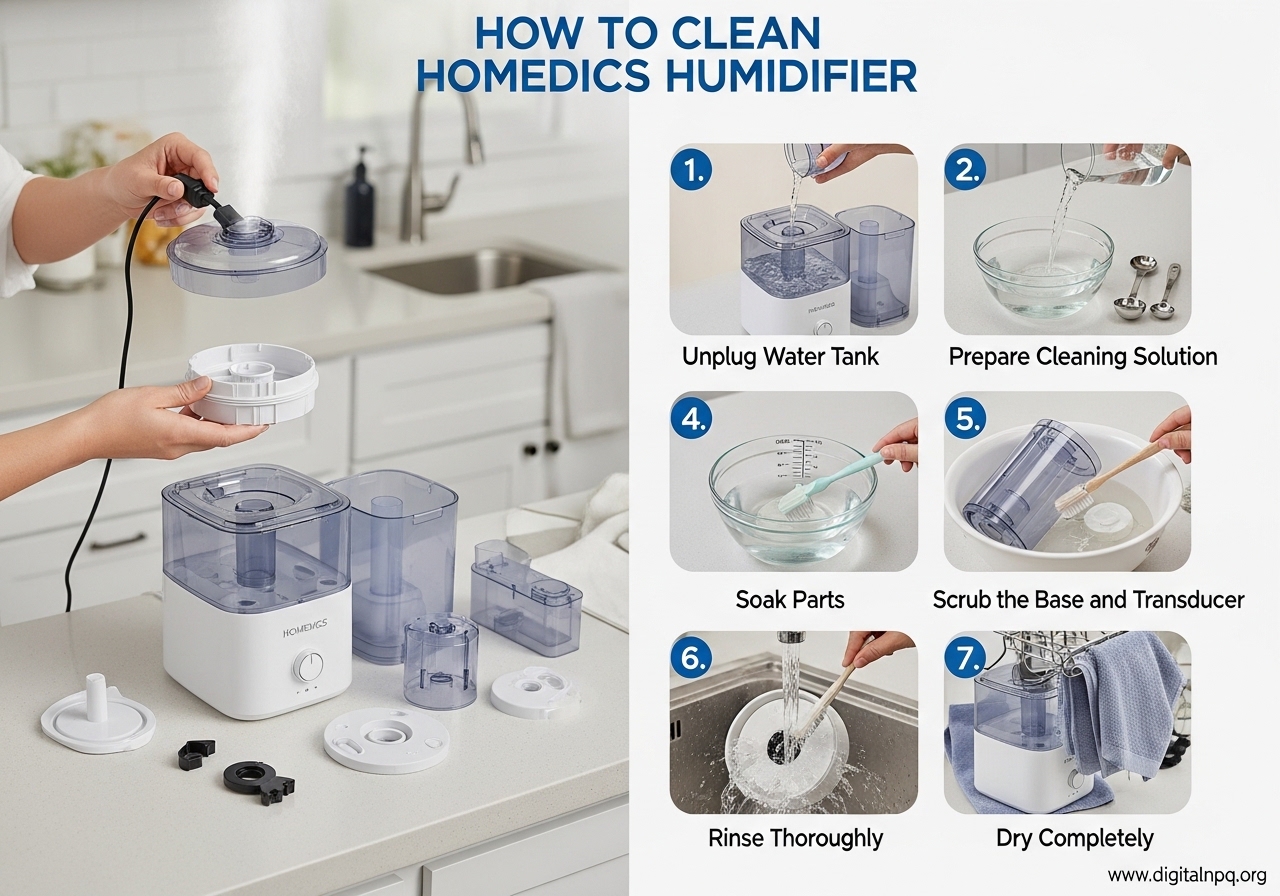
Step-by-Step Cleaning Instructions
Step 1: Unplug and Disassemble the Humidifier
Safety always comes first. Before starting any cleaning procedure, turn off the humidifier and unplug it from the electrical outlet. Allow the unit to cool completely if it was recently running.
Next, carefully disassemble your HoMedics humidifier. Remove the water tank from the base unit, take out any filters or demineralization cartridges, and set aside the tank lid. If your model has a mist chamber or nozzle, remove these as well. Keep track of where each component goes so reassembly is straightforward.
Step 2: Clean the Water Tank
The water tank is where mineral deposits and bacteria accumulate most heavily. Fill a small container with a 50/50 mixture of white vinegar and warm water.
Pour the vinegar solution into the water tank and let it sit for 15-20 minutes. This gives the vinegar time to dissolve mineral buildup on the walls and bottom of the tank. After soaking, use your soft-bristled brush to scrub the interior surfaces, paying special attention to the corners and any textured areas where residue tends to collect.
For stubborn mineral deposits, you can add a cup of rice to the tank along with the vinegar solution and shake vigorously. The rice acts as an abrasive that helps scrub away tough buildup. Rinse the tank thoroughly with clean water until you no longer smell vinegar.
Step 3: Clean the Base and Transducer
The base unit contains the transducer—the component that uses ultrasonic vibrations to create mist from water. This is a delicate part that requires careful cleaning.
Dip a Q-tip or soft cloth in the vinegar solution and gently wipe around the transducer. Never submerge the base unit in water or use abrasive materials on the transducer, as this can damage it permanently. The hinge floats should also be removed and cleaned separately, as they can accumulate mineral deposits that affect their movement.
Use a soft-bristled brush dipped in the vinegar solution to clean the base’s interior surfaces, the mist chamber, and any areas where water flows. Remove any visible mineral buildup around the water intake areas. Wipe everything dry with a clean microfiber cloth.
Step 4: Clean the Filter
If your HoMedics humidifier has a filter or demineralization cartridge, check its condition. Some filters can be cleaned and reused, while others need replacement after extended use.
For reusable filters, soak them in a bowl of warm water and mild detergent for 15 minutes, then rinse thoroughly with clean water. For heavily mineral-fouled filters, a longer soak in undiluted white vinegar may be necessary. Allow the filter to dry completely before reinstalling—it should never be put back in the unit while damp.
Check your user manual to determine if your filter should be replaced periodically. Many HoMedics models recommend replacing the filter every 30-60 days depending on usage and water quality. Using distilled water can extend filter life significantly.
Step 5: Reassemble and Test
Once all components are clean and completely dry, reassemble your HoMedics humidifier in reverse order of disassembly. Ensure the water tank is properly seated on the base, any filters are correctly positioned, and the lid is securely attached.
Fill the tank with fresh distilled water (never use vinegar or cleaning solutions in the tank when running the unit) and plug in the humidifier. Run it for a few minutes to verify proper mist output and check for any leaks around the base. If the clean indicator light was on, reset it using the procedure in the troubleshooting section below.
Deep Cleaning vs Regular Maintenance
Understanding the difference between regular maintenance and deep cleaning will help you keep your HoMedics humidifier in optimal condition while avoiding unnecessary work.
Regular maintenance should be performed weekly and includes rinsing the water tank after each use, wiping down the exterior, and checking the filter condition. This takes only a few minutes but prevents buildup from accumulating.
Deep cleaning is a more thorough process that should be done monthly or when you notice mineral deposits, odor, or reduced performance. Deep cleaning involves using the full vinegar soaking process on all components, including the transducer area and any hard-to-reach parts. If you use hard tap water, you may need to deep clean more frequently.
For HoMedics TotalComfort series and other models with demineralization cartridges, monitor the cartridge monthly. These cartridges gradually deplete and should be replaced according to the manufacturer’s schedule—typically every 30-90 days depending on water hardness and usage hours.
Troubleshooting the Clean Indicator Light
One of the most common complaints from HoMedics humidifier owners is that the clean indicator light stays on even after cleaning the unit. This light is designed to remind you when it’s time for cleaning, but it can become confusing when it doesn’t turn off.
To reset the clean indicator light on most HoMedics models, follow these steps:
- Turn off and unplug the humidifier
- Hold down both the clean light button and the timer button simultaneously
- While holding both buttons, plug the unit back in
- Continue holding for 3-5 seconds until the clean light turns off
- Release the buttons and turn the unit back on
If the above method doesn’t work for your model, check your user manual for model-specific reset procedures. Some Costco-exclusive models and certain TotalComfort series units have different reset sequences. In some cases, you may need to clean the unit more thoroughly before the light will reset—the sensor may still detect mineral buildup even if you can’t see it.
Cleaning Solutions: Vinegar vs Alternatives
White vinegar is the most recommended cleaning solution for HoMedics humidifiers, but you may wonder about alternatives. Here’s how vinegar compares to other common cleaning agents:
| Solution | Effectiveness | Safety | Best Use |
|---|---|---|---|
| White Vinegar (50/50 with water) | Excellent for mineral deposits and bacteria | Very safe when diluted | Regular deep cleaning, all components |
| Hydrogen Peroxide (3%) | Good antibacterial properties | Safe when diluted | Alternative to vinegar, tough stains |
| Mild Dish Soap | Good for light cleaning | Very safe | Regular maintenance, between deep cleans |
| Bleach Solution (1 tbsp per gallon) | Excellent for sanitization | Requires thorough rinsing | Only for heavily contaminated units |
For regular use, stick with the 50/50 white vinegar and water solution. It’s effective, affordable, and completely safe when properly rinsed. Avoid using harsh chemicals or abrasive cleaners, as residue can be harmful when dispersed into your air.
How Often Should You Clean Your HoMedics Humidifier?
Establishing a consistent cleaning schedule is the best way to maintain your HoMedics humidifier and ensure it runs efficiently. Here’s a recommended cleaning frequency guide:
| Task | Frequency | Notes |
|---|---|---|
| Rinse water tank | After every use | Empty and rinse with clean water daily |
| Wipe exterior | Weekly | Use a damp cloth to remove dust |
| Deep clean with vinegar | Weekly | Soak tank and clean base monthly minimum |
| Clean transducer area | Monthly | Use Q-tips and vinegar solution |
| Check/replace filter | Every 30-60 days | Depends on water quality and usage |
| Replace demineralization cartridge | Every 30-90 days | Check manufacturer guidelines |
If you notice any odor from the unit, visible mold, reduced mist output, or the clean light won’t turn off, clean the humidifier immediately regardless of your schedule. Using distilled water instead of tap water can reduce cleaning frequency by up to 50% and extend the life of filters and demineralization cartridges.
Frequently Asked Questions
How to clean Homedics humidifier without vinegar?
You can clean your HoMedics humidifier without vinegar by using mild dish soap and warm water. Mix a few drops of mild detergent with warm water, use a soft-bristled brush to scrub the interior surfaces, rinse thoroughly with clean water, and allow all parts to air dry completely before reassembling. For stubborn mineral deposits, you can also use hydrogen peroxide as an alternative solution.
Can I put vinegar in my HoMedics humidifier?
Yes, you can safely use white vinegar in your HoMedics humidifier. A 50/50 mixture of white vinegar and water is one of the most effective and safest cleaning solutions for ultrasonic humidifiers. The acetic acid in vinegar helps dissolve mineral deposits and has antibacterial properties that kill bacteria inside the water tank and base unit. Always rinse thoroughly with clean water after using vinegar.
How do I reset the clean light on my Homedics humidifier?
To reset the clean indicator light on most HoMedics humidifiers, hold down both the clean light button and the timer button simultaneously for 3-5 seconds until the light turns off. For Costco models or certain TotalComfort series units, the procedure may differ—consult your model’s user manual for specific reset instructions. The light typically won’t reset if mineral buildup is still present on the sensor.
Can I use Dawn dish soap to clean a humidifier?
Yes, Dawn dish soap or any mild liquid dish detergent is safe and effective for cleaning your HoMedics humidifier. Use a few drops mixed with warm water and a soft-bristled brush to scrub the water tank and base. Always rinse thoroughly with clean water at least three times to remove any soap residue before using the unit again. Soap alone won’t dissolve mineral deposits, so use vinegar periodically for deep cleaning.
How often should I clean my Homedics humidifier?
You should perform light cleaning (rinsing the tank) after every use, weekly deep cleaning with vinegar or mild detergent, and monthly deep cleaning including the filter and transducer. If you notice mineral buildup, odor, or reduced mist output, clean the unit immediately regardless of the schedule. Using distilled water reduces the required cleaning frequency.
Conclusion
Regular cleaning is essential for keeping your HoMedics humidifier running efficiently and ensuring the air in your home stays healthy. By following this guide, you now know how to clean your HoMedics humidifier thoroughly, including the proper techniques for the water tank, base unit, transducer, and filter.
Remember to establish a consistent cleaning schedule—light maintenance after each use and deeper cleaning weekly. Using distilled water instead of tap water will significantly reduce mineral buildup and extend the time between cleanings. Don’t forget to reset the clean indicator light after each thorough cleaning, and replace filters and demineralization cartridges according to the manufacturer’s recommendations.
By taking proper care of your humidifier, you’ll enjoy better air quality, optimal mist output, and a longer-lasting appliance. If you found this guide helpful, share it with other HoMedics humidifier owners who want to maintain their units properly.