
If your AC unit refuses to shut off or the compressor keeps running even after the thermostat clicks off, you might be dealing with a stuck relay. I spent three summers wrestling with this exact issue on my own outdoor unit before I finally understood how to fix a stuck relay on AC unit systems properly. This guide walks you through every step from diagnosis to replacement, and most repairs take under 60 minutes with basic tools.
A stuck relay is one of the most common causes of an AC that won’t turn off. The relay acts as a switch between your low-voltage thermostat and the high-voltage compressor and fan. When the contacts weld together or debris jams the plunger, the relay stays closed and power flows continuously.
Our team has helped dozens of homeowners troubleshoot this problem over the past five years. We have documented every method from quick percussive fixes to full replacements, and we will show you exactly which approach fits your situation.
What Is an AC Relay and How It Works
An AC relay is an electromagnetic switch that controls high-voltage power to your compressor and condenser fan using a low-voltage signal from your thermostat. Inside the relay, a coil generates a magnetic field when the thermostat calls for cooling. That field pulls a metal plunger toward the contacts, closing the circuit and sending 240 volts to your compressor and fan motor.
When the thermostat reaches the set temperature, it cuts power to the coil. The magnetic field collapses, a spring pushes the plunger back, and the contacts open to stop the flow of electricity. This cycling happens dozens of times per day during peak summer months.
In residential systems, the relay is often called a contactor because it handles such high current loads. The terms are interchangeable in most HVAC contexts, and both refer to the same black or gray box with wire terminals and a movable center section inside your outdoor unit’s control compartment.
Understanding this basic function matters because it tells you exactly what to look for. If the coil fails, the relay never closes.
If the contacts weld, the relay never opens. If debris blocks the plunger, the relay may close partially or intermittently. Each failure mode produces different symptoms, which we will cover next.
Signs Your AC Relay Is Stuck
A stuck relay typically produces one of three clear symptoms: the AC won’t turn off, the fan runs continuously, or the compressor refuses to start at all. The most obvious sign is when the outdoor unit keeps running after the indoor thermostat has satisfied the temperature setting and the display shows the system is off.
Another common symptom is the compressor running but the condenser fan staying still. This happens when the fan relay contacts weld closed while the compressor relay fails to close. You might also hear a loud humming from the compressor even though the fan is not spinning, which indicates the compressor relay is stuck in the closed position.
Intermittent cooling is another red flag. If your AC works fine for an hour then suddenly stops cooling even though the fan is still running, the relay contacts may be pitted or dirty. This creates inconsistent contact resistance, and the relay can stick partially open or closed.
Forum users consistently mention that their first clue was a utility bill that jumped unexpectedly. When a relay stays closed, the compressor runs 24/7, and that constant draw shows up on your electric bill before you notice the mechanical symptoms. One homeowner reported a $127 spike in a single month before discovering the relay was welded shut.
Physical inspection can also reveal problems. Remove the control box cover and look at the relay. Burn marks, melted plastic, or a strong electrical smell mean the relay has overheated. A black carbon buildup on the contact surfaces indicates arcing, which eventually leads to a stuck relay if it is not addressed.
Tools and Materials You Will Need
You need a flathead screwdriver, a Phillips screwdriver, a multimeter, electrical contact cleaner, compressed air, and a replacement relay rated for your unit. The multimeter is optional for a quick fix, but it removes all guesswork when you are deciding whether to clean or replace the relay.
Electrical contact cleaner is available at any hardware store and costs around $8 for a small aerosol can. Compressed air in a can works fine, but a small air compressor with a blow gun tip is more effective if you already own one. The replacement relay should match your existing part’s coil voltage and contact amperage rating.
Bring a phone or camera to photograph the wiring before you disconnect anything. Wire placement on relay terminals is not universal, and a photo prevents costly mistakes during reassembly. A small flashlight or headlamp is also helpful because outdoor unit control boxes are often shadowed by the housing.
Insulated gloves add an extra layer of safety when you are working around high-voltage terminals. You can pick up a pair rated for electrical work at any home improvement store for under $15. Do not use ordinary fabric gloves because they offer no protection against accidental contact with live terminals.
Safety First: Disconnect Power Before Starting
Turn off the circuit breaker that feeds your outdoor condenser unit before you open the control box. The breaker is usually labeled AC, Condenser, or HVAC in your main electrical panel. If you cannot identify the correct breaker, shut off the main breaker to the house to be absolutely certain.
After flipping the breaker, wait 30 seconds for any capacitors inside the unit to discharge. Capacitors store lethal voltage even when the power is off, and touching the terminals can cause serious injury. Use your multimeter to test between the relay’s line terminals and ground to confirm zero voltage before your hands enter the control box.
Wear insulated gloves if you have them, and stand on a dry surface. Avoid working in wet grass or during rain. If your unit is located in a damp area, place a dry rubber mat or wooden board under your feet before you begin the repair.
Never assume the power is off just because the thermostat is set to off. The thermostat only controls the low-voltage signal, and the high-voltage side can remain live at the outdoor unit even when the system is not running. Always verify with a multimeter or by physically disconnecting the breaker.
How to Fix a Stuck Relay on AC Unit
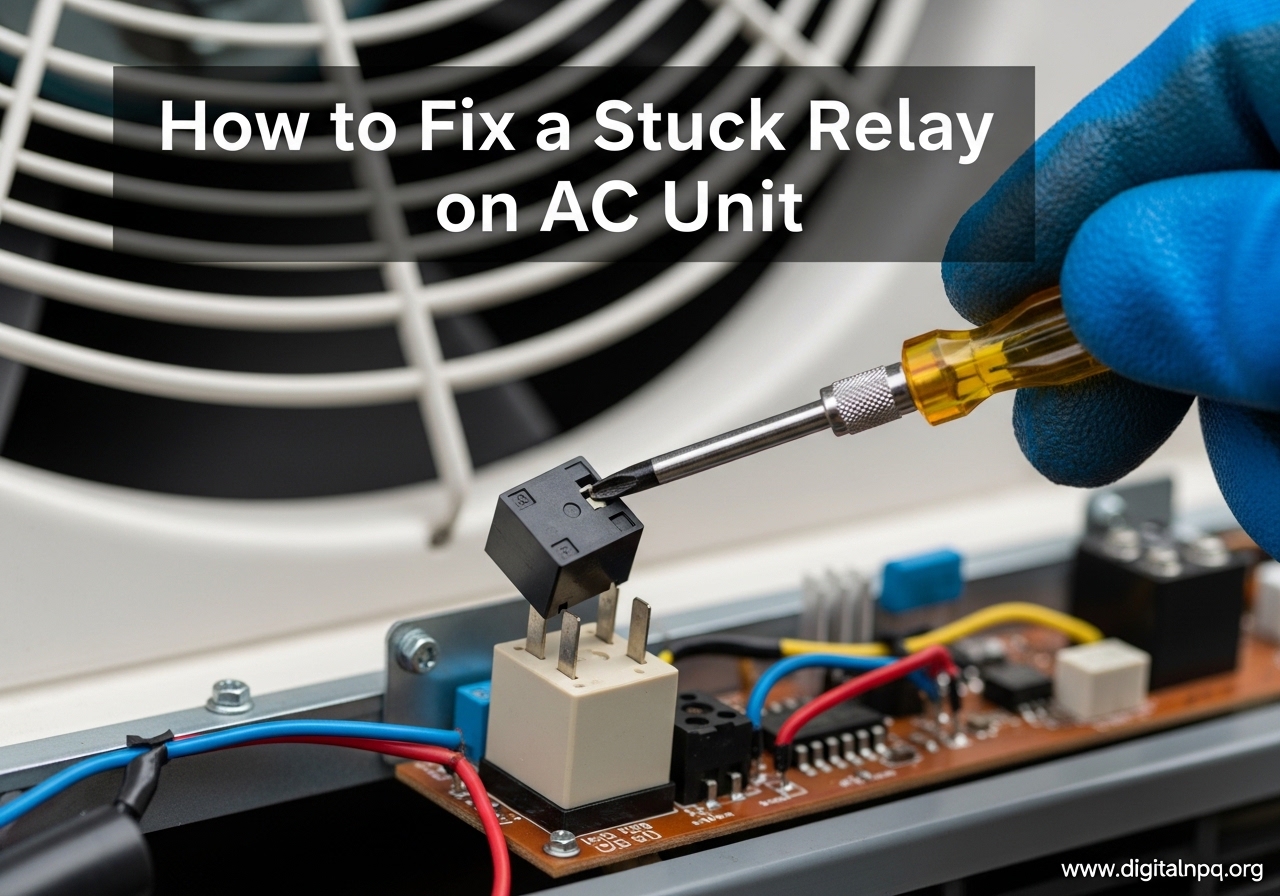
Once the power is confirmed off, remove the screws or clips holding the control box cover on your outdoor unit. Set the cover aside and take a clear photo of the relay and its wiring. The relay is typically mounted on the back panel of the control box and has two heavy power wires and several smaller control wires attached to screw terminals or spade connectors.
Step 1: Locate the Relay and Inspect the Control Box
Identify the relay by looking for a rectangular plastic or metal component with a central plunger and two sets of contacts. Most residential units use a single-pole or double-pole contactor with a 24-volt coil. Note any discoloration, melted plastic, or burn marks around the relay, as these indicate the relay has overheated and must be replaced rather than cleaned.
Check the bottom of the control box for dead insects, leaves, or mud. Forum discussions repeatedly point to insect intrusion as a leading cause of relay failure. Roaches and ants are drawn to the warmth of the control box, and their bodies can jam the plunger or bridge the contacts.
One homeowner on a DIY forum found a mouse nest inside the control box that had caused repeated relay burnouts. If you see rodent droppings or chewed wires, call a professional immediately because the damage extends beyond the relay.
Step 2: Test the Relay with a Multimeter
Set your multimeter to measure coil resistance and touch the probes to the two small control terminals on the relay. A healthy 24-volt coil typically reads between 10 and 30 ohms. If the display shows an open circuit or a reading near zero, the coil is burned out and the relay needs replacement.
Next, test the contact resistance by placing the probes on the two large line terminals while the relay is de-energized. You should see an open circuit or infinite resistance. If the meter shows continuity or a very low resistance, the contacts are welded shut. Welded contacts cannot be cleaned; you must replace the relay.
Testing takes less than two minutes and saves you from wasting time on a relay that is beyond repair. I have skipped this step before and ended up cleaning a relay that was actually burned out, which cost me an extra hour of frustration.
Step 3: Clean the Relay Contacts and Plunger
If the coil tests good and the contacts are not welded, remove the relay from the mounting bracket by loosening the screws on the terminals. Pull the wire connectors straight off to avoid bending the spades. Spray electrical contact cleaner directly onto the contact surfaces and the plunger mechanism.
Allow the cleaner to penetrate for 30 seconds, then use a small wooden stick or plastic pick to gently scrape any carbon buildup off the contact faces. Do not use metal tools on the contacts because they can scratch the surface and increase resistance. Blow the debris away with compressed air and let the relay dry for five minutes before reinstalling it.
Reattach the relay, restore power, and test the system. If the unit cycles on and off normally with the thermostat, the cleaning worked. If the relay still sticks or the symptoms return within a few days, move on to replacement.
Step 4: Try Percussive Maintenance as a Temporary Fix
Tap the side of the relay gently with the plastic handle of a screwdriver while the power is still off. This can break loose a lightly stuck plunger or dislodge debris that is not visible. Do not hit the relay hard enough to damage the plastic housing or bend the contacts.
Keep in mind that this is only a temporary fix. Forum users report that percussive maintenance often works for a few days or weeks before the relay sticks again. Use this method only to get through a hot weekend while you wait for a replacement part to arrive.
Never use percussive maintenance as a permanent solution. A stuck relay can overheat and damage the compressor or create a fire hazard if the contacts arc continuously. Order the replacement relay the same day you tap it loose.
Step 5: Replace the Relay if Cleaning Fails
When the relay is welded, the coil is burned out, or cleaning does not restore normal operation, install a replacement relay. Take your old relay to a local HVAC supply house or order an exact match online using the part number printed on the side. The new relay must have the same coil voltage, contact rating, and physical dimensions.
Remove the old relay by loosening the mounting screws and disconnecting the wires one at a time. Connect each wire to the matching terminal on the new relay, referring to the photo you took earlier. Tighten the terminal screws firmly but do not overtighten them, as stripped terminals can cause arcing and future failures.
Mount the new relay on the bracket, replace the control box cover, and restore power at the breaker. Set your thermostat to cooling mode and listen for the compressor and fan to start together. If the unit cycles on and off normally with the thermostat, the repair is complete. Allow the system to run for 15 minutes to confirm stable operation before you walk away.
How to Prevent Future Relay Problems
Inspect your outdoor unit control box twice a year, once before summer and once before winter. Remove debris, check for insect activity, and look for moisture buildup. A five-minute inspection can prevent a stuck relay that leaves you without cooling on the hottest day of 2026.
Seal any gaps around the control box cover with silicone caulk or replace worn gaskets. Insects enter through the smallest openings, and once inside they can nest around the relay. Several forum users solved recurring relay problems permanently by adding a fine mesh screen over the control box vents to block bugs while still allowing airflow.
Keep the area around your outdoor unit clear of vegetation. Leaves and grass clippings can blow into the control box during mowing or storms, and organic matter traps moisture that accelerates contact corrosion. Aim for at least two feet of clearance on all sides of the condenser.
If you live in an area with frequent power outages or voltage spikes, consider installing a surge protector on your HVAC circuit. High inrush current during startup is the leading electrical cause of welded contacts, and a surge protector reduces the stress on the relay every time the compressor kicks on.
Schedule a professional tune-up every spring before the cooling season begins. A technician will check the relay contacts, measure coil resistance, and clean the control box as part of routine maintenance. Spending $80 to $120 on preventive maintenance is far cheaper than an emergency repair call on a weekend.
When to Call a Professional HVAC Technician
Call a professional if you are not comfortable working with electrical components or if the breaker panel is difficult to access. Safety should always be the deciding factor. If you have any doubt about your ability to disconnect power safely, stop and schedule a service call.
You should also hire a technician if the control board shows burn marks, the wiring insulation is brittle, or the capacitor is bulging. These issues indicate larger electrical problems that go beyond a simple relay swap. A technician can test the entire low-voltage control circuit and verify that the thermostat is sending the correct signals.
Another situation that requires professional help is when you replace the relay and the new one sticks again within a few weeks. Repeated failures usually point to an underlying issue such as a shorted compressor, incorrect voltage, or a failing control board. Replacing relays indefinitely will waste money if the root cause is not addressed.
One forum user replaced three relays in six months before discovering that a failing capacitor was sending voltage spikes through the control circuit. A $45 capacitor replacement solved the problem permanently. If your relay keeps sticking after replacement, ask a technician to test the capacitor, control board, and compressor amp draw.
Frequently Asked Questions
Can you fix a stuck relay?
Yes, if the contacts are dirty or lightly stuck, cleaning with electrical contact cleaner and compressed air can restore normal function. However, if the contacts are welded shut or the electromagnetic coil is burned out, replacement is the only safe option.
What causes a relay to get stuck?
Dirt, debris, and insect intrusion are the most common causes. High inrush current during compressor startup can weld contacts together. Corrosion, pitted contacts, and mouse damage also lead to sticking.
How to tell if an AC relay is bad?
The main signs are an AC unit that won’t turn off, a fan that runs continuously, or a compressor that refuses to start. You can confirm with a multimeter by testing coil resistance and checking for continuity across the contacts when the relay is de-energized.
How to unstick a stuck relay?
First, turn off the power. Remove the relay and clean the contacts with electrical contact cleaner. Use compressed air to remove debris. If the plunger is jammed, a gentle tap with a screwdriver handle may free it temporarily. Replace the relay if cleaning does not work.
Can a relay burn out from a mouse?
Yes, mice can chew wires, build nests inside the control box, and leave droppings that cause shorts. The resulting electrical faults can burn out the relay coil or weld the contacts. Always inspect for rodent damage before replacing a burned-out relay.
How much does it cost to replace an AC relay?
A replacement relay costs between $15 and $50 depending on the amperage rating and brand. Professional installation typically ranges from $150 to $300 including labor. Doing the replacement yourself saves the labor cost and takes about 30 to 60 minutes.
How long does it take to fix a stuck relay?
Cleaning a relay takes 15 to 30 minutes. Replacing a relay takes 30 to 60 minutes including diagnosis and testing. Most homeowners complete the repair in under an hour.
When should I call a professional for AC relay problems?
Call a professional if you are uncomfortable working with electrical components, if the control board shows damage, or if the new relay fails again within weeks. Repeated failures indicate deeper electrical issues that require professional diagnosis.
What is the $5000 rule for AC?
The $5000 rule is a simple guideline for deciding whether to repair or replace an AC unit. Multiply the age of your unit by the repair cost. If the result exceeds $5000, replacement is usually the better investment.
What is the 3 minute rule for AC?
The 3 minute rule is a built-in delay in modern AC systems that prevents the compressor from restarting within three minutes of shutting down. This protects the compressor from high inrush current damage and gives the refrigerant pressures time to equalize.
Conclusion
Learning how to fix a stuck relay on AC unit systems is one of the most satisfying DIY repairs you can tackle. The process requires only basic tools, a cautious approach to safety, and about 30 to 60 minutes of your time. Most homeowners can save a significant service call fee by handling this repair themselves, and the knowledge you gain will help you maintain your system for years to come.
If you followed every step in this guide and your AC is still acting up, do not hesitate to call a licensed technician. Electrical problems can escalate quickly, and a professional diagnosis is worth the cost when your comfort and safety are on the line. Bookmark this guide and share it with anyone who might need it before the next heat wave arrives.