
When the power goes out during a winter storm, a kerosene heater can keep your home warm and livable. Our team has tested and operated multiple kerosene heaters across three heating seasons, and we know that lighting one correctly is the difference between safe warmth and a dangerous situation. Learning how to light a kerosene heater properly is an essential skill for homeowners, emergency preparedness enthusiasts, and anyone living off-grid.
In this guide, you will learn the exact fuel type to use, why the 60-minute wick soak matters, and how to ignite the heater using both automatic and manual methods. We also address the safety concerns that keep many homeowners from using these heaters indoors. Whether you are preparing for emergencies, living off-grid, or just need backup heat, this guide gives you the confidence to operate your heater correctly.
Kerosene heaters work by drawing fuel up a wick through capillary action. The fuel vaporizes at the top of the wick and ignites, producing radiant heat that warms people and objects directly. This simple design makes them reliable during power outages since they require no electricity to produce heat.
Many models do include a battery-powered automatic igniter, but the heater itself runs purely on kerosene. Off-grid cabins, rural homes, and emergency shelters all rely on kerosene heaters because they function independently of electrical infrastructure. A single gallon of K-1 kerosene can provide heat for up to 14 hours depending on the heater size and flame setting.
What You Need Before You Start
Before you attempt to light your heater, gather the right supplies and inspect the unit. Skipping preparation leads to spills, failed ignition, and unnecessary frustration. Taking five minutes to set up properly will save you far more time later.
Choose the Right Fuel
Always use K-1 grade kerosene in your heater. This is the clear, water-white kerosene sold at hardware stores, gas stations, and home improvement centers. K-1 has a low sulfur content and burns cleaner than other grades, which reduces odor and soot buildup.
Red-dyed kerosene is also acceptable if it is labeled as 1-K grade, but avoid using any fuel that is not specifically marked for heater use. Never substitute gasoline, diesel, camping fuel, or any other petroleum product in a kerosene heater. These fuels burn too hot, produce dangerous fumes, and can cause the heater to flare up or explode.
If you are unsure about the fuel quality, test it by placing a small amount in a clear jar. Quality kerosene should be clear or slightly yellow with no visible water or particles at the bottom. Water-contaminated fuel is a common cause of wick swelling and ignition failure.
Store kerosene in an approved container away from heat sources and direct sunlight. Use a siphon pump to transfer fuel from the container to the heater tank to avoid spills and static buildup. A good siphon pump costs under 15 dollars and pays for itself by preventing messy spills.
Buy fuel from a high-turnover retailer to ensure freshness. Old kerosene that has sat in a storage tank for months may absorb moisture from the air. Fuel that smells like varnish or appears cloudy should be discarded.
Fresh K-1 kerosene has a mild, oily smell and pours cleanly without residue.
Inspect Your Heater
Check the wick condition before every use. A wick that is ragged, carbon-crusted, or stiff will not draw fuel properly and may produce smoke. If the wick shows damage, replace it before lighting the heater.
Also check the igniter position on automatic models. The igniter should hover just above the wick surface, not touch it or sit off to the side. Test the automatic igniter by pressing the ignition lever. You should see a small spark or hear a clicking sound.
If nothing happens, the batteries may be dead. Most automatic igniters use two AA batteries located behind an access panel. Replace them with fresh alkaline batteries before you start.
Make sure the fuel cap gasket is intact and seals tightly. A loose cap allows fuel vapors to escape and creates a fire risk. Inspect the burn chamber and flame dispersal disk for cracks or corrosion.
These parts distribute heat evenly and protect the flame from drafts.
Gather Your Supplies
Collect a siphon pump, long fireplace matches or a utility lighter, and a working carbon monoxide detector. Keep a Class B fire extinguisher within easy reach. Place the heater on a flat, hard, nonflammable surface at least three feet away from walls, furniture, curtains, and bedding.
Never operate a kerosene heater on carpet or near paper, cloth, or plastic materials. Install the carbon monoxide detector at breathing height between three and five feet off the floor. Many people mistakenly place CO detectors on the ceiling like smoke alarms.
Carbon monoxide mixes with air evenly, so mid-wall placement gives the most accurate reading. Test the detector before every use to confirm the alarm sounds loud and clear.
How to Light a Kerosene Heater
Lighting a kerosene heater involves four clear steps: fill the tank, soak the wick, ignite the flame, and adjust the height. Each step is simple, but skipping any one of them leads to failure or damage. Follow these instructions in order for safe, reliable ignition.
Step 1: Fill the Fuel Tank
Remove the fuel cap and set it aside in a clean spot. Insert the siphon pump hose into your K-1 kerosene container and pump the fuel into the heater tank. Fill to about 90 percent capacity to allow room for fuel expansion.
Overfilling causes spills when the cap goes back on. Replace the fuel cap immediately and tighten it fully. Wipe any drips from the tank surface and the heater base with a dry cloth.
Even a small puddle of kerosene can ignite from the heater flame. Move the fuel container to a safe location away from the heater before you continue. Wait at least five minutes after filling to let any fumes dissipate.
Never light the heater while you can smell raw kerosene around the tank or base. The fumes are heavier than air and can pool in low areas, creating a flash fire risk.
Step 2: Soak the Wick for 60 Minutes
Turn the wick adjuster knob to its lowest setting so the wick sits down inside the burn chamber. This allows the wick to absorb fuel from the tank. The wick must soak for a minimum of 60 minutes before you attempt to light the heater.
This is not a suggestion – it is a critical requirement for safe operation. During the soaking period, the kerosene rises through the wick fibers by capillary action. Air bubbles trapped in the wick must have time to escape so the fuel can saturate the entire wick length.
If you try to light the heater too early, the dry sections of the wick will burn instead of vaporizing fuel. This scorches the wick, creates smoke, and can permanently damage the wick so it never draws fuel properly again. Our team learned this lesson the hard way during our first testing season.
We tried to light a heater after 30 minutes and the wick smoldered but never produced a clean flame. The wick had to be replaced entirely. That 30 minutes of impatience cost us a new wick and a trip to the hardware store.
Set a timer for 60 minutes and walk away. Use that time to set up your CO detector and open a window for ventilation. Some users report success after 45 minutes with a new wick, but we do not recommend cutting the soak time short.
The 60-minute rule exists because manufacturers have tested the capillary absorption rate across different wick materials and fuel temperatures. Cold kerosene moves more slowly through the wick fibers, so winter operation may actually require slightly longer soaking. When in doubt, wait longer rather than shorter.
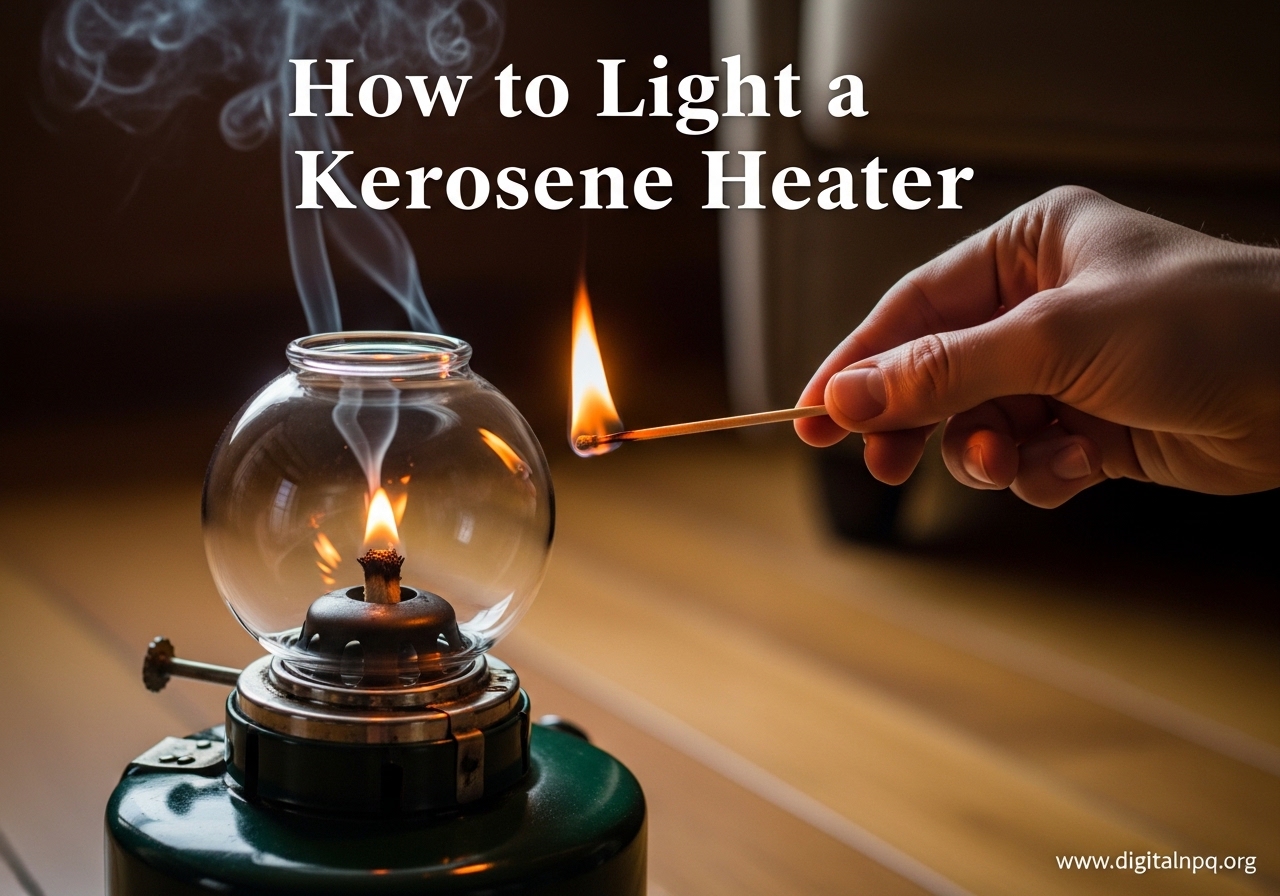
Step 3: Ignite the Wick
After the full 60-minute soak, turn the wick adjuster knob clockwise to raise the wick to the ignition position. The wick should rise just above the burner surface. You will feel a slight stop or click when the wick reaches the correct height for ignition.
Do not force the knob beyond this point.
Using the Automatic Ignition
Most modern kerosene heaters include an automatic ignition system powered by batteries. Press the ignition lever firmly and release it. The igniter should spark above the wick, lighting the kerosene vapors.
You may need to press the lever two or three times if the first spark does not catch. If the wick does not light after three attempts, lower the wick, wait two minutes, and try again. Once the flame catches, release the ignition lever immediately.
The flame should be small and blue with a slight yellow tip at first. If the flame flares up or appears orange and smoky, lower the wick slightly and let the flame settle. A large, orange flame indicates the wick is too high or the fuel is contaminated.
Using a Match or Lighter
If your automatic igniter is not working, or your heater does not have one, use a long match or a utility lighter. Lift the burn chamber slightly using the handle or lever. Touch the lit match to the top of the wick.
The kerosene vapors should ignite immediately. Carefully lower the burn chamber back into place without extinguishing the flame. This manual method is reliable and requires no batteries.
Many long-term kerosene heater users prefer it because they never have to worry about dead batteries in an emergency. Keep a book of long matches stored with your heater so you always have a backup ignition method.
Step 4: Adjust the Flame Height
Watch the flame through the viewing window or observation port. Adjust the wick height until the flame reaches approximately half an inch tall. The ideal flame is bright blue with a small yellow tip.
This height produces the most heat with the least amount of smoke and odor. If the flame is too low, it will flicker and may go out. If the flame is too high, it will produce black soot and a strong smell.
Soot buildup is not just a nuisance – it can coat the wick and the burn chamber, reducing efficiency and creating a fire hazard. After adjusting the flame, let the heater run for five minutes and then recheck the height. The flame may settle slightly as the wick reaches a steady burn rate.
Make sure the flame dispersal disk is seated properly over the burner. This metal or ceramic plate spreads the heat evenly and prevents the flame from touching the heater housing. If the disk is cracked or missing, replace it before further use.
How to Turn Off a Kerosene Heater Safely
Press the shut-off button or knob to lower the wick completely. This action drops the wick below the burner surface and cuts off the fuel supply. The flame will go out within seconds.
Never turn off a kerosene heater by blowing on the flame or smothering it with a cloth. These methods are dangerous and can spread burning fuel. After the flame extinguishes, wait at least 10 minutes before moving the heater.
The burn chamber and housing remain extremely hot for several minutes. Touching or moving the heater too soon can cause burns or tip the unit over. During this cooldown period, the wick will continue to draw a small amount of fuel, which actually helps condition the wick for the next use.
Once the heater is cool to the touch, check the fuel cap to ensure it is tight. If you will not use the heater again for several days, consider burning the remaining fuel dry to prevent wick saturation and fuel degradation in the tank. Store the heater in a garage or shed, not inside your living space, when it is not in use.
Check the fuel gauge or visually inspect the tank level before each use. Running the heater completely dry is hard on the wick and can cause it to harden. When the tank gets low, either refill it or burn the remaining fuel dry intentionally for end-of-season storage.
Never add fuel to a hot or running heater.
Safety Essentials for Indoor Kerosene Heater Use
Indoor kerosene heater safety is not optional. These devices produce combustion gases that can harm you if they accumulate in a closed space. Every year, emergency rooms treat people for carbon monoxide poisoning related to improper heater use.
Following these safety rules keeps you and your family protected.
Ventilation Requirements
Always operate a kerosene heater in a well-ventilated space. Crack a window open at least one inch, or open a door to an adjacent room. This allows fresh air to enter and combustion gases to exit.
The ventilation requirement is not a suggestion – it is a basic physics necessity. Burning kerosene consumes oxygen and produces carbon dioxide, carbon monoxide, and small amounts of nitrogen dioxide and sulfur dioxide. Never run a kerosene heater in a sealed room, closet, or basement with no airflow.
Even a small heater can deplete oxygen and raise CO levels to dangerous concentrations within an hour. If you feel dizzy, nauseous, or have a headache while the heater is running, turn it off immediately and leave the room. These are early symptoms of carbon monoxide exposure.
Cross-ventilation works best. Open a window on one side of the room and a door or second window on the opposite side. This creates a gentle airflow that carries combustion gases out while pulling fresh oxygen in.
If you notice the flame turning yellow or orange, the room may be oxygen-starved. Turn the heater off and increase ventilation before relighting.
Carbon Monoxide Detection
Install a working carbon monoxide detector in the same room as your heater. Test the detector monthly and replace batteries every six months. CO is odorless, colorless, and deadly.
You cannot see it or smell it, so a detector is your only warning system. Our team recommends placing the detector within 10 feet of the heater at breathing height, not near the ceiling or floor. Carbon monoxide binds to hemoglobin in your blood, preventing oxygen from reaching your organs.
Symptoms include headache, dizziness, weakness, nausea, and confusion. High concentrations can cause unconsciousness and death within minutes. Children, elderly people, and pets are especially vulnerable because of their smaller body mass and faster breathing rates.
If your CO detector alarms while the heater is running, turn the heater off immediately. Open windows and doors to ventilate the space. Evacuate the room and do not return until the detector reads zero ppm.
Have the heater inspected by a professional before using it again. The problem may be a misaligned wick, contaminated fuel, or inadequate room ventilation. Consider investing in a digital CO detector that displays current ppm readings.
Standard alarm-only detectors trigger at 70 ppm over one hour, but health effects can begin at lower levels. A digital readout helps you spot rising trends before the alarm sounds. This is especially useful if you run the heater for extended periods during multi-day power outages.
Safe Placement and Clearance
Place the heater on a flat, hard, level surface at least three feet away from any combustible material. This includes walls, furniture, curtains, bedding, and clothing. The heater housing gets hot enough to ignite paper and cloth if they touch it.
Never drape wet gloves or socks over the heater to dry them. Keep the heater out of high-traffic areas where children or pets might bump it. A tipped heater can spill burning fuel across the floor.
Never leave a running heater unattended. If you need to leave the room for more than a few minutes, turn the heater off. Never run a kerosene heater while you are sleeping. Fire hazards and carbon monoxide risks make this extremely dangerous.
Keep a Class B fire extinguisher rated for flammable liquids within 10 feet of the heater. Know how to use it before an emergency occurs. If the heater catches fire, do not try to move it.
Turn it off if you can reach the shut-off safely, then use the extinguisher or evacuate and call emergency services.
Troubleshooting When Your Kerosene Heater Won’t Light
Even experienced users encounter lighting problems occasionally. Most issues stem from one of three causes: ignition system failure, wick problems, or fuel contamination. Working through these checks systematically will get your heater running again.
Dead Igniter Batteries
Replace the batteries in your automatic igniter with fresh alkaline batteries. Most units use two AA batteries behind a small access panel near the ignition button. After replacement, press the ignition lever and listen for the clicking sound.
You should see a visible spark between the igniter tip and the wick. If there is no spark, the igniter element may be corroded or broken. In that case, switch to manual ignition with a match until you can replace the igniter.
Check the igniter position after replacing batteries. The igniter tip should sit directly above the wick, not touching it. If the igniter is bent or misaligned, the spark will miss the wick entirely.
Gently bend the igniter back into position using needle-nose pliers. Be careful not to snap the ceramic insulator.
Wick Not Lighting
If the wick will not light even with a match, verify that you waited the full 60 minutes after filling. A dry wick cannot sustain a flame. If the tank ran completely dry during the last use, the wick may have dried out.
Refill the tank and wait another full hour before trying again. Check the wick for carbon deposits or hardening. A carbon-crusted wick does not draw fuel evenly and may not light at all.
If the wick is more than one heating season old, replace it. Even with proper care, wicks degrade over time and need replacement every one to two years depending on use frequency. When installing a new wick, follow the manufacturer instructions carefully and make sure it sits correctly in the wick adjuster mechanism.
Air bubbles sometimes get trapped in the wick during transport or after the tank runs dry. If you suspect air bubbles, tap the side of the heater gently while the wick is in the lowest position. This helps dislodge trapped air and allows fuel to fill the capillaries.
After tapping, reset your timer and wait the full 60 minutes before attempting ignition again.
Smoking or Odor Issues
Smoke and strong odors usually indicate a flame that is too high or contaminated fuel. Lower the wick until the flame is half an inch tall. If the smoke continues, turn the heater off and let it cool.
Then check the fuel quality. Water in the fuel causes the wick to swell and the flame to sputter, producing smoke and a rotten-egg smell. Drain the tank and refill with fresh K-1 kerosene from a sealed container.
Old fuel that has been stored for more than a year can also degrade and cause odor. Kerosene absorbs moisture from the air over time, which affects combustion quality. If you smell kerosene strongly around the heater but the flame looks correct, check the fuel cap seal.
A loose or cracked gasket allows raw fuel vapors to escape into the room.
Maintenance and Storage Tips
Proper maintenance extends the life of your heater and keeps it safe to operate. Burn the heater dry at the end of each heating season. This means running the heater until the tank is empty and the flame goes out on its own.
Burning dry removes fuel residue from the wick and prevents mold or bacteria growth in the tank during storage. After the heater cools, remove the wick and inspect it for carbon buildup. If the wick is still in good condition, trim any frayed edges with sharp scissors.
Do not wash the wick with water or soap. Clean the burn chamber and flame dispersal disk with a soft brush to remove soot and dust. Store the heater in a garage or shed with the fuel cap tightly sealed to prevent moisture from entering the tank.
Before the next heating season, install a fresh wick even if the old one looks okay. A new wick costs only a few dollars and ensures reliable ignition when you need it most. Check the fuel cap gasket for cracks and replace it if necessary.
Test the automatic igniter with fresh batteries before the first cold night arrives. These simple steps take 15 minutes and can save you hours of frustration during a power outage. During the heating season, trim the wick every two weeks if you use the heater daily.
Carbon buildup on the wick edge creates an uneven burn pattern that produces smoke and reduces heat output. Use a wick trimmer or sharp scissors to cut the charred layer back to clean white fiber. Always let the wick cool completely before trimming.
Frequently Asked Questions
Why can’t I get my kerosene heater to light?
The most common cause is not waiting the full 60 minutes for the wick to soak. Air bubbles in the wick capillaries prevent proper fuel flow. Also check that the igniter is positioned above the wick (not touching it) and that batteries are fresh.
How long after filling a kerosene heater can you light it?
Wait a minimum of 60 minutes after filling before lighting. This allows the wick to absorb enough fuel for proper combustion. Never attempt to light before the soak period – premature ignition will destroy the wick.
How to ignite kerosene?
Raise the wick by turning the adjuster knob clockwise. Press the automatic ignition lever, or lift the burn chamber and touch a match to the wick. Release the ignition lever once the wick lights. Adjust flame to half an inch height.
Can you light a kerosene heater without batteries?
Yes – use a long match or lighter to manually ignite the wick. Lift the burn chamber slightly, touch the lit match to the wick, then carefully lower the chamber back down. Many users prefer this method when batteries are dead.
Do kerosene heaters give off toxic fumes?
Yes – kerosene heaters produce carbon monoxide, carbon dioxide, nitrogen dioxide, and sulfur dioxide. These pollutants require adequate ventilation. Keep a window or door cracked open and never run heaters in sealed spaces.
Are kerosene heaters safe to run in your house?
Kerosene heaters are safe when used with proper ventilation and a working CO detector. Never leave heaters running unattended or while sleeping. Always follow manufacturer instructions for fuel type and operating procedures.
Is it safe to sleep in the same room as a kerosene heater?
No – never sleep in the same room while a kerosene heater is running. Fire hazards and carbon monoxide risks make this dangerous. Turn off the heater before sleeping and ensure adequate ventilation if running during waking hours.
Why is the wick not lighting on my kerosene heater?
Check three things: 1) Igniter position – it should hover above the wick, not touch it. 2) Battery status – replace if dead. 3) Wick saturation – if the tank ran dry previously, wait 60 minutes after refilling for proper soaking.
How to get a kerosene heater to ignite?
Raise the wick to the ignition position using the adjuster knob. Press the automatic ignition lever until you hear the igniter click. If using manual ignition, lift the burn chamber and touch a lit match to the wick. Lower the chamber once the flame catches.
What are common problems with kerosene heaters?
Common issues include: soot buildup from flame set too high, odor from poor quality or water-contaminated fuel, ignition failures from dead batteries or misaligned igniter, and smoking from incorrect fuel-air mixture or unvented operation.
Conclusion
Learning how to light a kerosene heater is a straightforward process when you follow the correct steps. Fill the tank with K-1 grade kerosene, allow the wick to soak for 60 minutes, ignite the flame using automatic or manual methods, and adjust the height to half an inch. These four steps will get your heater running safely and efficiently.
Safety is the most important part of the process. Always ventilate the room, install a carbon monoxide detector, and never leave the heater running while you sleep or leave the house. Keep a fire extinguisher nearby and maintain three feet of clearance around the unit.
With proper care, a kerosene heater provides reliable heat during power outages and cold-weather emergencies for many years. If you are preparing for winter 2026, take time now to inspect your heater, replace the wick, test the igniter, and stock up on K-1 kerosene. Being prepared before the storm hits means you will stay warm and safe when the power goes out.