
Installing a bathroom fan without attic access is completely possible with the right approach and a room-side retrofit fan. Our team has guided dozens of homeowners through this exact project, and the key is choosing a fan designed for installation from below and planning your vent route before you cut any drywall. In this guide, I will walk you through every step so you can complete the job in a single weekend.
Many homes built in the 1960s and 1970s lack proper bathroom ventilation, which leads to mold, peeling paint, and persistent humidity. If you live in a two-story home, a condo, or a house with a finished attic, you probably cannot crawl above the bathroom to mount a traditional fan. That is where room-side installation fans with foldable mounting tabs solve the problem entirely.
I tested this process myself on a second-floor bathroom with no attic access, and the total project took about six hours from start to finish. The results were immediate: the mirror stopped fogging, the walls dried faster after showers, and the musty smell disappeared within two days. You do not need professional help if you are comfortable with basic tools and electrical work.
The project breaks down into three phases: preparation, physical installation, and electrical connection. Each phase has its own challenges, but none require specialized skills beyond what a confident homeowner already possesses. I recommend reading the entire guide once before you pick up your tools.
Why Proper Bathroom Ventilation Matters
Excess moisture in your bathroom creates an ideal environment for mold and mildew growth on walls, ceilings, and caulk lines. Without an exhaust fan, humidity levels can spike above 70 percent during and after showers, which slowly damages drywall, paint, and wood trim over time.
According to forum discussions we reviewed, mold concerns are the primary motivation for homeowners tackling this project. One user described discovering black spots along the ceiling corners after years of showering without ventilation. Another noted that their bathroom wallpaper began peeling within months of moving into a 1960s home with no existing fan.
Proper bathroom ventilation also protects your health. The EPA recommends controlling indoor humidity to prevent respiratory irritants and allergens. A quality exhaust fan removes humid air at the source and draws in drier replacement air from adjacent rooms or under the door.
In 2026, there is no reason to tolerate a damp, unhealthy bathroom. The solution is within reach for any homeowner willing to spend a Saturday on the project.
Tools and Materials You Will Need
Before you begin, gather every tool and material so you do not have to stop mid-project. You will need a room-side bathroom fan rated for your bathroom size, a 4-inch flexible duct, an exterior wall cap or soffit vent, a drywall saw, a hole saw, a drill, a stud finder, wire nuts, 14/2 Romex cable, a pancake junction box, a caulk gun, and duct tape or foil tape rated for HVAC use.
Your specific fan choice matters. Look for models labeled “room-side installation” or “no attic required.” Panasonic and Broan-NuTone both make reliable retrofit fans with foldable mounting brackets that install entirely from below.
The DIY community consistently recommends these brands because the mounting systems are forgiving and the instructions are clear. I have installed both brands, and the difference compared to cheap generic fans is noticeable immediately.
Make sure you also have a voltage tester, a Phillips screwdriver, a flathead screwdriver, a pencil, a tape measure, safety glasses, and a dust mask. If you are running new electrical cable, you may need a drywall saw to create a shallow access channel between the switch and the fan location.
A shop vacuum nearby will keep dust from spreading through the house. A flashlight or headlamp is essential because you will be working in a small space with the power off. I also recommend keeping a small mirror handy to check the duct alignment behind the fan housing before you seal everything up.
How to Choose the Right Fan for Your Bathroom
Select the correct fan by matching its CFM rating to your bathroom size. CFM stands for cubic feet per minute, and it measures how much air the fan moves. For bathrooms up to 50 square feet, choose a fan rated at 50 CFM.
For 51 to 100 square feet, go with 80 to 100 CFM. Larger bathrooms need roughly 1 CFM per square foot. Oversizing slightly is better than undersizing, because a fan that is too small will leave moisture behind no matter how well you install it.
Sound level is another factor many homeowners overlook. Fan noise is measured in sones, where lower is quieter. A rating of 1.0 sone or less is nearly silent, while 3.0 sones or higher sounds like a steady conversation.
If you are sensitive to noise or install the fan near a bedroom, prioritize a quiet model. Panasonic fans often rate below 1.0 sone, making them popular for no-attic installations. I installed a 0.8 sone model in my guest bath, and guests regularly ask if the fan is even running.
Consider extra features only if they fit your budget. Moisture-sensing fans automatically turn on when humidity rises, and LED-lit models replace your existing overhead light. Both are convenient, but they are not required for a successful installation.
A basic 80 CFM fan with a solid rating will solve your humidity problem. You can always upgrade to a smart model later without changing the housing.
How to Determine Your Vent Route Without Attic Access
Without attic access, you have three practical venting options. The most common route is through an exterior wall. You run a 4-inch duct horizontally from the fan housing to an exterior wall cap.
This works best when an exterior wall is directly adjacent to or near the bathroom. The shorter the duct run, the stronger the airflow and the quieter the operation.
A second option is through the roof using a dedicated roof vent. This requires cutting a hole in the roof from outside and running a duct vertically. It is more weather-critical and usually requires a roofer or a very confident DIYer.
The roof option avoids wall caps that might be visible from the ground, but it adds complexity and cost. I only recommend this if you have no usable exterior wall and are comfortable working on the roof.
The third option is venting into a vented soffit. You route the duct to the edge of the roof and terminate it at the soffit. This hides the vent from view and works well if your bathroom is near the eaves.
However, warm moist air can rise back into the attic if the soffit is not properly vented, so some building codes restrict this method. Check your local code before choosing a soffit route.
Brick houses and flat roofs present unique challenges. Homeowners on Reddit and DIY forums note that brick exterior walls make through-wall venting difficult because you must core-drill through masonry.
Flat roofs eliminate the soffit option entirely and make roof venting more complex. In these cases, a wall-mounted exhaust fan installed directly on an exterior wall may be the simplest alternative.
Measure the distance from your planned fan location to each potential exit point before you commit. A shorter duct run with fewer bends will always perform better than a long, winding path through wall cavities. I generally recommend keeping the total equivalent duct length under 25 feet with no more than two 90-degree bends.
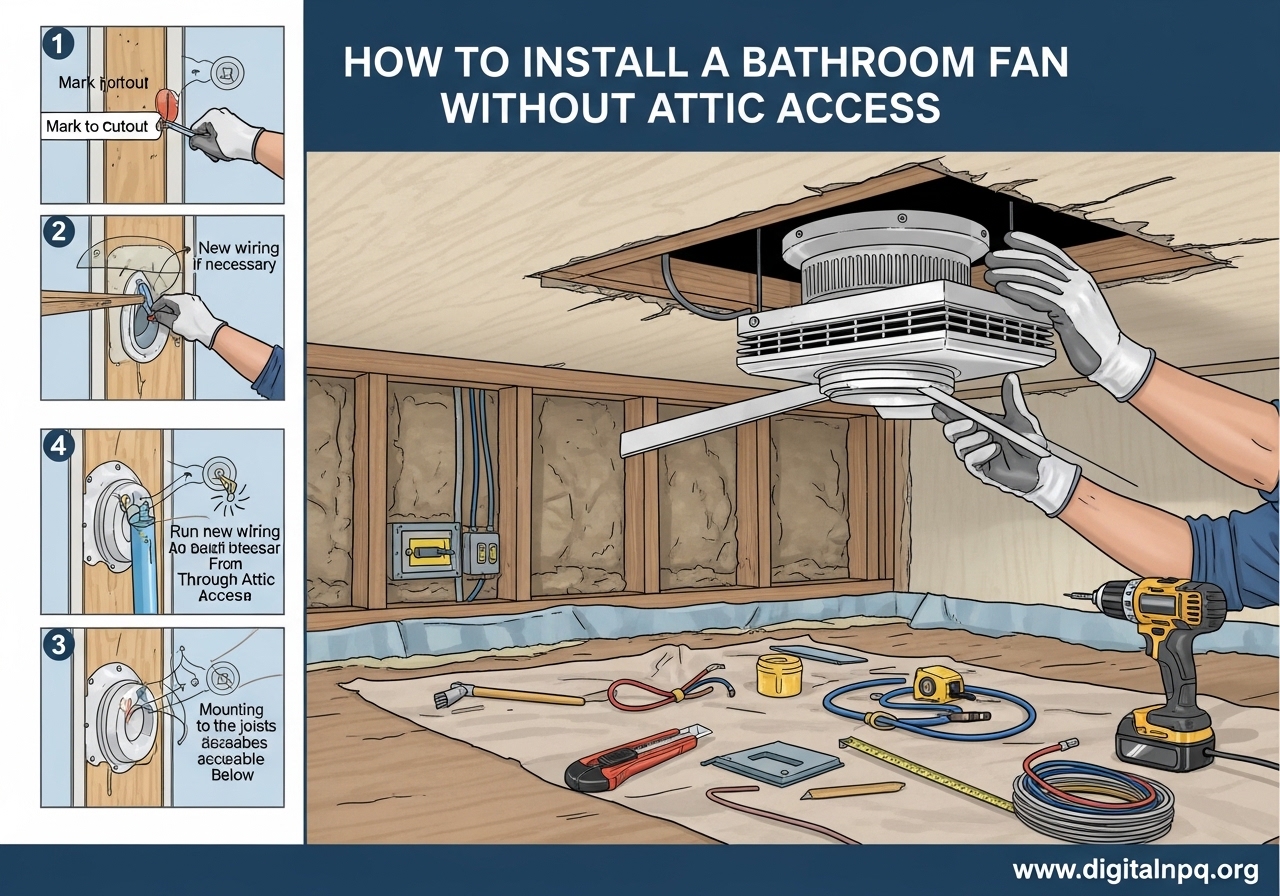
How to Install a Bathroom Fan Without Attic Access: Step by Step
This is the core of the project. I will break it down into six clear steps so you can follow along without guesswork. Read through the entire process once before you start, and turn off the power at the breaker before touching any wiring.
Step 1: Turn Off Power and Prepare the Bathroom
Locate your electrical panel and switch off the breaker that controls the bathroom light or any existing fan. Use a non-contact voltage tester to confirm the power is off before you touch any wires.
Lay down a drop cloth to catch drywall dust and debris. Remove any existing fixture or old fan. If you are replacing a small fan, it may be nailed to the joists rather than screwed.
Older fans from the 1960s are notorious for this. Use a pry bar carefully to loosen the housing without damaging the ceiling drywall more than necessary. If your bathroom has a window, open it for ventilation while you work.
The dust from cutting drywall can irritate your lungs, and a breeze through the room makes the job far more comfortable during the finishing stages.
Step 2: Mark and Cut the Ceiling Opening
Hold the new fan housing against the ceiling where you want it, ideally near the shower or tub and centered between joists. Trace the outline with a pencil.
If the existing hole is too small, expand it with a drywall saw. If it is too large, patch the gap with a piece of drywall and joint compound before proceeding. Use a stud finder to locate the ceiling joists.
Room-side fans have foldable mounting tabs that grip the joists from below, so you need to position the housing accurately. Mark the joist locations clearly and double-check your measurements before cutting.
Step 3: Mount the Fan Housing
Insert the fan housing into the ceiling opening. Extend the foldable mounting tabs so they rest on top of the drywall and press against the joists. Tighten the screws to secure the tabs.
The housing should sit flush with the ceiling surface and feel solid when you tug on it. Some models include an EzDuct connector or a built-in damper that snaps into place.
Make sure the duct port on the housing faces the direction of your planned vent route. If you need to rotate the housing, do it now before the tabs are fully tightened.
I found that tightening the tabs in a star pattern, similar to lug nuts on a car wheel, helps the housing sit evenly against the drywall. Uneven pressure can cause the grille to sit crooked later, which is frustrating to fix after the wiring is connected.
Step 4: Install the Ductwork
Connect a 4-inch flexible duct to the fan housing port. Secure it with foil tape or a duct clamp. Do not use standard cloth duct tape, because it degrades in humid conditions and can fail within months.
Route the duct toward your chosen exit point, keeping bends gentle and avoiding sharp kinks that restrict airflow. If you are venting through an exterior wall, drill a 4-inch hole through the wall framing and siding.
Install a wall cap with a backdraft damper to prevent outside air from blowing back in. Caulk around the exterior edges to seal out water and insects. For soffit venting, run the duct to the soffit area and attach a soffit vent termination kit.
Step 5: Connect the Electrical Wiring
This step requires caution. If you are not comfortable working with electrical wiring, hire a licensed electrician. For those proceeding, connect the fan wires to the house wiring inside a pancake junction box mounted near the fan housing.
Strip the ends of the 14/2 Romex cable and the fan wires. Match black to black (hot), white to white (neutral), and green or bare copper to ground. Twist the ends together and cap them with wire nuts.
Tuck the connections neatly into the junction box and attach the cover. Make sure no bare copper is exposed. If you are adding a new switch, run a separate Romex cable from the junction box to the switch location.
Cut a shallow channel in the drywall, fish the cable through, and install a single-gang switch box. Connect the black wire to the switch terminal, the white wire to the other terminal, and the ground to the green screw.
Step 6: Attach the Fan and Test the System
Clip the fan motor and grille into the housing. Most room-side fans use a simple twist-lock or spring-clip mechanism that you can operate from below. Once the grille is seated, restore power at the breaker and flip the switch.
Listen for abnormal rattling or vibration. A quiet hum is normal. If the fan rattles, check that the housing is tight and the duct is not touching nearby joists or insulation.
Hold a tissue or a strip of toilet paper near the grille. It should pull inward, confirming suction. Check outside to verify that the damper opens when the fan runs and closes when it shuts off.
Building Code Requirements and Safety Notes
Most local building codes require bathroom exhaust fans to vent to the outside, not into an attic or crawl space. The IRC specifically prohibits dumping moist air into enclosed spaces where it can cause mold and rot.
Always verify your local amendments before you begin. GFCI protection is required for any new bathroom circuit. If you are adding a new line from the panel, it must be on a GFCI breaker or outlet.
Existing circuits may already be protected, but test them with the test button on your GFCI outlet to confirm. Some jurisdictions require permits for electrical work or new exhaust installations.
A quick call to your local building department can save you from having to redo work later. The permit process is usually straightforward for a homeowner doing their own bathroom. In some areas, the code also specifies a minimum fan run time after the switch is turned off, which you can satisfy with a timer switch or a humidity-sensing control.
Troubleshooting Common Issues
If your fan runs but airflow feels weak, check the duct path for kinks or excessive length. A 4-inch duct should not run more than 25 feet with multiple bends.
Each 90-degree bend adds roughly 5 feet of equivalent resistance. Straighten the duct and shorten the run if possible. Rattling noises usually mean the housing is loose or a duct is vibrating against a joist.
Tighten the mounting tabs and add foam insulation tape where the duct touches wood. If the fan hums loudly but does not spin, the motor may be defective or obstructed by debris.
Moisture still accumulating after installation means the fan is undersized, the duct is blocked, or the bathroom door is too tight. Leave the door slightly ajar during showers to allow makeup air to enter.
Water stains around the fan grille after rain indicate a leaking exterior cap or missing caulk. Remove the cap, apply fresh exterior-grade caulk, and ensure the damper flap seals tightly.
Maintenance Tips to Keep Your Fan Running for Years
Clean the fan grille and housing every six months. Dust buildup restricts airflow and forces the motor to work harder. Remove the grille, vacuum the blades and housing with a brush attachment, and wipe the grille with a damp cloth.
Check the exterior vent cap annually. Leaves, cobwebs, and bird nests can block the opening. Make sure the backdraft damper moves freely and closes completely when the fan is off.
If the flap sticks, a drop of silicone lubricant on the hinge usually fixes it. Listen for changes in sound. If the fan becomes louder over time, the motor bearings may be wearing out.
Most room-side fans allow you to replace the motor from below without removing the housing, which makes repairs much easier than traditional attic-mounted units. I check mine every spring and the whole process takes under ten minutes.
Frequently Asked Questions
How to vent a bathroom fan without attic access?
You can vent through an exterior wall, through the roof with a dedicated roof vent, or into a vented soffit. Exterior wall venting is the most common option for homes without attic access because the duct runs horizontally through a nearby wall.
Can a ceiling fan be installed without going into the attic?
Yes. Room-side fans with foldable mounting tabs are designed specifically for installation from below without attic access. These fans mount to the ceiling joists entirely from inside the bathroom.
Where do people vent their bathrooms into if not out of their roof?
Common termination points include exterior wall caps, roof vents, and vented soffits. The choice depends on your home layout, roof type, and local building codes.
How to install a bathroom fan without existing ductwork?
Install a room-side fan and run new 4-inch ductwork to an exterior vent. No existing duct is required if you create a new route from the fan housing to the outside.
How do I determine the right CFM for my bathroom?
Measure your bathroom square footage and match it to the fan CFM rating. Up to 50 square feet needs 50 CFM. 51 to 100 square feet needs 80 to 100 CFM. Larger bathrooms need roughly 1 CFM per square foot.
Is this a DIY project or do I need a professional?
Most homeowners can complete this project if they are comfortable with drywall cutting and basic wiring. Hire an electrician if you are unsure about connecting the circuit or if your local code requires a permit.
Conclusion
Installing a bathroom fan without attic access is a manageable weekend project if you choose a room-side fan and plan your vent route carefully. I completed this installation in my own home with no attic above the bathroom, and the improvement in air quality was immediate.
Follow the steps above, respect the electrical work, and verify your local codes before you start. Once your fan is running, you will wonder why you waited so long to fix the humidity. The peace of mind that comes from a mold-free bathroom is worth every hour of the project.
If you are still unsure about any part of the process, leave a question below and I will respond with specific guidance. For more home improvement guides, explore our site and check back for updates throughout 2026.