
Trying to push your dryer against the wall only to hear the vent hose crunch is one of the most frustrating laundry room problems. I have dealt with this in two different apartments over the past five years, and I learned that how to hook up a dryer vent in a tight space is not just about convenience. It is about safety.
A crushed or kinked flexible dryer hose restricts airflow, traps lint, and creates a real fire hazard. In this guide, I will show you every practical solution I have found, tested, or researched. Our team updated this guide for 2026 with current building code information and new installation tips we tested ourselves.
You will learn how much clearance you actually need, which venting options work best for laundry closets, and the exact steps to install a periscope vent without calling a contractor. I have also included the mistakes I made so you do not have to repeat them.
Whether you have a narrow closet, a condo with a stacked washer dryer, or just a few inches of clearance, this guide covers tight space venting solutions that keep your dryer running safely and efficiently.
How to Hook Up a Dryer Vent in a Tight Space
When you have less than six inches behind your dryer, the standard flexible dryer hose becomes a problem. It kinks, compresses, and blocks airflow. Over time, lint collects in those bends, and your dryer works harder while clothes stay damp longer.
The good news is that several purpose-built solutions exist for this exact problem. The most common options are periscope vents, offset dryer vents, magnetic connectors, and recessed dryer vent boxes. Each one is designed to let you push your dryer closer to the wall while keeping the exhaust duct straight and unobstructed.
Our team compared these four methods by looking at installation difficulty, cost, and long-term safety. We also reviewed forum discussions from hundreds of homeowners who shared their real experiences. The takeaway is that no single option is perfect for every situation.
The right choice depends on your wall configuration, how often you need to pull the dryer out for maintenance, and whether you can modify the wall itself.
Why Tight Space Venting Is a Problem
Most dryers need a minimum of four to six inches behind the unit for the vent hose and connections. If you are working with a laundry closet or a narrow room, those inches disappear fast. I once measured a space that had only two and a half inches between the back of the dryer and the wall.
That small gap causes three major problems. First, a flexible dryer hose compressed in a tight space kinks easily. Second, a kinked hose reduces airflow velocity, which means lint does not get pushed outside.
Third, restricted airflow makes the dryer overheat. According to the National Fire Protection Association, dryers are a leading cause of house fires, and blocked vents are a major contributor. This is why proper dryer vent installation matters even in small spaces.
Forum users consistently report the same pain points. They cannot push their dryer all the way back. The semi-rigid duct they bought bent instead of recompressing when pushing the dryer back.
Water collected in a long, crushed hose. In one case, a homeowner found that a contractor had simply crushed a flexible hose flat instead of installing a proper solution. These stories are why getting the venting right matters so much.
The Four Best Solutions for Tight Space Venting
After researching dozens of installations and reading hundreds of comments from DIYers and HVAC professionals, four solutions stand out for tight space venting. Each has a specific use case, and each requires different levels of skill and wall modification.
Periscope and Offset Dryer Vents
A periscope dryer vent is a telescoping, rigid metal duct that extends horizontally from the dryer exhaust and then turns ninety degrees to meet the wall vent. It replaces the flexible dryer hose entirely. Because it is rigid metal, it maintains its shape even when the dryer is pushed back flush.
Offset dryer vents work similarly but use two short metal sections with an adjustable slide mechanism. These are ideal when the dryer exhaust port and the wall vent are slightly misaligned. The telescoping design allows you to adjust the length from about eighteen inches down to almost zero.
This gives you the flexibility to match your exact spacing. Users report that periscope vents save three to four inches compared to a standard hose. However, they do not seal as tightly out of the box.
You will need foil tape to close any gaps between the telescoping sections.
Magnetic Dryer Vent Connectors
Magnetic dryer vent systems use a quick-connect coupler that separates the dryer from the wall duct. One half mounts to the wall vent. The other half attaches to the dryer.
When you push the dryer back, the two halves connect with a strong magnetic seal. This is the best option if you need to pull the dryer out frequently for cleaning or maintenance.
Instead of wrestling with a hose clamp in a dark, narrow gap, you simply pull the dryer away. The magnetic connection breaks cleanly and reconnects automatically when you push it back.
Forum users who installed magnetic connectors said reconnection took seconds instead of minutes. The downside is cost. Magnetic systems are more expensive than a basic periscope vent.
They also require precise alignment. If the dryer is not level or the wall vent is crooked, the magnets may not seal perfectly.
Recessed Dryer Vent Boxes
A recessed dryer vent box, often called a Dryerbox, is installed inside the wall between the studs. It creates a pocket where the dryer vent connection lives. The dryer can then sit almost flush against the wall because the hose and elbow are recessed into the wall cavity.
This is the most space-saving option available. It can give you the full six inches of clearance back. It is also the most permanent solution.
Once installed, it is out of sight and protected from getting crushed. Many new construction laundry rooms use recessed boxes for this reason.
The catch is that installation requires cutting drywall, modifying framing, and potentially moving plumbing or electrical. This is not a weekend project for beginners.
Most homeowners hire a handyman or carpenter for this work. If you are in a rental, you will need landlord approval and should expect some repair costs when you move out.
Semi-Rigid Aluminum Duct with Strapping Technique
Sometimes you do not want to buy a specialty kit. In that case, a semi-rigid aluminum duct with a rope or strapping technique can work.
You install a ninety-degree elbow on both the dryer exhaust port and the wall vent. Then you connect them with a short piece of semi-rigid duct.
The trick is guiding the dryer backward without bending the duct. One technique we found on a DIY forum involves wrapping a loop of rope or strap around the midpoint of the duct, leaving both ends free. As you slide the dryer back, a helper pulls the rope ends to compress the duct straight back.
It sounds awkward, but multiple users confirmed it works once you get the hang of it. This is the cheapest option, but it is also the least reliable.
The duct can still buckle if you push too fast. You also need a helper, which is not always practical.
What You Need Before You Start
Before you open the wall or move the dryer, gather the right supplies. The exact list depends on which method you choose, but most installations require the following.
Basic tools include a screwdriver, tin snips, utility knife, measuring tape, drill with bits, flashlight or headlamp, and a level. Materials include a four-inch diameter rigid or semi-rigid aluminum duct, foil tape, hose clamps, a ninety-degree elbow, and your chosen venting solution.
Safety gear is important. Wear work gloves, a dust mask, and safety glasses. Lint dust is irritating to lungs and eyes.
I learned that the hard way during my first install. One note from the forums: do not use screws to join duct sections inside the vent line. Lint catches on screw threads and creates a blockage.
Always use foil tape and hose clamps for interior connections.
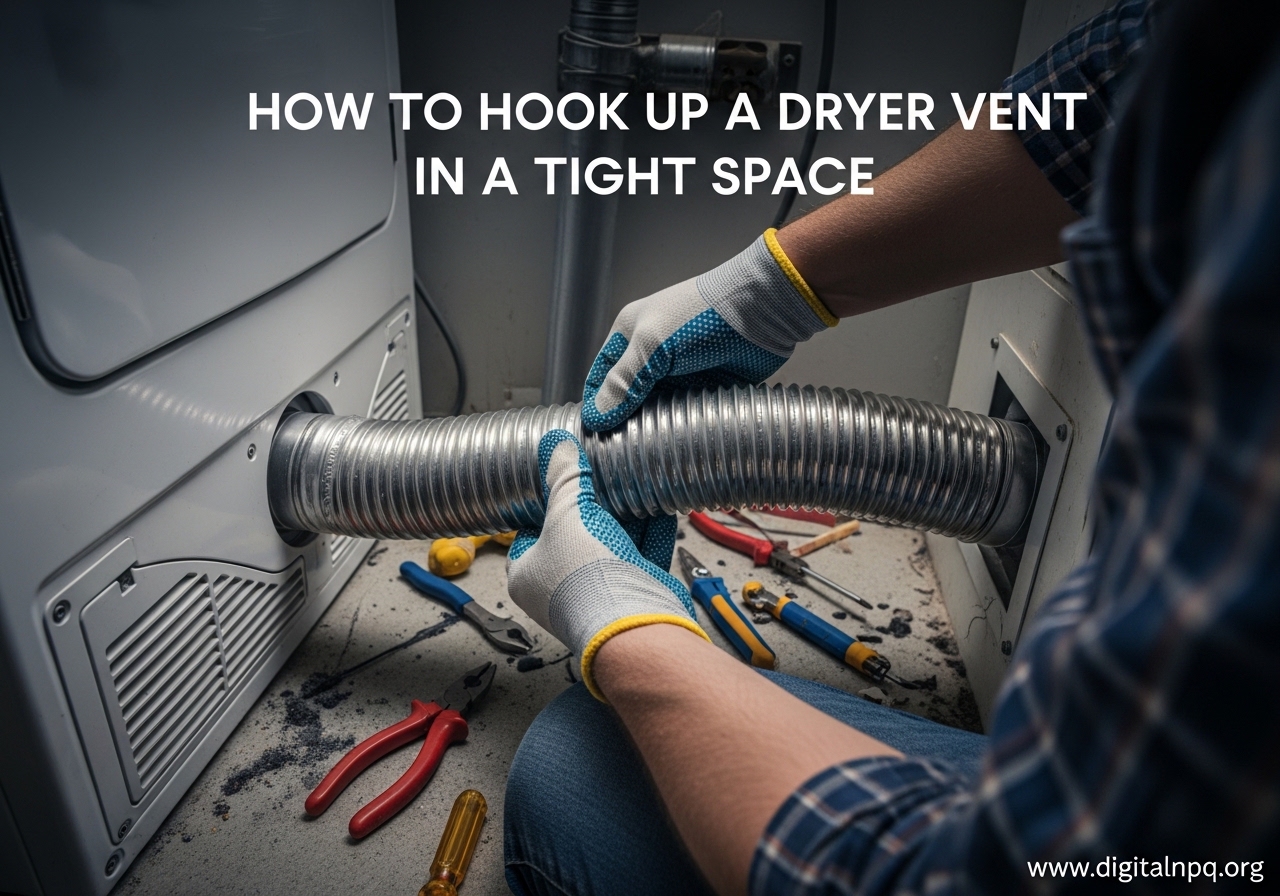
Step-by-Step Installation for a Periscope Vent
The periscope vent is the most popular DIY option because it balances cost, space savings, and installation simplicity. I installed one in my own laundry closet last spring, and it took about forty-five minutes. Here is the exact process I followed.
Step 1: Measure your space. Pull the dryer away from the wall. Measure the distance between the dryer exhaust port and the wall vent.
Measure the vertical offset if the two ports are not at the same height. Periscope vents come in different lengths, so you need to know your exact dimensions before buying.
Write the numbers down. I forgot to write mine and had to make a second trip to the hardware store.
Step 2: Shut off power and gas. Unplug the dryer. If it is a gas dryer, turn off the gas valve at the wall.
You do not want the dryer running while your hands are behind it.
Step 3: Remove the old hose. Loosen the hose clamp on the dryer exhaust port. Loosen the clamp on the wall vent.
Remove the old flexible hose and inspect the wall vent for lint buildup. Clean it out with a vacuum or a dryer vent brush.
A clean start is essential. I pulled out a shocking amount of lint from a hose that looked fine from the outside.
Step 4: Install the ninety-degree elbow on the dryer. Attach the elbow to the dryer exhaust port. Secure it with a hose clamp.
Do not overtighten. The clamp should be snug enough to hold but not so tight that it dents the thin metal.
A dented elbow can restrict airflow at the very start of the run.
Step 5: Attach the periscope duct. Slide the telescoping section of the periscope vent over the elbow. Extend it to reach the wall vent.
If you have a slight height difference, use the offset version and adjust the slide until the ports align.
Step 6: Connect to the wall vent. Attach the wall-side elbow to the in-wall duct. Use foil tape to seal every joint.
Wrap the tape around the connection completely. No gaps should be visible.
This is what creates an airtight seal and prevents lint from leaking into the laundry room. Do not skip this step.
Step 7: Test the fit. Slowly push the dryer back toward the wall. Watch the periscope duct compress.
It should slide straight back without twisting. If you feel resistance, pull the dryer out and check for alignment.
A twisted duct will leak and trap lint.
Step 8: Run a test cycle. Plug the dryer back in. Turn on the gas if you shut it off.
Run a short drying cycle. Go outside and check the exterior vent hood.
You should feel strong, warm airflow. If airflow is weak, there is a blockage or the duct is still compressed somewhere. Stop and inspect.
Step 9: Clean up and inspect. After the test cycle, pull the dryer out one more time and inspect the connections. Make sure the foil tape held and no sections shifted.
Once you confirm everything is secure, push the dryer back into place. The whole job should take under an hour if you have the right tools.
Alternative Methods for Specific Situations
Not every laundry room fits the periscope model. Here are the scenarios where the other three solutions shine.
Choose a magnetic connector if you clean your vent often. If you have pets or do heavy laundry, you should pull the dryer out twice a year to clean the duct. A magnetic system makes that a ten-minute job instead of a thirty-minute struggle with hose clamps.
Choose a recessed box if you are remodeling. If you are already opening the wall for plumbing, electrical, or drywall repair, adding a recessed dryer vent box is a smart upgrade. It costs more upfront but saves space permanently and looks cleaner.
Choose the semi-rigid strapping method if you are on a tight budget. A basic aluminum elbow and a short duct cost under twenty dollars.
The rope technique is free if you already have strapping. This is a decent temporary fix while you save for a better solution.
Choose a roof vent or through-wall extension if you have no exterior wall access. Some apartments and condos have no outside wall in the laundry area. In that case, you may need to run a rigid metal duct through the ceiling or a nearby wall to reach an exterior vent.
This is where you should consider hiring a professional. Running a vent through a crawlspace or attic involves fire safety codes and insulation concerns that are beyond a basic DIY project.
Common Mistakes to Avoid
Over the years, I have made most of these mistakes myself. I have also read about them from dozens of homeowners in forum threads. Here are the errors that cost time, money, or safety.
Using plastic or vinyl flexible hose is a major mistake. Some old homes still have white plastic vent hose.
It is a fire hazard. Building codes require metal ducting. Replace plastic immediately, even if you are not in a tight space.
The risk is not worth the few dollars you might save.
Using duct tape instead of foil tape is another common error. Duct tape dries out and peels off in the hot, humid environment behind a dryer. Foil tape is the only tape approved for dryer vent connections.
It handles heat and stays sealed for years. Do not substitute with anything else.
Installing too many elbows reduces airflow. Every ninety-degree elbow restricts airflow. Codes generally limit the number of elbows to two in a vent run.
In a tight space, you might be tempted to add extra bends to make the connection fit. Do not do it. It will create back pressure and lint buildup.
Ignoring the exterior vent hood is a mistake many DIYers make. A good interior connection is useless if the exterior hood is blocked by a bird nest, paint, or a broken damper. Check the outside vent at the same time you replace the interior duct.
Crushing the hose instead of fixing the root problem is the worst mistake. I have seen contractors and homeowners simply push the dryer back and crush the flexible hose flat. It works until the dryer overheats.
The clothes take two hours to dry, or worse, the lint catches fire. Always install a proper tight space solution.
Troubleshooting After Installation
Even after a careful install, problems can appear. Here is how to diagnose and fix them.
Clothes take too long to dry. This is the first sign of restricted airflow. Check the exterior vent hood.
If airflow is weak, pull the dryer out and inspect the duct. Look for a kink or a section that slipped out of alignment.
Also check the lint trap inside the dryer. A full lint trap is an easy fix.
Water collects in the duct. This happens when warm, moist air cools inside a long or poorly insulated vent run. In tight spaces, it can also happen if the duct dips or sags.
Rigid metal ducts should slope slightly toward the outside. If water is an issue, add an insulation sleeve or shorten the run.
Lint leaks into the laundry room. Leaks mean your seal is not airtight. Recheck every foil tape joint.
Replace any tape that did not stick properly. Also check that the wall vent collar is tight against the drywall. Small gaps here let lint and humid air escape into the room.
Strong vibration or rattling noise is usually caused by the duct touching the wall. If the periscope vent touches the wall or the floor, it can rattle when the dryer runs.
Add a small piece of foam or rubber between the duct and the wall to dampen the vibration. Do not compress the duct itself.
Safety, Code Compliance, and Maintenance
Dryer venting is not just a DIY convenience project. It is regulated by building codes for a reason. The International Residential Code requires dryer vents to terminate outside the building.
They cannot vent into a crawlspace, attic, or garage. They must be made of smooth metal with a four-inch diameter.
Some homeowners ask if they can skip the exterior vent when they have no outside access. The answer is no, unless you use an indoor lint trap in a specific approved setup. Even then, indoor traps are generally for electric dryers only and require high maintenance.
The safest and most code-compliant path is always to the outside. The safest path is always worth the extra cost.
Maintenance does not stop after installation. At least once a year, disconnect the vent and clean it with a vent brush. Clean the exterior hood and make sure the damper opens and closes freely.
If you have a magnetic connector, cleaning is easier because disconnection is fast. If you have a recessed box, clean the interior cavity with a vacuum and a long brush attachment. Regular maintenance keeps airflow strong and fire risk low.
When should you hire a professional? If you need to run duct through a crawlspace, attic, or roof, call a licensed contractor. If your wall configuration requires more than two elbows, get professional advice.
If you are not comfortable cutting drywall or working with gas connections, it is worth paying for peace of mind.
Frequently Asked Questions
How to vent a dryer in tight space?
Use a periscope vent, offset dryer vent, magnetic connector, or recessed vent box. These replace the flexible hose and allow the dryer to sit closer to the wall while maintaining proper airflow. Measure your clearance first, then choose the solution that fits your space and budget.
How to vent a dryer with no outside access?
You generally cannot safely vent a dryer without exterior access. Approved alternatives include indoor lint traps for electric dryers in some jurisdictions, but these require frequent maintenance and do not meet all code requirements. The best long-term solution is to install an exterior wall vent or roof vent.
Can you run a dryer vent through a crawlspace?
Yes, but only if the duct is smooth metal, properly insulated, and terminates at an exterior vent hood. It must not vent into the crawlspace itself. Building codes require termination outside the structure. This job is usually best handled by a professional to satisfy compliance and fire safety.
How much space is needed behind a dryer for venting?
Standard flexible hoses require four to six inches. With a tight space solution like a periscope vent or recessed box, you can reduce that to two to three inches. Some recessed boxes allow the dryer to sit almost flush against the wall.
Is it better to clamp or tape dryer vent hose?
Use both. Secure the connection with a hose clamp for mechanical strength, then seal the joint with foil tape for an airtight seal. Never use duct tape on dryer vents. Duct tape dries out and fails under heat. Foil tape is the only approved sealing method.
Are flat dryer vents safe?
Flat or slim dryer vents can be safe if they are UL-rated and made of smooth metal. However, they must maintain the equivalent airflow of a standard four-inch round duct. Avoid any flat vent that uses plastic, flexible material, or a collapsible design. Always check local code before installing.
Final Thoughts
Learning how to hook up a dryer vent in a tight space is one of those home improvement skills that pays off immediately. You gain floor space, your dryer runs more efficiently, and you remove a hidden fire hazard from your home.
Start by measuring your clearance. Then pick the venting solution that matches your space, budget, and comfort level.
If you have a few inches and want an easy DIY fix, a periscope or offset vent is the way to go. If you need maximum space savings and are willing to open the wall, a recessed box is worth the investment.
If you pull your dryer out often, spend the extra money on a magnetic connector. Remember the basics: smooth metal duct, foil tape, no screws inside the vent, and an exterior termination. Check your work after the first load of laundry.
If the exterior vent blows strong, warm air and your clothes dry in a normal cycle, you did it right. If you are ever unsure about a complex run through a crawlspace or roof, call a professional. Safety is always worth the extra cost.