
Learning how to clean air conditioner units is one of the smartest maintenance tasks you can tackle as a homeowner. A dirty AC system works harder, costs more to run, and pushes dust and allergens back into your living space.
Our team has helped dozens of friends and family members through this process, and the results are always noticeable: cooler rooms, lower electric bills, and less noise from the unit.
In this guide, you will learn the exact steps to clean both central air systems and window units. I have broken everything down into simple phases so you can work at your own pace without feeling overwhelmed.
You do not need to be an HVAC technician to handle 90 percent of this job yourself. This guide is current for June 2026.
Before we start, gather your tools and set aside about two hours for a full cleaning. Spring is the best time to do this, but any weekend in 2026 will work if your unit is running sluggish.
A clean AC can lower your cooling costs by 5 to 15 percent according to Department of Energy data. That makes this one of the most productive DIY projects you can complete in an afternoon.
Tools and Supplies You’ll Need
Having the right gear on hand makes the job faster and safer. I keep a dedicated AC cleaning kit in my garage so I am ready when the first heat wave hits.
Nothing is worse than opening the condenser and realizing you left the coil cleaner at the hardware store.
Here is what you should gather:
- Flathead and Phillips screwdrivers
- Garden hose with a gentle spray nozzle
- Soft-bristle brush or fin comb
- Vacuum cleaner with a brush attachment
- Foaming coil cleaner spray
- Mild dish soap and warm water
- Microfiber cloths or old towels
- Spray bottle
- Wet/dry vacuum (optional, for condensate drains)
- Safety gloves and eye protection
- Pipe cleaner or thin wire (for drain holes)
- Foil tape (for resealing access panels)
Most of these items are already in your home. The only item worth buying specifically is a foaming coil cleaner, which runs about $8 to $12 at any hardware store.
I have had the same can last for two seasons. Store it in a cool, dry place away from direct sun so the propellant stays active.
How to Clean Air Conditioner Safely
Never work on an AC unit while the power is active. I always turn off the circuit breaker at the main panel and switch the thermostat to the off position.
This takes 30 seconds and removes any risk of the unit starting while my hands are near the fan blades or wiring.
Wait at least 30 minutes after shutting off the power before opening the outdoor condenser. Capacitors can hold a charge, and you want them to discharge fully.
If you are unsure about electrical safety, stop here and call a licensed technician.
Wear gloves to protect your hands from sharp metal fins and eye protection when spraying cleaners. Work in daylight so you can see what you are doing.
Keep pets and children away from the work area while the unit is open. I also recommend having a phone nearby in case you need to look up your unit’s manual online.
How to Clean a Central Air Conditioner
Central systems have two main areas that need attention: the outdoor condenser and the indoor evaporator components. I split this into two phases so you can work methodically.
Clean the Outdoor Condenser Unit
Start outside at the large metal box. Remove any leaves, twigs, grass clippings, and plastic bags from the top and sides. I use a shop vacuum for this because it is faster than picking debris out by hand.
Trim back any plants or bushes so there is at least two feet of clearance around the entire unit. Good airflow around the condenser is necessary for the system to release heat.
Remove the outer grille or side panels according to your manufacturer manual. Most units have screws along the top edge. Keep the screws in a cup so you do not lose them in the grass.
Spray the condenser coils from the inside out using a garden hose on a gentle setting. The water pressure should be similar to a heavy rain, not a pressure washer.
High pressure will bend the delicate aluminum fins and reduce airflow permanently. Apply foaming coil cleaner to the coils if they are heavily soiled.
Let the foam sit for 10 to 15 minutes, then rinse again. Check the fins for bends. If you see flat spots, gently straighten them with a fin comb.
I bought my fin comb for $6 and it has saved me from expensive coil replacements twice. Work slowly and do not force the comb through tight areas.
Inspect the fan motor and blades. Wipe them down with a damp cloth if they are dusty.
Make sure the unit sits level on its concrete pad. A tilted condenser can strain the compressor over time.
Check that the concrete pad has not cracked or shifted during winter freeze cycles.
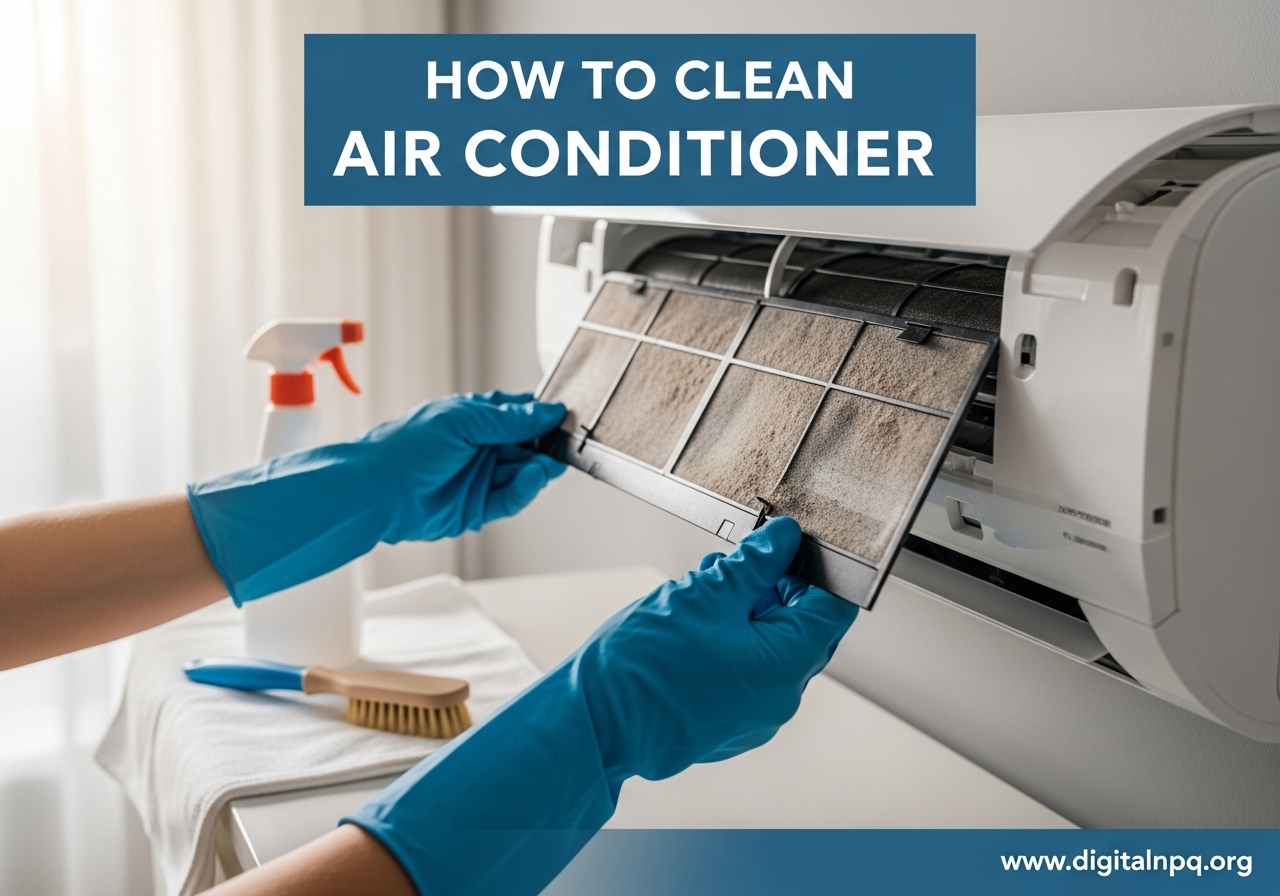
Replace or Clean the Indoor Filter
Move inside to your return-air vent or furnace cabinet. Slide out the filter and hold it up to a light. If you cannot see through it, it needs cleaning or replacement.
Disposable filters should be tossed and replaced. Washable filters can be rinsed with a garden hose and left to dry completely.
Filter sizes vary, so check the printed dimensions on the cardboard frame before buying replacements. I write the size on the furnace cabinet with a permanent marker so I never forget.
During peak summer months, I check the filter every 30 days because a clogged filter is the number one cause of weak airflow.
Homes with multiple pets or allergy sufferers may need to replace filters every 20 to 30 days. Consider the filter MERV rating when you buy replacements.
A MERV rating between 8 and 11 works well for most homes. Higher ratings trap more particles but can restrict airflow in older systems.
Match the filter type to what your manufacturer recommends.
Maintain the Evaporator Coil and Drain
The evaporator coil sits inside your home, usually above the furnace or in a dedicated air handler cabinet. It absorbs heat from your indoor air, which is why keeping it clean matters so much.
A dirty evaporator cannot absorb heat efficiently, so your system runs longer and cools less. Turn off the power to this unit as well.
Remove the access panel with a screwdriver. You may see a metal panel with foil tape; peel it back carefully.
Spray foaming cleaner on the evaporator coils. The foam will expand and lift dirt off the fins. Let it work for 10 minutes.
Do not rinse the evaporator coil with water unless your manufacturer specifically allows it. The foam usually breaks down and drains away on its own.
I place a small pan under the coil to catch any drips that miss the drain pan.
Check the condensate drain line while you are inside the unit. This PVC pipe removes moisture that the coil collects.
If it is clogged, water can back up and damage your ceiling or furnace. I use a wet/dry vacuum to suck out blockages from the end of the pipe.
Pouring a cup of white vinegar down the drain every spring keeps it clear. If you see algae growth, a tablespoon of bleach-free cleaner works well.
Replace the access panel and seal any foil tape you disturbed. Restore power and set the thermostat to cooling mode.
Listen for unusual sounds and feel the vents after 10 minutes to confirm cold air is flowing. If you smell cleaner fumes, run the fan for an hour to clear the air.
How to Clean a Window Air Conditioner
Window units are smaller but can get just as dirty. I have cleaned window ACs in apartments and workshops, and the process is straightforward once you know how to open the chassis.
Remove and Wash the Filter
Unplug the unit from the wall outlet. Never rely on the power button alone. Remove the front grille or panel, usually by pressing release clips or removing a few screws.
Slide out the mesh filter. Some window units also have a secondary carbon filter behind the mesh; remove that too if your model has one.
Wash the filter in warm, soapy water. I use a soft brush to gently scrub the mesh. Rinse thoroughly and let it air dry for at least one hour.
Putting a wet filter back into the unit traps moisture and can lead to mold growth. I lean the filter against a wall outside where the breeze helps it dry faster.
Access and Clean the Coils
With the filter removed, you can see the evaporator coils at the front and the condenser coils at the back. Spray both sets of coils with foaming cleaner. Let the foam sit for 15 minutes.
The foam will drip into the drain pan, which is normal. The back coils are usually dirtier because they face outside, so give them extra attention.
Wipe the drain pan with a cloth and clear the drain hole with a pipe cleaner or a thin wire. A clogged drain hole causes water to leak inside your room.
I learned this the hard way after a summer storm flooded my windowsill. You can also pour a small amount of vinegar through the drain hole to prevent algae.
Use a vacuum with a brush attachment to clean the fan blades and the inside of the cabinet. Be gentle around the coils.
Straighten any bent fins with a fin comb. Check the foam weatherstripping around the unit for cracks and replace it if needed.
Good weatherstripping keeps hot outdoor air from leaking in around the frame.
Reassemble the Unit Properly
Make sure all parts are completely dry before reassembly. Snap the front panel back into place. Reinstall the filter.
Plug the unit back in and test it on high cool. You should feel stronger airflow within minutes.
If you notice a musty smell, the unit may still have damp areas. Run it on fan-only mode for an hour to dry it out.
At the end of the cooling season, remove the window unit and store it upright in a dry closet. Cover it with a sheet to keep dust out.
Never store a window unit on its side; the compressor oil can shift and cause damage when you restart it next season. Before storing, clean it thoroughly so you are not greeted by a year-old grime buildup in 2026.
How Often Should You Clean Your AC Unit?
Consistency matters more than perfection. I clean my central AC every spring and do a mid-season filter check in July.
This routine has kept my 8-year-old system running like new. My neighbor who skips maintenance ends up calling a repair technician every other summer, which costs far more than a $10 can of cleaner.
Filters need attention every 30 to 90 days depending on your household. If you have pets, allergies, or live in a dusty area, check them monthly.
A household with no pets and mild weather can stretch to 90 days. I mark filter changes on my calendar so I do not forget.
Pet owners should know that dog and cat hair clogs filters faster than dust alone. Coils and condensers need a full cleaning once per year.
Spring is ideal because you are preparing for peak demand. Window units should be cleaned before installation and again at mid-season if they run daily.
When you store a window unit for winter, clean it first so dirt does not bake onto the coils during the off months. I schedule my cleaning for the first Saturday in April every year.
Watch for warning signs that your unit needs immediate attention. Weak airflow, ice on the coils, strange odors, or a sudden spike in your electric bill all point to a dirty or struggling system.
Address these signs quickly to avoid bigger repairs. If you see ice, turn the unit off immediately and let it thaw before cleaning.
Common Mistakes to Avoid When Cleaning Your AC
Over the years, I have seen people make the same errors. The most expensive mistake is using a pressure washer on the outdoor condenser.
The force will flatten the fins and destroy the coil’s ability to transfer heat. A garden hose is the only water tool you need.
I watched a friend damage a $2,000 condenser this way, and the repair bill was painful. Another frequent error is using a wire brush or hard scrub pad on the coils.
Aluminum fins are paper-thin and bend with almost no pressure. Stick to soft brushes, foaming cleaners, and gentle water flow.
If you do bend fins, fix them immediately with a fin comb before they block airflow. Never use bleach, ammonia, or other harsh chemicals on AC components.
These can corrode metal and damage rubber seals. Foaming cleaners made specifically for HVAC systems are formulated to break down dirt without attacking the metal.
Household cleaners are not designed for this job. Reassembling a unit while parts are still wet is a recipe for mold.
Let filters, coils, and drain pans dry completely. Patience here saves you from musty odors and potential health issues later.
Also, do not forget to clean the condensate drain. A clear drain is just as important as clean coils.
Why Is My AC Not Cooling After Cleaning?
If your unit runs but does not cool after you have cleaned it, do not panic. In most cases, the fix is simple.
I have helped three neighbors through this exact situation, and every time it was a quick correction. One of them had simply bumped the thermostat to heat mode while cleaning nearby.
First, check that the breaker is fully on and the thermostat is set to cool. It sounds obvious, but it happens.
Next, confirm that the filter is installed in the correct direction. Most filters have an arrow showing airflow direction; if it points the wrong way, airflow drops immediately.
I check the arrow twice because reversing it is an easy mistake to make. Wet coils cannot transfer heat efficiently.
If you rinsed the coils heavily, let the unit run on fan-only mode for 24 hours. The air movement will dry the fins.
Once dry, switch back to cooling mode. Ice buildup can also occur if the coil is too wet, so give it time to recover.
If you still have weak cooling after 24 hours, you may have a refrigerant leak or a compressor issue. Those problems require a licensed technician.
Do not attempt to add refrigerant yourself; it is illegal without EPA certification and dangerous if handled incorrectly. Burning smells or loud grinding noises also mean it is time to call a pro immediately.
When to Call a Professional HVAC Technician
DIY cleaning handles the maintenance that keeps your system efficient. Professional service covers the mechanical and electrical parts that homeowners should not touch.
I get my system professionally inspected every two years, and I do my own cleaning in between. This hybrid approach keeps my costs low and my system reliable.
Call a technician if you hear grinding noises, see refrigerant lines frosting over, or smell burning. These are signs of electrical or mechanical failure, not dirt.
A professional tune-up costs between $75 and $200 depending on your region and the complexity of your system. That price usually includes a full inspection, refrigerant check, and electrical testing.
Technicians also check refrigerant levels, test electrical connections, and inspect ductwork for leaks. Those tasks are beyond the scope of a cleaning guide.
If your system is over 10 years old, annual professional service becomes more important to catch wear before it turns into a breakdown. A $150 tune-up is cheaper than a $3,000 compressor replacement.
Frequently Asked Questions
Can I clean my air conditioner myself?
Yes, most homeowners can clean their own air conditioner safely. You can handle filter changes, debris removal, coil spraying, and drain clearing without professional help. Leave electrical repairs and refrigerant work to a licensed HVAC technician.
What is the 3 minute rule for air conditioners?
The 3 minute rule means you should wait at least 3 minutes after turning off your AC before turning it back on. This allows the compressor pressure to equalize and prevents damage to the motor. It also applies after a power outage to avoid short-cycling.
How do I deep clean my air conditioner?
Deep cleaning involves turning off power, removing the filters, spraying foaming cleaner on both evaporator and condenser coils, clearing the condensate drain, vacuuming debris from the cabinet, and straightening bent fins with a fin comb. Let all parts dry before reassembling.
What is the best thing to clean your air conditioner with?
Use a foaming coil cleaner designed for HVAC systems, a garden hose on gentle spray, mild dish soap for filters, and a soft brush or fin comb for fins. Avoid bleach, ammonia, pressure washers, and wire brushes that can damage delicate components.
How often should I clean my AC unit?
Clean or replace filters every 30 to 90 days depending on pets, allergies, and dust levels. Deep clean coils and condensers once per year in spring. Window units should be cleaned before installation and again at mid-season with daily use.
Why is my AC not cooling after cleaning?
Check that the breaker is on and the thermostat is set to cool. Verify the filter direction matches the airflow arrow. Allow wet coils to dry for 24 hours on fan-only mode. If cooling does not return, you may have a refrigerant leak or compressor issue requiring a technician.
Conclusion
Learning how to clean air conditioner units is a skill that pays off every summer. You will breathe cleaner air, pay less on your utility bill, and add years to your system’s life.
The process is simple once you break it into steps: power off, remove debris, clean filters, treat coils, and check drains.
I recommend scheduling your main cleaning session in early spring before the first heat wave. Keep a calendar reminder for filter checks every 30 days during peak season.
If you hit a problem that feels outside your comfort zone, call a professional. There is no shame in protecting your safety and your investment.
Start with your filters this weekend. It takes 15 minutes and you will feel the difference immediately.
Your future self will thank you when the August heat arrives and your home stays perfectly cool.