
If you run a humidifier daily, you already know the pain of white dust coating your furniture or the hassle of scrubbing mineral deposits out of the tank every weekend. Learning how to make distilled water for humidifier use at home can cut your supply costs and reduce the plastic jug waste piling up in your recycling bin. Our team has tested both popular DIY methods through multiple winter seasons, and we will walk you through exactly what works, what does not, and how much time you should expect to invest.
You do not need fancy lab equipment. Most households already own the basic items required to distill water on a stove top or with two glass bottles. The process is straightforward once you understand the simple science behind evaporation and condensation.
You can also check out more humidifier guides and reviews on our homepage for related maintenance tips and product recommendations. This guide is updated for 2026 with current methods and safety advice.
By the end of this article, you will know whether making your own distilled water fits your routine or if buying it is the smarter move.
How to Make Distilled Water for Humidifier: The Short Answer
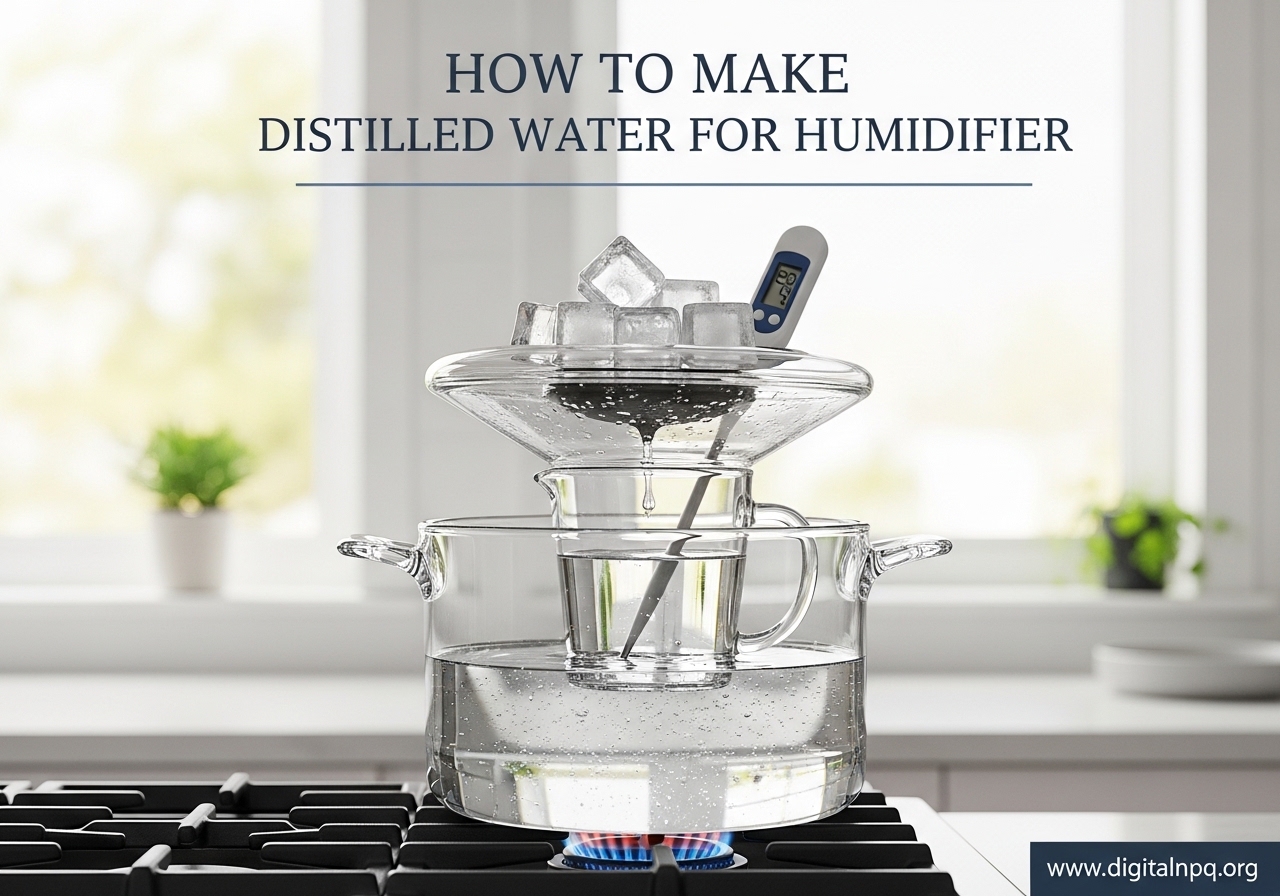
You can make distilled water for a humidifier by boiling tap water and collecting the steam that condenses back into liquid. The two easiest home methods are the stove-top pot and bowl technique and the glass bottle distillation setup.
Both rely on the same basic principle: heat turns water into vapor, leaving minerals and impurities behind, then the vapor cools into pure water. A typical batch takes 45 to 90 minutes and yields about one to two cups depending on your pot size. If your humidifier runs all day, you may need to prepare several batches in advance.
Why Distilled Water Is the Best Choice for Humidifiers
Distilled water prevents the white dust that settles on floors and electronics when ultrasonic humidifiers mist hard tap water. That white film is actually dried calcium and magnesium minerals. Once airborne, it lands on every surface and becomes a daily cleaning chore.
Mineral deposits also build up inside the humidifier tank and on the vibrating nebulizer plate. Over time, that scale buildup reduces mist output, strains the motor, and can eventually break the unit. One Reddit user told us they deep clean their humidifier at least once a week when using tap water. Switching to distilled water stretched that to once a month.
For parents running a baby humidifier, the CDC recommends distilled water because it removes both minerals and potential contaminants. The American Lung Association also notes that pure water helps maintain better indoor air quality. If you have allergies or asthma, the fewer impurities you release into the air, the better.
Even warm mist humidifiers benefit from distilled water. While boiling does kill bacteria, it does not remove dissolved solids. Those solids still concentrate inside the heating element and create scale. Distilled water keeps the entire system cleaner, longer.
Stove-Top Pot and Bowl Method
The stove-top pot and bowl method is the fastest way to make distilled water with common kitchen items. You only need a large pot with a lid, a heat-safe bowl, tap water, and ice.
Step 1: Place the large pot on a stove burner and fill it with about 8 cups of tap water. Do not fill it to the top. Leave at least two inches of space so the boiling water does not splash into your collection bowl.
Step 2: Set the heat-safe bowl inside the pot. The bowl should float freely or sit on a small rack so its bottom stays above the water line. If the bowl touches the bottom, it will get too hot and the collected water may evaporate again.
Step 3: Turn the burner to medium-high heat and bring the water to a gentle boil. You want a steady simmer, not a violent rolling boil that splashes.
Step 4: Once the water is boiling, invert the pot lid and place it on top. The lid should form a shallow cone pointing down toward the bowl. This angle channels condensation into the center.
Step 5: Load the top of the inverted lid with ice cubes. The cold surface causes the steam to condense rapidly. As the steam hits the cold lid, it turns back into liquid and drips down into the bowl.
Step 6: Let the setup run for 45 to 60 minutes. Check the ice level every 15 minutes and replenish it as it melts. The bowl inside the pot will slowly fill with distilled water.
Step 7: Turn off the heat and let everything cool for 10 minutes before removing the bowl. The distilled water is now ready for your humidifier.
Step 8: Repeat the process if you need more than one bowl. Store the finished water in a clean glass or BPA-free plastic container with a tight lid.
The main risk here is bowl overflow. If you let the pot run too long, the bowl can fill and spill distilled water back into the tap water below. Set a timer and stop when the bowl is three-quarters full.
Glass Bottle Distillation Method
The glass bottle method works well if you do not have a heat-safe bowl or if you prefer a setup that runs mostly unattended. You need two glass bottles, duct tape, and a large pot.
Step 1: Fill one glass bottle with tap water. Leave about two inches of empty space at the top. This gap prevents pressure buildup when the water heats.
Step 2: Tape the two bottles together at their curved necks so they form a V-shape or a straight line. The empty bottle should angle slightly downward. This downward angle lets the condensed water flow naturally into the collection bottle.
Step 3: Place the taped bottles in a large pot. The bottle with water should sit lower in the pot. You can rest it on a small towel or rack to hold the angle.
Step 4: Add water to the pot until the level reaches about halfway up the bottle that contains the tap water. Do not submerge the bottle completely. The top half must stay above the water line so steam can travel into the second bottle.
Step 5: Bring the pot water to a boil over medium-high heat. As the tap water in the first bottle heats, it will evaporate. The steam travels through the neck connection and enters the second bottle.
Step 6: Keep the second bottle cooler than the first. You can wrap a wet cloth around the collection bottle or set it slightly outside the pot rim. The temperature difference causes the steam to condense inside the cooler bottle.
Step 7: Let the system run for 60 to 90 minutes. The collection bottle will gradually fill with distilled water. Check the water level in the pot occasionally and add more if it gets too low.
Step 8: Remove the bottles carefully with oven mitts. They will be hot. Let them cool before separating the tape and pouring the distilled water into a storage container.
This method is slower than the pot and bowl technique, but it produces a cleaner separation between the boiling water and the distilled product. The downside is that the tape seal can leak steam if you do not wrap it tightly.
Troubleshooting Common Distillation Problems
If your yield is low, the lid or collection bottle is probably not cold enough. Ice is the simplest fix. Add fresh cubes every 15 minutes and make sure the lid surface is making direct contact with the steam.
Steam escaping from the pot means the lid is not sealed. A heavy glass lid usually sits tight enough. If you use a lightweight metal lid, place a small weight on top or wrap the rim with aluminum foil.
Cloudy or off-smelling distilled water indicates that tap water splashed into your collection bowl. Always keep the bowl above the boiling water line. If the bowl is too large, switch to a smaller one that fits on a steamer rack.
If you see mineral residue inside the collection container, your distilled water is not pure enough. This happens when the bowl gets too hot and some of the collected water re-evaporates, leaving behind any trace minerals that made it over. Lower the heat slightly and let the bowl stay cooler.
Comparing Water Types for Your Humidifier
Not every household wants to distill water by hand. Here is how common alternatives stack up.
Distilled water is nearly free of dissolved solids. It is the safest choice for ultrasonic humidifiers, baby humidifiers, and anyone with hard tap water. The only regular cost is time or store-bought jugs.
Reverse osmosis water removes most minerals through a membrane filtration process. Forum users who own RO systems report that it works almost as well as distilled water for humidifiers. The remaining total dissolved solids are typically under 50 parts per million, which is low enough to prevent heavy scale buildup. If you already have an RO system under your sink, use it.
Filtered water from a pitcher reduces total dissolved solids significantly, but the exact level depends on your starting water and filter age. One user noted their filtered readings stayed near zero for the first few weeks, then climbed as the filter aged. You would need to monitor the meter and replace filters on schedule.
Boiled water is not the same as distilled water. Boiling kills bacteria and viruses, but it does not remove calcium, magnesium, or other dissolved minerals. In fact, boiling can slightly concentrate those minerals because some water evaporates while the solids stay. For humidifiers, boiled water still produces white dust and scale.
Tap water is the worst option for ultrasonic humidifiers in hard water areas. It is convenient, but the mineral load is the highest. You will spend more time cleaning and replacing humidifiers if you use tap water daily.
Cost, Storage, and Environmental Impact
A gallon of store-bought distilled water usually costs between one and two dollars at most grocery stores. If you run a large humidifier all winter, you might need two to three gallons per week. That adds up to roughly thirty to fifty dollars per season, plus the inconvenience of carrying heavy jugs home.
Making distilled water at home costs almost nothing in materials. The only expense is the gas or electricity to heat your stove. Our rough estimate is about ten to twenty cents per gallon in energy costs, depending on local rates. The real cost is time. Each batch takes roughly an hour of active stove time, and you must be nearby to add ice or check water levels.
Storage is simple. Use clean glass jars or BPA-free plastic containers with tight lids. Keep them in a cool, dark pantry. Homemade distilled water does not contain minerals that prevent bacterial growth, so it can grow algae if left in direct sunlight. Plan to use your batch within two to four weeks.
The environmental angle is worth considering. Store-bought distilled water comes in single-use plastic jugs. If you use two gallons a week for three months, that is twenty-four plastic jugs per season. Making your own eliminates that waste entirely. Even if you only distill water during the driest months, the reduction in plastic adds up.
Safety Tips and When Buying Makes More Sense
Always use oven mitts when removing hot bowls or bottles from the stove. Steam burns are more dangerous than hot water burns because steam carries extra heat energy. Keep children and pets away from the stove while you are distilling.
Do not use plastic bowls or bottles inside the pot. Heat can cause chemicals to leach into your distilled water. Stick to glass, stainless steel, or ceramic.
If you are preparing water for a baby humidifier, the CDC advises using distilled water to reduce any risk of mineral or microbial exposure. We echo that guidance. Do not cut corners with boiled or filtered water in a nursery.
Buying distilled water is the better choice when your time is limited. If you work full-time, run multiple humidifiers, or simply do not want to watch a pot for an hour, store-bought jugs are a reasonable trade-off. You can also buy a countertop electric distiller. These machines cost between one hundred and three hundred dollars, but they automate the entire process and pay for themselves over a few seasons.
Another low-maintenance alternative is a wicking humidifier. These units evaporate water through a fabric wick rather than creating a mist. They do not release minerals into the air, so tap water is acceptable. The trade-off is that they are louder and need regular wick replacement.
Frequently Asked Questions
Can I make my own distilled water for my humidifier?
Yes. You can make distilled water at home using a stove-top pot and bowl or two glass bottles. Both methods boil tap water and collect the condensed steam, which leaves minerals and impurities behind.
What can I use if I don’t have distilled water for a humidifier?
Reverse osmosis water and filtered water are the closest alternatives. Boiled water is not the same as distilled because it still contains dissolved minerals. Tap water works in a pinch, but it will cause scale buildup and white dust in ultrasonic humidifiers.
Can I use boiled water instead of distilled water in my humidifier?
No. Boiled water kills bacteria, but it does not remove calcium, magnesium, or other dissolved solids. Those minerals still create white dust and scale inside your humidifier. Only distillation or reverse osmosis removes enough minerals to prevent buildup.
What is the easiest way to get distilled water?
Buying gallon jugs at a grocery store is the easiest option. If you prefer DIY, the stove-top pot and bowl method is faster than the glass bottle method, taking about 45 to 60 minutes per batch.
How long does homemade distilled water last?
Homemade distilled water lasts about two to four weeks when stored in a clean, sealed container in a cool, dark place. Because it lacks minerals that inhibit bacterial growth, avoid direct sunlight and do not store it indefinitely.
How much distilled water does a humidifier use?
A small bedroom humidifier uses roughly one to two gallons per week. A large whole-house unit can use three to four gallons per week. During winter, expect to go through thirty to fifty gallons over a three-month period.
Final Thoughts
Learning how to make distilled water for humidifier use at home is a practical skill that saves money and reduces plastic waste. The stove-top pot and bowl method is fastest, while the glass bottle method gives a cleaner separation. If your tap water is hard, the time investment is worth the cleaner air and longer humidifier life.
Start with one batch, see how it fits your schedule, and adjust from there. If DIY distillation feels like too much work, reverse osmosis water or store-bought jugs are solid backup plans.