
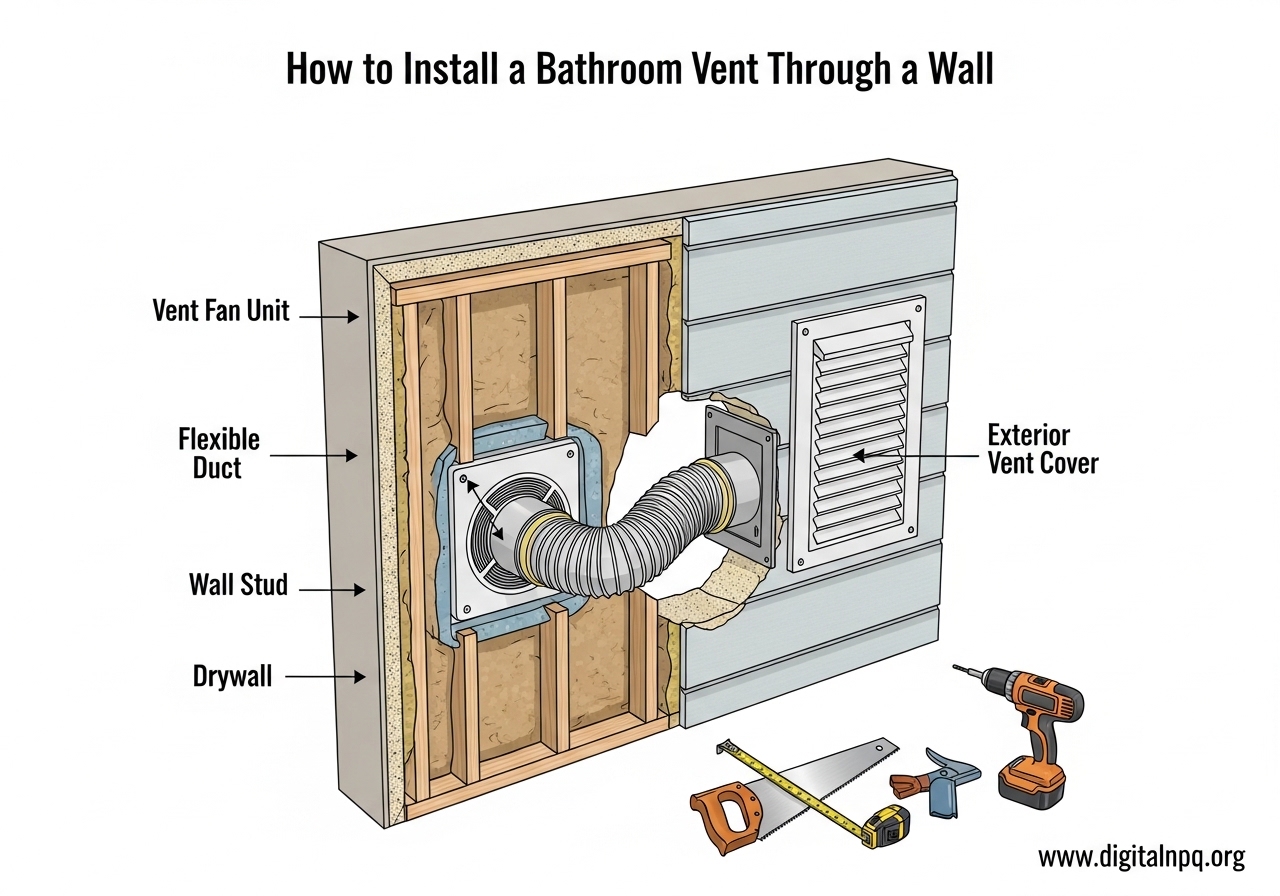
If your bathroom smells musty, your mirror fogs up every shower, or you have noticed dark spots forming on the ceiling, you are probably dealing with poor ventilation. Learning how to install a bathroom vent through a wall can solve these problems without needing attic access or a complicated roof penetration. I have helped several homeowners tackle this exact project, and the good news is that it is well within reach for a reasonably handy DIYer with a free weekend.
Through-wall bathroom venting is exactly what it sounds like: you route moist, humid air from your bathroom directly out through an exterior wall instead of going up through the roof. This approach works especially well for bathrooms on the main floor, in basements, or in homes where getting into the attic is impractical. According to the International Residential Code, bathroom exhaust air must be vented to the outside of the home, never into an attic, wall cavity, or crawlspace. Wall venting is fully code-compliant when done correctly.
In this guide, I will walk you through the entire process from start to finish. You will learn how to choose the right fan size, gather the correct tools, cut through your wall safely, run the electrical, and seal everything up tight. I will also cover specific tips for different wall types, code requirements you need to know, and how to troubleshoot common issues after installation.
Why Through-Wall Bathroom Venting Works
Through-wall venting is often the most practical option for bathrooms that lack attic access above. If you have a single-story home with a flat ceiling and a vaulted roof above it, running ductwork up through the roof can be complex and expensive. Wall venting gives you a shorter, simpler duct run with fewer elbows and better airflow efficiency.
The main advantage is simplicity. A direct wall penetration means less ductwork, fewer connections, and a shorter path for moist air to travel. Shorter duct runs also mean your fan does not have to work as hard, which can reduce noise and extend the life of the motor. The shorter the duct, the less chance moisture has to condense inside it before reaching the outside.
You might wonder whether it is acceptable to vent through a sidewall rather than the roof. Yes, sidewall venting is allowed by most building codes, provided the wall cap has a proper backdraft damper and the exhaust point is at least 3 feet from any operable window, door, or air intake. Some jurisdictions may have additional requirements, so it is always smart to check with your local building department before you start cutting holes.
Tools and Materials You Will Need
Before you start cutting into walls, gather everything you need. Having all your tools and materials ready saves you from mid-project runs to the hardware store. Here is what I recommend based on multiple installations.
Essential Tools
- Stud finder (electronic, not magnetic)
- Drill with driver bits
- Hole saw kit (4-inch or 6-inch depending on duct size)
- Jigsaw or reciprocating saw
- Fish tape or wire puller
- Tape measure and pencil
- Utility knife
- Level (small torpedo level works fine)
- Caulking gun
- Wire strippers
- Voltage tester (non-contact)
Materials
- Bathroom exhaust fan unit (wall-mount or standard with wall-mount bracket)
- Flexible or rigid ductwork (4-inch diameter is standard)
- Exterior wall cap with built-in backdraft damper
- Foil HVAC tape (do not use standard cloth duct tape)
- Silicone caulk (exterior grade, paintable)
- Deck screws or mounting screws
- Romex cable (14/2 or 12/2 with ground, matching your existing circuit)
- Wire nuts and cable connector
Safety Gear
- Safety glasses
- Dust mask or respirator
- Work gloves
One thing I always stress: use foil tape for all duct connections, not regular duct tape. Duct tape degrades quickly in temperature changes and will eventually peel off, leaving gaps that leak moist air into your wall cavity. Foil tape creates a permanent, airtight seal.
How to Calculate the Right Fan Size (CFM Guide)
Choosing a fan with the correct CFM (cubic feet per minute) rating is one of the most important steps in this project. An undersized fan will not remove moisture fast enough, while an oversized fan wastes energy and can create excessive noise.
The basic rule is straightforward: you need at least 1 CFM per square foot of bathroom floor area. For example, a standard 5-foot by 8-foot bathroom (40 square feet) requires a fan rated for at least 40 CFM. Most manufacturers offer fans in the 50 to 110 CFM range, which covers the majority of residential bathrooms.
There are a few situations where you should increase the CFM rating. If your bathroom has a jetted tub or a large walk-in shower, add 50 CFM to your baseline calculation. For bathrooms with ceilings higher than 8 feet, increase the CFM by about 10 percent for each additional foot of ceiling height.
Also factor in your duct run length. If your duct path from the fan to the exterior wall cap is longer than 6 feet or has more than one elbow, move up to the next fan size. Friction from longer duct runs reduces the effective airflow at the exhaust point. A fan rated at 80 CFM might only deliver 60 CFM through 10 feet of duct with two 90-degree elbows.
Pay attention to the sone rating as well. Sones measure fan noise. A rating of 1.0 sone is roughly equivalent to a quiet refrigerator, while anything above 4.0 sones sounds like a range hood on high. For a bathroom, I recommend choosing a fan rated at 1.5 sones or less if noise is a concern.
How to Install a Bathroom Vent Through a Wall: Step-by-Step
This is the core of the project. Take your time with each step, and remember that careful measuring prevents costly mistakes. Once you cut a hole in your exterior wall, there is no undo button.
Step 1: Choose the Fan Location
Pick a spot on an exterior wall that is as close to the shower or tub as possible. The fan should be at least 6 inches away from any showerhead spray. Use your stud finder to locate the wall studs and mark them clearly. You want to position the fan between studs, centered in the stud bay. Also check the other side of the wall (inside the bathroom) for any existing electrical boxes, plumbing, or other obstacles.
Consider the path your duct will take from the fan to the wall cap. The shorter and straighter this path, the better your fan will perform. Ideally the fan mounts directly on the exterior wall with a very short duct connection to the wall cap.
Step 2: Drill a Pilot Hole and Verify
Before cutting the full opening, drill a small pilot hole (about 1/4 inch) through the wall at your planned location. Use a piece of wire or a coat hanger to probe around inside the wall cavity. This helps you confirm there are no hidden plumbing pipes, electrical wires, or blocking between the studs.
If you hit something, patch the small hole with spackle and choose a different location. Spending 10 minutes on this verification step can save you from cutting into a water pipe or live electrical wire.
Step 3: Cut the Interior Wall Opening
Using the template that comes with your fan unit (or tracing the housing itself), mark the cutout on the bathroom side of the wall. Cut along your lines with a jigsaw. Cut carefully and stay within the marks. If the opening is slightly too small, you can always trim more. Going too large means a loose fit and more work to seal.
Remove the drywall section and vacuum out any insulation that falls into the cavity. You will need a clear workspace inside the wall for mounting the fan housing and running the duct.
Step 4: Cut the Exterior Wall Hole
This step varies depending on your exterior wall type. For wood siding or vinyl siding, use a hole saw matching your duct diameter (typically 4 inches) or a jigsaw for a rectangular wall cap. Drill from the inside out if possible, which gives you a more accurate starting point.
For brick or masonry walls, use a hammer drill with a masonry hole saw. This takes patience and steady pressure. Do not force the bit. Let the tool do the work, and keep the bit cool by spraying it with water periodically. A 4-inch hole through solid brick can take 20 to 30 minutes of drilling.
For stucco walls, score the surface with a utility knife or grinder before cutting to prevent cracking beyond your cut lines. Work slowly and support the stucco around the edges as you cut.
Step 5: Install the Fan Housing
Position the fan housing in the wall opening. Most fans come with mounting brackets or flanges that attach to the wall studs on either side. Secure the housing to the studs using the provided screws or deck screws. Make sure the housing is level before you tighten everything down.
If your fan does not have wall-mount brackets, you can attach mounting cleats (short pieces of 2×4) between the studs and then screw the fan housing to those cleats. The fan needs to be firmly supported so it does not vibrate or rattle during operation.
Step 6: Connect the Ductwork
Attach one end of your flexible duct to the exhaust port on the fan housing. Slide the duct over the port and secure it with a hose clamp or foil tape. Wrap the foil tape around the connection at least twice for a tight seal.
Run the duct to the exterior wall opening. Keep the duct as straight as possible. If you need to make a turn, use gradual bends rather than sharp kinks. Each sharp bend reduces airflow. Trim any excess duct length with a utility knife, leaving just enough to make a clean connection to the wall cap.
Step 7: Install the Exterior Wall Cap
From outside, insert the wall cap through the hole you cut. The flange of the wall cap should sit flat against the exterior surface. Connect the duct to the back of the wall cap and seal with foil tape.
Screw the wall cap to the exterior wall using galvanized or stainless steel screws. Then apply a generous bead of silicone caulk around the entire perimeter of the flange where it meets the wall. This is your primary defense against water infiltration, so do not skip this step. For extra protection on vinyl siding, install proper J-channel and flashing around the wall cap.
Step 8: Run the Electrical Wiring
Turn off the circuit breaker that supplies power to the bathroom. Use your non-contact voltage tester to confirm the power is off at any outlet or switch near your work area. Never skip this step.
If you are replacing an existing fan, you can likely use the same circuit. For a new installation, you need to run Romex cable from a power source to the fan location. Common power sources include a nearby outlet, an existing light fixture, or a dedicated new circuit from the breaker panel. If you are not comfortable with electrical work, this is the step where I recommend hiring a licensed electrician.
Feed the cable through a cable connector into the fan housing. The connector clamps around the cable and prevents it from being pulled out, which is a code requirement.
Step 9: Make the Wire Connections
Inside the fan housing, you will find a wiring compartment. Strip about 6 inches of outer sheathing from the Romex cable and strip about 1/2 inch of insulation from each individual wire.
Connect the wires: black to black (hot), white to white (neutral), and green or bare copper to the green grounding screw on the fan housing. Secure each connection with a wire nut and give each one a gentle tug to make sure it is tight. Tuck the connections neatly into the wiring compartment and close the cover.
If your fan has a built-in light or humidity sensor, follow the manufacturer’s wiring diagram carefully. Some units require a separate switch leg or a specific type of switch (like a timer or humidity-sensing switch).
Step 10: Install the Grille and Test
Snap or screw the decorative grille onto the fan housing. Most grilles attach with simple spring clips or a few screws. Make sure it sits flush against the wall surface.
Turn the circuit breaker back on and test the fan. You should feel air being pulled toward the fan when you hold your hand near the grille. If the fan runs smoothly without unusual noises, your installation is off to a good start.
Tips for Different Exterior Wall Types
Not all walls are created equal. The exterior surface of your home determines how you approach the hole-cutting step and the weatherproofing details.
Vinyl Siding
Vinyl is the easiest wall type to work with. Use a hole saw for the duct opening. Install a vinyl siding mounting block (available at any home center) to create a flat surface for the wall cap. The mounting block integrates with the siding J-channel and provides proper water drainage. Caulk around the mounting block where it meets the siding, but leave the bottom edge uncaulked so any trapped moisture can escape.
Wood Siding
Wood siding is also straightforward. Cut the hole with a hole saw or jigsaw. Install the wall cap directly over the siding, caulk the top and sides of the flange, and paint the caulk to match the siding. Consider adding a small piece of flashing above the wall cap to shed water away from the opening.
Brick or Masonry
Brick requires more effort and the right tools. Rent a large-diameter masonry core bit if possible, as it creates a much cleaner hole than drilling multiple small holes around a perimeter. Use a hammer drill, not a standard drill. Masonry anchors will hold the wall cap in place. Apply masonry-grade silicone caulk around the flange. Standard caulk may not adhere well to brick surfaces.
Stucco
Stucco is prone to cracking, so take extra care. Score the stucco surface along your cut lines before cutting to create controlled break lines. Use a masonry bit for the cutting. Once the wall cap is installed, apply stucco-compatible sealant around the edges. If you are uncomfortable working with stucco, this might be a good wall type to hire out for the exterior portion of the job.
Electrical Safety and Building Code Requirements
Safety comes first. Electrical work in a bathroom has stricter requirements than most other rooms because of the presence of water and moisture.
All bathroom outlets and circuits must have GFCI (Ground Fault Circuit Interrupter) protection. If you are tapping into an existing bathroom circuit, make sure it is GFCI-protected. If not, install a GFCI breaker in the panel or a GFCI outlet upstream of your fan connection.
Most local building codes require a permit for any new electrical circuit, including adding a bathroom exhaust fan where one did not exist before. If you are simply replacing an existing fan with a new one on the same circuit, a permit may not be required. However, requirements vary significantly by municipality. A quick call to your local building department can save you from potential issues when you sell the home.
The International Residential Code (IRC) requires that bathroom exhaust fans vent to the outdoors. Venting into an attic, crawlspace, soffit, or wall cavity is a code violation and a recipe for mold and structural damage. The exhaust termination point must be at least 3 feet from property lines, operable windows, and building air intake openings in most jurisdictions.
If you have any doubt about the electrical portion of this project, hire a licensed electrician. The cost of professional electrical work is far less than the cost of an electrical fire or a failed inspection.
Testing and Troubleshooting Your Installation
Once everything is installed and the power is back on, run through a few quick tests to make sure your bathroom vent is working properly.
The Paper Test
Hold a single sheet of toilet paper or a tissue up to the fan grille while it is running. The fan should pull the paper firmly against the grille and hold it in place. If the paper barely sticks or falls off, your fan may not be moving enough air. Check for duct restrictions, crushed flex duct, or a stuck backdraft damper.
The Smoke Test
Light a match or a smoke pencil near the duct connections inside the wall cavity (before you close up the wall). The smoke should be pulled toward the fan, not pushed outward. If you see smoke escaping at any connection point, add more foil tape to seal the leak.
Common Issues and Fixes
If the fan rattles or vibrates, check that the housing is securely screwed to the studs or mounting cleats. Loose mounting is the most common cause of fan noise. Also check that nothing inside the wall cavity is touching the duct or fan housing.
Weak airflow usually points to a duct problem. Inspect the full duct run for kinks, excessive length, or too many elbows. A duct run over 25 feet with multiple elbows will significantly reduce fan performance. If your run is long, consider upgrading to a higher-CFM fan or switching from flexible duct to rigid metal duct, which has less air resistance.
If you notice cold air coming through the fan when it is off, the backdraft damper may be stuck open or missing. Most wall caps have a built-in damper, but some fans also include one at the exhaust port. Make sure at least one damper is present and operating freely.
In cold climates, condensation inside the duct can be a problem during winter. Insulate the entire duct run with foil-faced duct insulation wrap. This keeps the warm, moist air from condensing on cold duct surfaces before it reaches the exterior. If freezing at the wall cap is a concern, choose a wall cap design that minimizes exposed metal surfaces and check it periodically during freezing weather.
FAQ
Is it okay to vent a bathroom fan through a wall?
Yes, venting a bathroom fan through a wall is perfectly acceptable and code-compliant in most jurisdictions. The IRC requires bathroom exhaust to terminate outside the building, and a wall penetration meets this requirement. The key is using a proper wall cap with a backdraft damper and sealing the penetration thoroughly to prevent water and air infiltration.
Can you vent a bathroom through a sidewall?
Yes, sidewall venting is allowed and is often the most practical option for bathrooms without attic access. The exhaust point must be at least 3 feet from any operable window, door, or building air intake. Always use a wall cap with an integrated backdraft damper to prevent cold air from entering when the fan is off.
How to vent a bathroom fan without outside access?
If true outside access is not available, your options are limited. A ductless bathroom fan with a charcoal filter can recirculate air and remove some odors, but it will not remove moisture. Your best options are: run the duct horizontally to the nearest exterior wall, use a soffit vent if the soffit is accessible, or consult an HVAC professional about routing ductwork through a nearby room to reach an exterior wall.
Can I install a bathroom vent myself?
Yes, a reasonably handy DIYer can install a through-wall bathroom vent. The project involves basic carpentry, ductwork, and electrical connections. If you are comfortable cutting drywall, using a drill, and making simple wire connections, you can handle this project in a day. However, if you are uncomfortable with any electrical work, hire a licensed electrician for that portion.
Do I need a permit to install a bathroom exhaust fan?
Permit requirements vary by municipality. Most jurisdictions require a permit if you are adding a new electrical circuit or installing a fan where none previously existed. Replacing an existing fan on the same circuit typically does not require a permit. Check with your local building department before starting. Getting caught without a required permit can cause issues when selling your home.
What size hole do I need for a bathroom vent?
The hole size depends on your duct diameter. Most bathroom exhaust fans use a 4-inch duct, which requires a 4-1/4 to 4-1/2 inch hole for the duct to pass through. If your wall cap has a larger flange or collar, the exterior hole may need to be slightly larger. Always follow the specific dimensions in your fan manufacturer’s installation instructions.
Final Thoughts
Installing a bathroom vent through a wall is one of those home improvement projects that pays for itself in prevented damage. Mold remediation, peeling paint, and rotted framing cost far more than the materials and time you will invest in this job. By following the steps outlined above, you can achieve a professional-quality installation that keeps your bathroom dry and your air clean.
The key takeaways: choose the right CFM rating for your space, seal every duct connection with foil tape, use a wall cap with a backdraft damper, caulk the exterior penetration thoroughly, and never skip the electrical safety steps. If any part of the electrical work makes you uncomfortable, there is no shame in calling an electrician for that portion while you handle the rest.
Take your time, measure carefully before cutting, and test everything before you close up the wall. With the right preparation and a methodical approach, learning how to install a bathroom vent through a wall is a weekend project that delivers real, lasting results for your home.