
If you have ever asked yourself how to oil a bathroom exhaust fan, you are not alone. I have fixed dozens of these noisy units over the years, and the process is simpler than most homeowners expect. A few drops of the right oil can silence a squealing motor and add years to your fan’s life.
Bathroom exhaust fans work hard every day removing moisture, odors, and steam from your home. Over time, dust builds up on the blades and motor bearings dry out. When that happens, the motor starts to squeal, hum, or struggle to spin at full speed.
Before you touch anything, shut off the power at the circuit breaker. Do not just flip the wall switch. Working on a live fan is dangerous, and I always recommend cutting power completely before removing any cover or touching the motor.
Safety comes first in every project I write about. Never skip the breaker step, even if you think the switch is enough protection.
Do Bathroom Fans Need to Be Oiled?
Yes, some bathroom fans need oil, but not all of them. Older fans built before the mid-2000s usually have motor bearings that require occasional lubrication. These units often have small oil ports or exposed shafts where you can add a few drops of turbine oil to keep the motor running quietly.
Modern fans are a different story. Most units sold in the last decade use sealed motors with maintenance-free bearings. These motors are factory-lubricated and designed to run for their entire lifespan without any oiling.
If you try to force oil into a sealed motor, you will probably damage the housing or cause an electrical hazard. Our team has taken apart fans from the 1990s and found bronze bushings with oil wicks that were bone dry.
We have also opened 2026-model fans and found fully sealed plastic housings with no access points at all. The difference matters because trying to oil a sealed motor is a waste of time and money.
Check your fan’s manual or model number online to confirm whether the manufacturer recommends oiling. If you cannot find the manual, a visual inspection of the motor will tell you quickly whether oil ports exist. I will explain exactly how to spot them in the steps below.
Signs Your Bathroom Fan Needs Oil
A noisy bathroom fan is the most obvious warning sign. If you hear a high-pitched squeal, grinding, or rattling sound when the fan runs, the motor bearings are likely dry and begging for lubrication. I have heard fans that sound like a crying cat, and a few drops of oil usually fixes that immediately.
Slow startup is another red flag. A healthy fan should spin the moment you flip the switch. If the blades hesitate, stutter, or need a push to get moving, the bearings are creating too much friction.
This extra drag strains the motor and can lead to premature burnout if you ignore it. You might also notice weaker airflow. When bearings are dry, the motor cannot spin the blades at full speed.
The result is less air moving through the vent, which means more humidity lingering after showers. Over time, that moisture can cause mold or mildew issues in your bathroom.
Tools and Materials You Will Need
Collecting the right supplies before you start will save time and prevent frustration. I keep a small kit in my garage for quick fan maintenance, and it has everything I need for a basic oiling job.
Here is what you should gather:
- A sturdy step ladder that lets you reach the fan safely
- A screwdriver set (Phillips and flathead) for removing the cover
- A vacuum with a brush attachment to clean dust from the housing
- A soft cloth or microfiber towel for wiping surfaces
- Turbine oil or Zoom Spout oiler for lubricating the bearings
- A small flashlight or headlamp to inspect the motor inside the housing
- Needle-nose pliers if you need to remove clips or wires
Do not grab WD-40 from the shelf. I will explain why that is a bad choice later in this guide. Stick with a proper electric motor oil or turbine oil rated for small appliances.
These oils are thin enough to penetrate the bearing but stable enough to resist drying out quickly. Using the right product from the start saves you from doing the job twice.
How to Oil a Bathroom Exhaust Fan
This is the exact process I follow every time I oil a bathroom exhaust fan. Take your time, work in good light, and do not skip the cleaning step. Dust is the enemy of smooth motor operation.
Step 1: Turn Off the Power at the Breaker
Walk to your electrical panel and flip the breaker that controls the bathroom fan. If you are unsure which breaker it is, turn off the main breaker or test the fan switch before and after flipping each breaker.
Never rely on a wall switch alone because someone could flip it back on while your hands are inside the housing. I also recommend wearing non-conductive gloves if you plan to touch any wiring.
The risk of shock is low once the breaker is off, but extra caution never hurts. Confirm the fan is dead by pressing the wall switch after the breaker is flipped.
Step 2: Remove the Fan Cover
Most bathroom fan covers are held in place by spring clips, metal tabs, or a few screws. Look closely at the edges of the cover to see how it attaches. If you see small screws, remove them carefully and set them in a cup so they do not roll away.
If your cover uses spring clips, squeeze the clips together and pull the cover straight down. The cover should release easily. If it feels stuck, check for hidden screws or paint that has sealed the edges.
I have seen fans painted over by previous homeowners, and a gentle rocking motion usually breaks the paint seal without cracking the plastic. Work slowly and avoid yanking the cover off.
Step 3: Inspect and Clean the Fan Housing
With the cover off, you will see the fan blades, motor, and a surprising amount of dust. Use your vacuum with a brush attachment to suck up loose dust from the blades, housing, and vent duct opening.
Do not blow the dust around with compressed air. You want to remove it, not redistribute it deeper into the motor. After vacuuming, wipe the blades and housing with a damp cloth.
Pay special attention to the motor body and any visible vents. Dust acts like insulation, trapping heat and making the motor work harder. A clean motor runs cooler and quieter.
While you are cleaning, inspect the wiring. Look for cracked insulation, loose connections, or scorch marks.
If you see any damage, stop and call an electrician. Oiling a fan with damaged wiring is not safe.
Step 4: Locate the Oil Ports or Motor Bearing
Now comes the most important part of learning how to oil a bathroom exhaust fan. You need to find where the oil actually goes. Some fans have small oil ports labeled “oil” on the motor housing.
These are usually tiny metal or plastic tubes with a removable cap. If you see one, you are in luck. Many fans do not have visible ports.
In that case, look at the ends of the motor shaft where it passes through the motor housing. You may see a bronze bushing or a felt oil wick around the shaft. These bearings need oil applied directly to the shaft where it meets the housing.
I use a flashlight to get a clear view because the space inside the fan housing is tight and dark. If your motor is completely sealed in a plastic or metal shell with no visible shaft ends, oil ports, or bushings, you likely have a maintenance-free sealed motor.
Do not try to drill or cut into the housing. These motors are not designed to be opened, and any attempt will ruin the unit.
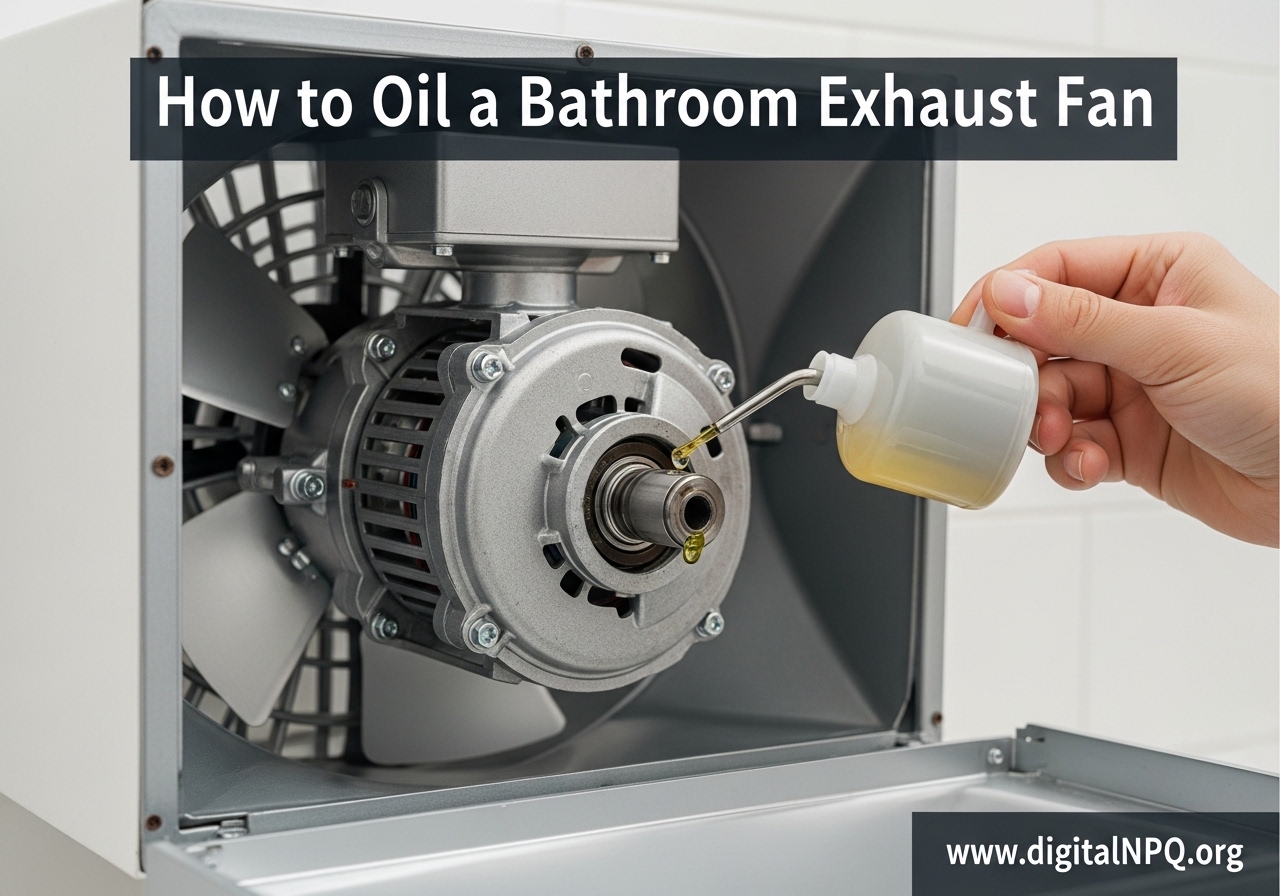
Step 5: Apply the Oil
Once you have located the bearing or oil port, apply two to three drops of turbine oil. That is all you need. More oil is not better.
Excess oil will attract dust and may drip onto the fan blades or housing, creating a mess and a potential fire hazard near the motor. If you are oiling a shaft with no port, place a drop at each end of the motor shaft where it enters the bearing.
Let gravity do the work. The oil will slowly seep into the bronze bushing or oil wick and lubricate the spinning parts inside. I like to use a Zoom Spout oiler because the long, flexible spout lets me reach tight spots without disassembling the motor.
Wait about thirty seconds after applying the oil. This gives the lubricant time to penetrate the bearing surfaces before you spin the blades. Patience here pays off with smoother, quieter operation.
Step 6: Spin the Blades Manually
Reach in and gently spin the fan blades by hand. Turn them several times in both directions. This motion works the oil into the bearing and helps distribute it evenly across the internal surfaces.
You should feel the blades spin more freely than before. If the blades still feel stiff or gritty after spinning, the bearing may be worn beyond what oil can fix. In that case, you are probably looking at a motor replacement rather than a simple oiling job.
I will cover that decision in the troubleshooting section below. Do not force the blades if they resist movement.
Step 7: Reassemble the Fan
With the oil applied and the blades spinning freely, put the fan cover back on. Align the clips or screw holes and secure the cover firmly. Do not overtighten screws into plastic housings because you can strip the threads or crack the cover.
Double-check that the blades can spin freely without hitting the cover or the housing walls. A warped cover or bent blade can create scraping noises that sound like a bad bearing but are actually a physical contact issue.
Step 8: Test the Fan
Flip the breaker back on and press the wall switch. The fan should start immediately and run quietly. Listen for any remaining squeals, rattles, or grinding.
If the noise is gone, you have successfully completed the job. Let the fan run for five minutes to warm up the oil and distribute it fully. If the sound improves but does not disappear completely, wait a day and check again.
Sometimes the oil needs a full heating cycle to settle into the bearing completely. Patience is your friend here.
What Oil Should You Use on a Bathroom Fan Motor?
Choosing the right oil is critical. The wrong lubricant can gum up the bearing, attract dust, or evaporate within weeks. I have tested several options over the years, and the forums agree on what works best.
The best choice is a lightweight turbine oil formulated for electric motors. Look for a product like Zoom Spout turbine oil or a similar 10-weight non-detergent motor oil. These oils are thin, stay fluid at a wide range of temperatures, and do not leave a sticky residue behind.
They are specifically designed for small motor bearings like the ones in bathroom exhaust fans. Silicone spray can also work for some fans, but it is messier and harder to control.
You risk overspraying onto the housing, blades, or ceiling. If you choose a spray, apply it to a cloth first, then dab the cloth onto the bearing. Direct spraying inside the fan housing is not recommended.
Now let me address the product everyone asks about. WD-40 is not a lubricant for this job. It is a penetrating oil and water displacer.
It will loosen the bearing temporarily, but it dries out and leaves a gummy residue that attracts dust like a magnet. I have seen Reddit users and DIY forum veterans warn about this exact problem.
Within a month, a WD-40-treated bearing is often noisier than before. Do not use it on your bathroom fan motor.
Also avoid 3-in-1 household oil, cooking oil, and motor oil meant for car engines. 3-in-1 is too thick for small fan bearings. Cooking oil goes rancid and sticky.
Automotive oil is too heavy and contains detergents that can harm small motor components. Stick with turbine oil or a dedicated electric motor lubricant and your fan will thank you.
The extra few dollars for the right oil saves you from a repeat repair.
Troubleshooting Common Problems
Even with the right oil and proper technique, things do not always go perfectly. Here are the problems I see most often and how to handle them.
The Fan Is Still Noisy After Oiling
If the squeal or rattle persists after oiling, the bearing may be permanently worn. Oil reduces friction, but it cannot rebuild a scored or pitted bearing surface. In this case, the motor needs replacement.
A new fan motor costs between twenty and fifty dollars, and replacement is usually a better investment than fighting a dying motor. Another possibility is a loose blade or housing.
Spin the blades by hand with the power off and listen for scraping. Tighten any loose screws and check for bent blades. Physical contact noise can mimic a bad bearing.
I Cannot Find Any Oil Ports
This is the most common complaint I see on forums. Many homeowners open the cover and stare at a sealed motor with no obvious oiling points. If the motor is wrapped in a plastic shell and the shaft ends are not visible, you likely have a maintenance-free sealed unit.
These motors are designed to run without oil for their entire lifespan, which is typically five to ten years. Do not drill, pry, or cut into a sealed motor.
You will destroy it and void any warranty. If the fan is noisy and the motor is sealed, the only real fix is a full fan replacement or a motor swap if the manufacturer sells replacement parts.
The Screws Are Stuck or Stripped
Old fans often have rusted or painted-over screws. If your screwdriver is slipping, try pressing down hard while turning to maintain grip. A rubber band between the screw head and the screwdriver can add traction.
For really stubborn screws, a small drop of penetrating oil on the screw head can help, but keep it away from the motor. If the screw is truly stripped, you may need to drill the head off carefully.
This is a last resort, and I only recommend it if you are comfortable with a drill. After the cover is off, you can use pliers to remove the remaining screw shaft.
The Fan Will Not Start at All
A fan that does not start is usually beyond the help of oil. Check the breaker, the wall switch, and the wiring connections first. If the motor hums but does not spin, the bearings may be seized.
Oil might free them temporarily, but a seized motor is a sign of serious internal wear. Plan for a replacement. A non-starting motor is a clear signal that the unit has reached the end of its service life.
When to Replace Instead of Oil
Sometimes the smartest choice is to stop trying to fix an old fan and install a new one. If your fan is more than fifteen years old, uses a sealed motor that is failing, or requires parts that are no longer available, replacement is the better option.
Modern bathroom exhaust fans are quieter, more efficient, and often easier to install than you might think. Many units now move more air with less noise and use maintenance-free motors that will not need oiling in the future.
I have replaced old squealing fans with new units and the difference in sound and airflow is dramatic. Replacement is also the right call if you see burn marks on the motor, smell melting plastic, or notice the fan housing is cracked.
These are safety issues, not maintenance problems. Oil will not fix a burned-out motor or a damaged housing. Call an electrician or a handyman if you are not comfortable with wiring, but do not ignore these warning signs.
A new fan costs between thirty and one hundred fifty dollars depending on airflow rating and noise level. Compared to the risk of mold from poor ventilation, that is a small investment. Factor in your time and the frustration of repeat oiling on a dying motor, and replacement often wins.
Frequently Asked Questions
What should I use to lubricate a bathroom exhaust fan?
Use a lightweight turbine oil or electric motor oil such as Zoom Spout turbine oil. These oils are thin, resist drying, and are made for small motor bearings. Avoid WD-40, 3-in-1 oil, cooking oil, and automotive motor oil.
Do bathroom fans need to be oiled?
Only older fans with accessible motor bearings need oiling. Modern fans with sealed motors are maintenance-free and should not be oiled. Check your user manual or inspect the motor for oil ports to determine if your fan can be lubricated.
Can I spray WD-40 on a bathroom exhaust fan?
No. WD-40 is a penetrating oil and water displacer, not a long-term lubricant. It dries out and leaves a sticky residue that attracts dust. Within weeks, the bearing can become noisier than before. Use turbine oil instead.
How to oil an exhaust fan?
Turn off the power at the breaker, remove the cover, clean the housing, locate the oil ports or shaft bearings, apply two to three drops of turbine oil, spin the blades manually to distribute the oil, reassemble the cover, and test the fan.
Conclusion
Learning how to oil a bathroom exhaust fan is a simple repair that can save you money and restore peace to your bathroom. The key steps are always the same: cut the power, clean the housing, find the bearing, apply two to three drops of turbine oil, and test the results.
If your fan has a sealed motor, skip the oil and plan for a replacement when the unit wears out. Regular maintenance every year or two keeps older fans running quietly and efficiently. I check mine each spring when I do my home cleaning routine.
A ten-minute oiling job beats listening to a squealing fan for months. Take care of your bathroom exhaust fan, and it will take care of your home’s air quality for years to come.