
Wiring a ceiling fan is one of those home projects that sounds intimidating but becomes straightforward once you understand the wire colors and connections involved. Whether you are installing a brand-new fan, replacing an old one, or troubleshooting a fan that stopped working, this ceiling fan wiring guide walks you through every configuration you will encounter. I have wired dozens of ceiling fans over the years — from basic single-switch setups to dual-switch installations with light kits and remote receivers — and the process follows the same core principles every time.
The most important thing to understand before you start is what each wire does. Every ceiling fan uses a color-coded wiring system, and knowing which wire carries power, which returns it, and which keeps you safe is the foundation of a successful installation. This guide covers wire color codes, the exact step-by-step process for wiring a ceiling fan, common wiring configurations (including single switch, dual switch, and remote receiver setups), text-based wiring diagrams, and troubleshooting for the most frequent problems homeowners run into.
Older homes with only two wires in the ceiling box present their own challenges, and I address those specifically. By the end of this article, you will know exactly which wires to connect, which tools you need, and how to verify your work is safe before turning the power back on.
Ceiling Fan Wire Colors Explained
Every ceiling fan installation starts with identifying the wires coming from your ceiling and the wires coming from your fan. The color coding tells you exactly what each wire does, and connecting the right colors together is the key to a safe, working installation.
Wires Coming From Your Ceiling Box
The wires in your ceiling junction box come from your home’s electrical system. Here is what each color means:
- Black wire (hot): Carries 120V power from your circuit breaker. This is the primary power source for the fan.
- Red wire (switched hot): A second hot wire found in dual-switch setups. It carries power independently, typically used to control the light kit separately from the fan motor.
- White wire (neutral): Returns current back to the electrical panel. It completes the circuit.
- Green or bare copper wire (ground): Provides a safety path for electrical faults. Connects to the grounding system.
Wires Coming From Your Ceiling Fan
Your ceiling fan will have its own set of color-coded wires. Here is the breakdown:
- Black wire (fan motor): Powers the fan motor. Connects to the hot wire from your ceiling.
- Blue wire (light kit): Powers the light fixture attached to the fan. On fans without a light kit, this wire may be capped off or absent.
- White wire (neutral): Connects to the white neutral wire from the ceiling. Both the fan motor and light kit share this neutral connection.
- Green wire (ground): Connects to the ground wire from the ceiling or to the grounding screw on the mounting bracket.
Quick Wire Matching Reference
Here is the simplest way to think about matching ceiling wires to fan wires:
- Ceiling black to fan black (fan motor power)
- Ceiling red to fan blue (light kit power, if using dual switch)
- Ceiling white to fan white (neutral return)
- Ceiling green/bare to fan green (ground safety)
If your ceiling does not have a red wire, connect the fan’s blue wire together with the black wire to the ceiling’s single black hot wire. This lets both the fan and light run off the same switch. If your fan does not have a light kit, cap the blue wire with a wire nut and tuck it into the mounting bracket.
Tools and Materials You Need
Having the right tools before you start saves time and prevents frustration. Here is everything you need to wire a ceiling fan:
- Voltage tester (non-contact): Absolutely essential. Confirms power is off before you touch any wires.
- Wire strippers: For removing insulation from wire ends. Most ceiling fans use 14 AWG or 12 AWG wire.
- Wire nuts: You need size medium (typically yellow) for most 14 AWG connections and size large (typically red) if your home uses 12 AWG wire. Check the wire nut packaging for compatibility.
- Screwdriver (Phillips and flathead): For mounting bracket screws, canopy screws, and terminal connections.
- Pliers (needle-nose): For bending wire ends and tightening connections.
- Stepladder: Tall enough to reach the ceiling comfortably without overstretching.
- Electrical tape: Optional but good practice to wrap wire nut connections for extra security.
- Drill with driver bits: For securing the mounting bracket to the ceiling joist or electrical box.
Check that your ceiling electrical box is rated for ceiling fan support. Standard light fixture boxes are not strong enough to hold a ceiling fan. If the box is plastic and not marked “fan-rated,” you need to replace it with a fan-rated box that can support at least 50 pounds. This is a common mistake I see — skipping this step can lead to the fan pulling out of the ceiling under its own weight and vibration.
Safety Precautions Before You Start Wiring
Electrical work can be dangerous if you skip safety steps. Follow these precautions before touching any wire:
Step 1: Turn Off Power at the Circuit Breaker
Do not just flip the wall switch off. Turn off the circuit breaker that controls the ceiling fixture. The wall switch only cuts power to one wire (the hot), and if the wiring is wrong or the switch is on the neutral side, the wires could still be live even when the switch is off. Go to your electrical panel, find the correct breaker, and flip it to the off position.
Step 2: Verify Power Is Off
Use your non-contact voltage tester on every wire in the ceiling box. Touch the tester to the black wire, the red wire (if present), and the white wire. The tester should show zero voltage on all wires. If any wire shows voltage, you turned off the wrong breaker. Try again until all wires are confirmed dead.
I always test the tester on a known live circuit first (like a lamp that is on) to make sure the tester itself is working. A broken voltage tester gives you a false sense of safety.
Step 3: Wear Safety Gear
Wear safety glasses when working above your head. Small debris, dust, and wire clippings can fall into your eyes. Gloves are optional but can improve your grip on wire nuts and tools.
Step 4: Check Local Electrical Codes
Some municipalities require a permit or licensed electrician for electrical work. Check your local building codes before starting. If you live in an area that requires permits and you plan to sell the home later, unpermitted electrical work can become a liability during inspection.
How to Wire a Ceiling Fan: Step-by-Step Guide
This step-by-step covers the most common ceiling fan wiring setup: a single switch controlling both the fan and light. I will walk through each connection in the correct order so you can follow along.
Step 1: Prepare the Ceiling Box
Remove the old fixture if one is present. Unscrew the mounting screws and carefully lower the fixture to expose the wires. Disconnect the old wire nuts and remove the fixture completely. You should now see the ceiling wires exposed in the junction box: black (hot), white (neutral), and green or bare copper (ground). If your home has a red wire, that will be present too.
Inspect the wires for damage. If any wire ends are frayed, corroded, or discolored, cut the damaged portion off with wire strippers and strip about half an inch of fresh insulation to expose clean copper.
Step 2: Install the Mounting Bracket
Attach the fan’s mounting bracket to the ceiling electrical box using the screws provided with the fan. The bracket must be secured tightly to the fan-rated box. If the bracket wobbles or feels loose, the fan will vibrate excessively once running. Make sure the bracket’s ground screw or ground wire connection is accessible.
Step 3: Connect the Ground Wires
Connect the green wire from the fan to the ground wire from the ceiling (green or bare copper). If the mounting bracket has a green ground screw, connect the ground wires to this screw as well. Twist the bare copper ends together clockwise, then secure with a wire nut. Grounding is non-negotiable — it protects you from electrical shock if a fault occurs inside the fan motor.
In older homes, you may find no ground wire in the ceiling box. If the box is metal and grounded through conduit, attach the fan’s green wire to the box using the green ground screw on the mounting bracket. If there is truly no ground available, consult an electrician.
Step 4: Connect the White (Neutral) Wires
Hold the stripped end of the fan’s white wire next to the stripped end of the ceiling’s white wire. Twist them together clockwise using pliers. Once the copper strands are tightly twisted, screw a wire nut over the connection clockwise until snug. Give each wire a gentle tug to confirm the connection is secure. If either wire pulls out, redo the connection.
Step 5: Connect the Black (Fan Motor Hot) Wire
For a single-switch setup: twist the fan’s black wire together with the ceiling’s black wire. Secure with a wire nut. This connection sends power to the fan motor through the wall switch.
For a dual-switch setup: connect the fan’s black wire only to the ceiling’s black wire (the fan motor hot from the fan switch). Do not connect it to the red wire.
Step 6: Connect the Blue (Light Kit) Wire
For a single-switch setup: connect the fan’s blue wire together with the black wires from Step 5. All three wires (ceiling black, fan black, fan blue) get joined under one wire nut. This lets the single switch power both the fan and the light.
For a dual-switch setup: connect the fan’s blue wire to the ceiling’s red wire (the light hot from the light switch). Cap the red wire and blue wire together with a wire nut.
If your fan does not have a light kit and no light is planned: cap the fan’s blue wire with a wire nut by itself and tuck it into the canopy. Never leave a bare wire end exposed.
Step 7: Tuck Wires and Mount the Fan Canopy
Carefully fold all wires up into the ceiling junction box. Keep wire nuts pointing upward so they do not unscrew from vibration. Make sure no bare copper is visible at any connection. Slide the fan canopy up over the mounting bracket and secure it with the provided screws. The canopy should sit flush against the ceiling with no gaps.
Step 8: Test the Installation
Turn the circuit breaker back on. Use the wall switch to power the fan. Test all functions: fan speeds (low, medium, high), light on/off, and direction switch (forward and reverse). If the fan wobbles, check that all screws are tight and use the included balancing kit. If nothing works, turn the breaker back off and recheck every wire nut connection.
Ceiling Fan Wiring Configurations
Different homes have different wiring setups. Here are the three most common configurations and how to handle each one.
Single Switch Wiring (Fan and Light Together)
This is the most common setup in homes built before 1990. One wall switch controls everything. In this configuration, the ceiling box has black, white, and ground wires only (no red wire).
Connect the fan’s black wire and blue wire together with the ceiling’s black wire under one wire nut. Both the fan motor and light kit receive power from the same source. You control the fan speed with the pull chain and the light with its own pull chain or button. The wall switch turns everything on and off together.
The downside of this setup is you cannot turn off just the light while leaving the fan running (or vice versa) from the wall switch. However, the pull chains on the fan itself give you independent control of fan speed and light while the wall switch is on.
Dual Switch Wiring (Separate Fan and Light Control)
Homes with two switches on the wall (one for the fan, one for the light) have an extra wire in the ceiling box: the red wire. The black wire carries power to the fan motor through one switch, and the red wire carries power to the light kit through the other switch.
Wire connections for dual switch:
- Ceiling black to fan black (fan motor power)
- Ceiling red to fan blue (light kit power)
- Ceiling white to fan white (neutral)
- Ceiling ground to fan green (ground)
This configuration gives you full independent control of the fan and light from the wall. Many homeowners prefer this setup because it eliminates the need to reach the pull chains.
Remote Receiver Installation
Many modern ceiling fans include a remote control receiver that sits inside the fan canopy above the mounting bracket. The receiver intercepts the power and routes it to the fan or light based on remote commands.
Wiring with a remote receiver changes the connections slightly:
- Ceiling black (hot) connects to the receiver’s black input wire
- Ceiling white (neutral) connects to the receiver’s white input wire
- Receiver’s black output connects to fan black (motor)
- Receiver’s blue output connects to fan blue (light kit)
- Receiver’s white output connects to fan white (neutral)
- Ground wires connect as normal
The remote receiver acts as an electronic switch between your house wiring and the fan. Make sure to set the dip switches on both the receiver and remote to the same frequency, or the remote will not communicate with the receiver. Also note that the wall switch must remain in the on position for the remote to work.
Old House 2-Wire Setup (No Ground)
Homes built before the 1960s often have only two wires in the ceiling box: a black hot wire and a white neutral wire. There is no ground wire, and no separate red wire for a light kit.
In this scenario, connect the fan’s black and blue wires to the ceiling’s black wire, the fan’s white wire to the ceiling’s white wire, and attach the fan’s green ground wire to the mounting bracket’s ground screw if the box is metal. If the box is plastic and has no ground, you should have an electrician install a grounded circuit.
Running a ceiling fan without proper grounding is a safety risk. I strongly recommend having a ground wire added by a professional if your home lacks one. It is a relatively simple job for an electrician and adds meaningful protection.
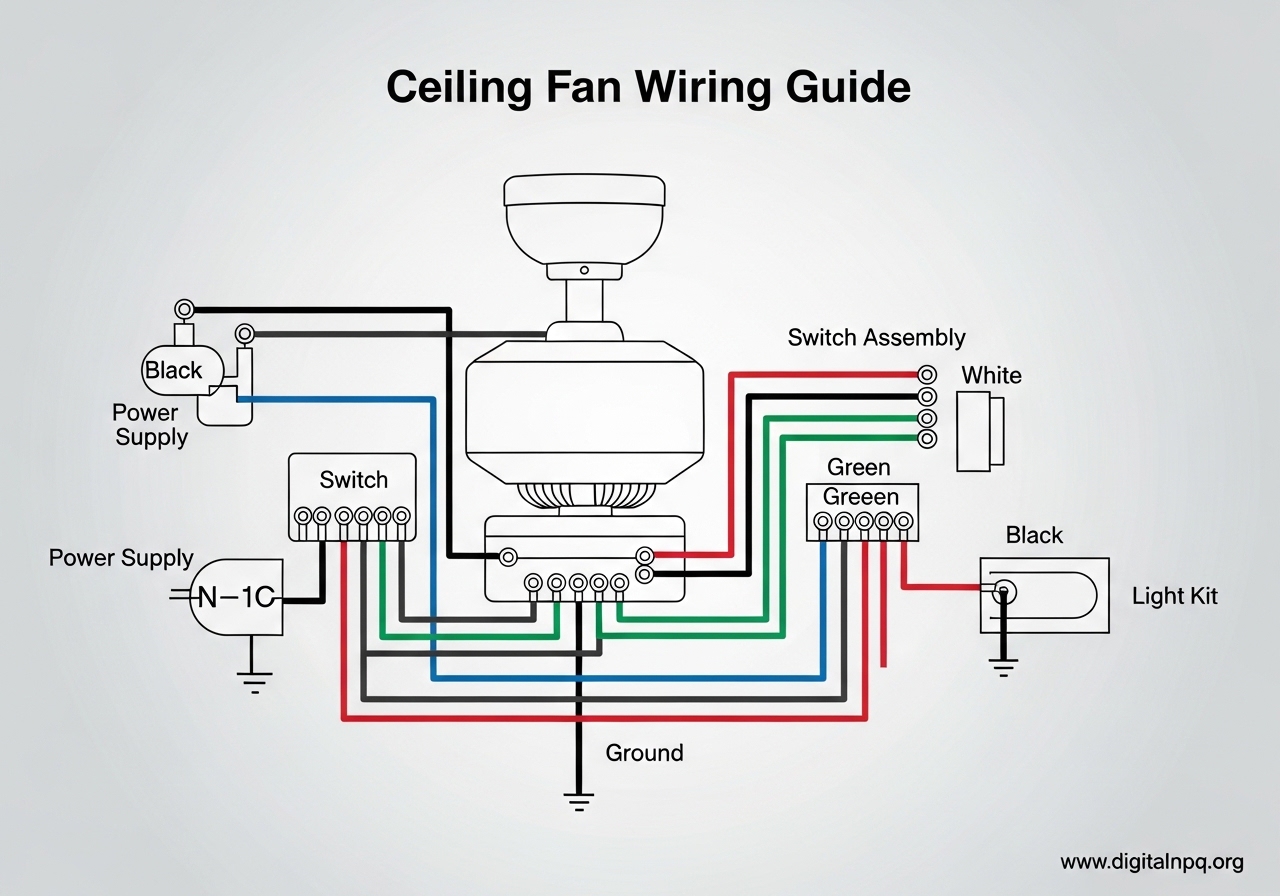
Ceiling Fan Wiring Diagrams Explained
Wiring diagrams help visualize the connections before you start. Here are text-based descriptions of the two most common ceiling fan wiring diagrams.
3-Wire Ceiling Fan Wiring (Single Switch)
In a 3-wire configuration, the ceiling box contains three wires: black (hot), white (neutral), and green/bare (ground). This is the standard single-switch setup found in most homes.
The connection diagram looks like this:
- Ceiling black (hot) joins with fan black (motor) and fan blue (light) — all three under one wire nut
- Ceiling white (neutral) joins with fan white (neutral) — under one wire nut
- Ceiling green/bare (ground) joins with fan green (ground) — under one wire nut or ground screw
Power flows from the breaker through the wall switch to the black wire. At the ceiling box, that power splits to both the fan motor and the light kit. The neutral wire returns current from both the motor and light back to the panel. The ground wire sits idle unless a fault occurs, at which point it safely redirects stray current.
4-Wire Ceiling Fan Wiring with Light (Dual Switch)
In a 4-wire configuration, the ceiling box contains four wires: black (fan hot), red (light hot), white (neutral), and green/bare (ground). This enables independent control of the fan and light from two separate wall switches.
The connection diagram looks like this:
- Ceiling black (fan hot) joins with fan black (motor) — under one wire nut
- Ceiling red (light hot) joins with fan blue (light kit) — under one wire nut
- Ceiling white (neutral) joins with fan white (neutral) — under one wire nut
- Ceiling green/bare (ground) joins with fan green (ground) — under one wire nut or ground screw
Each switch controls its own circuit. The fan switch sends power through the black wire to the motor. The light switch sends power through the red wire to the light kit. Both circuits share the same white neutral return and green ground safety path.
If your ceiling has a red wire but you want to use a single switch, cap the red wire with a wire nut and leave it in the box. Do not cut it — future owners may want dual-switch capability. Connect the fan’s blue wire together with the black wires instead.
Troubleshooting Common Ceiling Fan Wiring Problems
Even with careful installation, things can go wrong. Here are the most common problems and their solutions.
Fan Does Not Turn On At All
If the fan shows no signs of life after wiring, check these things in order:
- Confirm the circuit breaker is on and the wall switch is in the on position
- Check that the wire nut connections are tight — a loose black or white wire nut is the most common cause
- Verify the fan’s pull chain switch is not in the off position
- Test the voltage at the ceiling box with your voltage tester to confirm power is reaching the box
Light Works But Fan Does Not Spin
This means the blue wire connection is good but the black wire connection to the fan motor has a problem. Open the canopy and check the black wire nut. The fan’s black wire may have pulled out during installation. Also check the fan’s direction switch — sometimes it gets stuck between forward and reverse during shipping.
Fan Spins But Light Does Not Work
The blue wire connection is the suspect here. Open the canopy and verify the blue wire nut is secure. If the fan has a light kit that was installed separately, check the plug connection between the fan body and the light kit. Some fans use a plug-in connector rather than direct wiring for the light. Also check the light bulb — sometimes the simplest answer is the right one.
Fan Humming or Buzzing Sound
A low hum is normal on many ceiling fans, especially on lower speeds. However, a loud buzz or grinding sound indicates a problem. Check for loose wire nut connections vibrating against the canopy. Ensure all screws on the mounting bracket, blade holders, and motor housing are tight. If the fan has a remote receiver, the receiver itself can cause a slight hum — this is usually normal. If the hum is accompanied by slow or stalled rotation, the capacitor inside the fan may be failing and needs replacement.
Fan Wobbling After Installation
Wobbling is almost never a wiring issue. It is caused by unbalanced blades. Use the balancing kit that came with the fan (a small weighted clip) and follow the instructions to find which blade needs the weight. Also verify all blade holder screws are equally tight and that the blades are not warped. A blade that is bent even slightly out of plane will cause noticeable wobble.
Wall Switch Feels Hot
If the wall switch becomes warm or hot to the touch during operation, the fan may be drawing more current than the switch is rated for. Standard toggle switches are rated for 15 amps, which is sufficient for most ceiling fans. However, if the fan is on a shared circuit with other fixtures, the total load may exceed the switch rating. Replace the switch with one rated for the correct amperage, or have an electrician evaluate the circuit. A hot switch is a fire risk and should not be ignored.
When to Call a Licensed Electrician
DIY ceiling fan wiring is well within the ability of most homeowners, but some situations call for a professional:
- Aluminum wiring: Homes built in the 1960s and 1970s may have aluminum wiring, which requires special connectors and techniques. Never connect copper fan wires directly to aluminum house wires without the proper COPALUM or AlumiConn connectors.
- No ground wire: If your ceiling box has no ground wire and no grounded metal box, an electrician should run a ground wire before you install the fan.
- Flickering or dimming lights: This can indicate a loose connection elsewhere on the circuit, an overloaded circuit, or a problem at the panel. These issues need professional diagnosis.
- Multi-fan installation: Installing multiple fans on one circuit requires calculating the total electrical load to avoid overloading the circuit breaker.
- Permit requirements: If your local code requires permits for electrical work, hire a licensed electrician. The cost is worth the safety and code compliance.
A licensed electrician typically charges between $150 and $400 to wire a ceiling fan, depending on your area and the complexity of the installation. If you are unsure about any step in the wiring process, that fee is money well spent for peace of mind and safety.
FAQ
How do I wire a ceiling fan correctly?
Connect matching wire colors: ceiling black to fan black, ceiling white to fan white, ceiling green to fan green. If the fan has a light kit (blue wire), connect it to the ceiling black for a single switch or to a separate ceiling red wire for dual-switch control. Always turn off the breaker and verify with a voltage tester before touching any wires.
Do you need 3 wire for a ceiling fan?
A ceiling fan needs at minimum 3 wires to operate safely: a hot wire (black) to carry power, a neutral wire (white) to return current, and a ground wire (green or bare copper) for safety. A 4th wire (red) is only needed if you want separate wall switches for the fan and light kit.
Can you wire a fan and light on the same switch?
Yes. Connect both the fan’s black wire (motor) and blue wire (light kit) together with the ceiling’s black hot wire under one wire nut. The wall switch will then control both the fan and light simultaneously. Use the pull chains on the fan to independently adjust fan speed and turn the light on or off while the wall switch remains on.
Can I connect the red and black wire together from ceiling to fan?
Connecting the ceiling red and black wires together is not recommended. The red wire is a separate switched hot wire designed for independent control of the light kit. If you connect both hot wires together, both wall switches will feed power to the same circuit, which can cause confusion and potentially backfeed the circuit. Instead, cap the red wire if you only need single-switch operation, or connect the red wire to the fan’s blue wire for proper dual-switch control.
How to wire a ceiling fan with 2 wires in an old house?
In older homes with only a black hot wire and white neutral wire (no ground), connect the fan’s black and blue wires to the ceiling’s black wire, and the fan’s white wire to the ceiling’s white wire. Attach the fan’s green ground wire to the metal electrical box if present. If there is no ground path at all, have an electrician install one for safety.
Why is my ceiling fan humming after wiring?
A slight hum is normal on many ceiling fans, especially at lower speeds. A loud buzz usually indicates a loose wire nut vibrating inside the canopy, loose screws on the mounting bracket, or a failing capacitor. Tighten all connections and screws first. If the hum persists and is accompanied by slow or stalled fan rotation, the internal capacitor may need replacement.
Conclusion
Proper ceiling fan wiring comes down to understanding wire colors, making secure connections with wire nuts, and always verifying the power is off before you start. Black wires carry power to the fan motor, blue wires handle the light kit, white wires return current on the neutral path, and green or bare copper wires provide the ground safety connection. Match the colors correctly, tighten every wire nut, and tuck the connections carefully into the ceiling box.
Whether you are working with a simple 3-wire single-switch setup or a 4-wire dual-switch configuration, the process follows the same pattern: ground first, then neutral, then hot wires. For homes with remote receivers, the receiver sits between the house wiring and the fan wiring as an electronic switch. And for older homes with only two wires, you can still get the job done — but consider having a ground wire added by a professional.
The most common mistakes I see are loose wire nut connections, forgetting to turn off the breaker (relying only on the wall switch), and skipping the ground wire. None of these are difficult to get right, but they are easy to overlook when you are eager to finish the job. Take your time, double-check every connection, and test thoroughly before calling it complete. If anything feels beyond your comfort level, a licensed electrician can handle the job safely and usually within an hour or two.