Category: Guides

  • Do Evaporative Coolers Work 2026: Complete Guide
    Do Evaporative Coolers Work 2026: Complete Guide

    Do evaporative coolers work? The short answer is yes, but only when the conditions are right. I spent weeks researching this question after a friend in Phoenix swore by her swamp cooler while my cousin in Florida insisted the same unit just made his living room feel like a sauna.

    The difference comes down to one factor that most people overlook until it is too late: humidity.

    In this guide, I will explain exactly how evaporative coolers function, where they perform best, and how much cooling you can realistically expect. I have also pulled real experiences from homeowners across dry and humid climates so you can decide whether this technology makes sense for your home in 2026.

    Our team looked at Department of Energy data, manufacturer specifications, and hundreds of user reports from forums like Reddit and Home Improvement communities. What we found is that evaporative coolers are not a gimmick, but they are also not a one-size-fits-all solution. The effectiveness depends almost entirely on your local climate and how you install the unit.

    If you are considering a purchase, this article will give you the facts you need to make a smart decision.

    How Evaporative Coolers Work

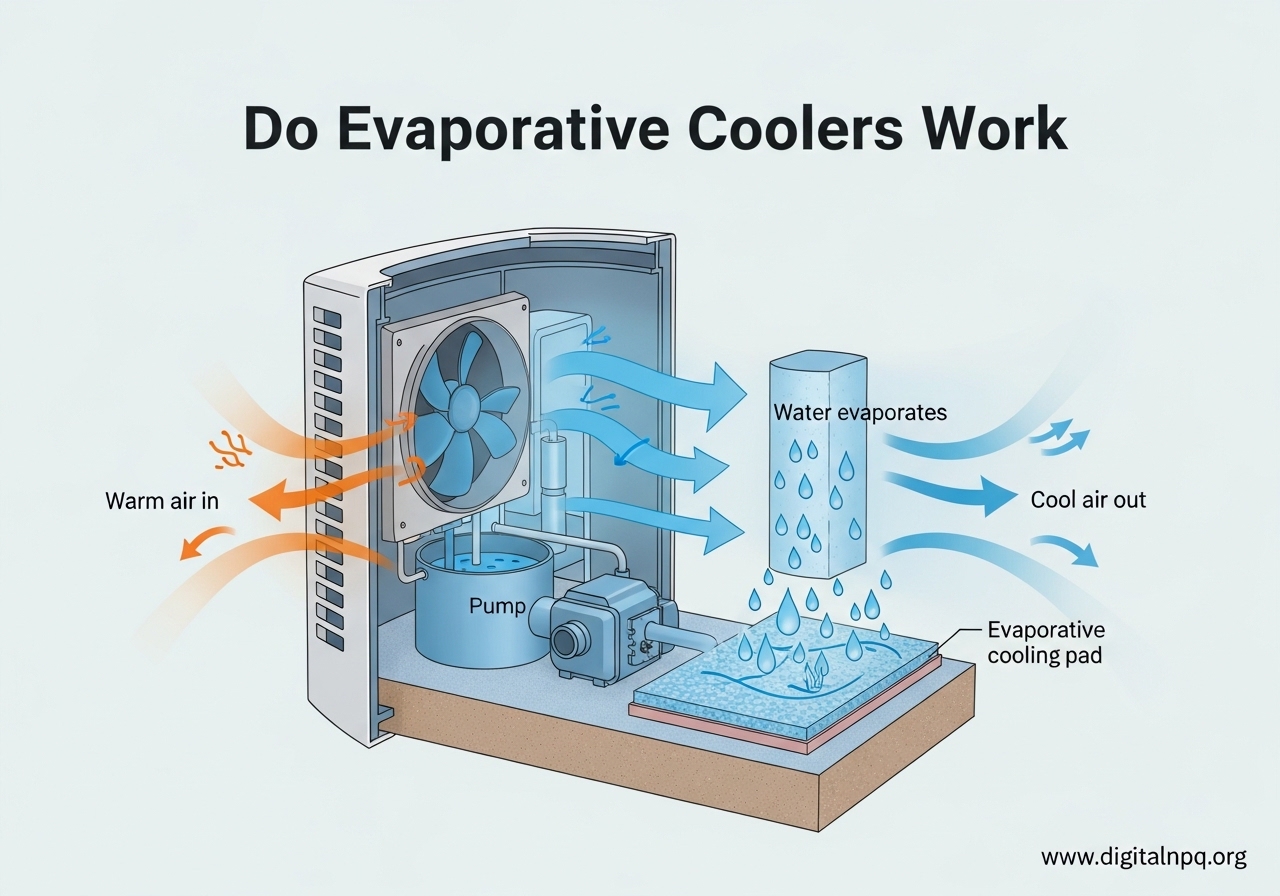
    Evaporative coolers, often called swamp coolers, use a simple natural process to lower air temperature. A pump circulates water from a reservoir onto thick cooling pads, saturating them completely.

    A powerful fan then pulls warm outside air through these wet pads, and as the water evaporates, it absorbs heat from the air stream. The result is a steady flow of cooler, slightly humid air pushed into your room or house.

    This is the same cooling principle your body uses when you sweat. On a hot day, moisture on your skin evaporates and pulls heat away from your body.

    An evaporative cooler does this on a larger scale, using water-soaked pads as the “skin” and a fan to force the air movement. The process requires no refrigerants, no compressor, and no complex mechanical parts beyond a water pump and a blower.

    The science behind this is called the wet-bulb temperature. When water evaporates, it changes from a liquid to a gas, and that phase change requires energy.

    The energy comes from the heat in the surrounding air, which drops the air temperature. The theoretical limit of cooling is the wet-bulb temperature, which is the lowest temperature air can reach through evaporation alone.

    In dry air, the wet-bulb temperature can be 30 to 40 degrees below the actual air temperature. In humid air, the gap shrinks to just a few degrees because the air is already close to saturated with moisture.

    The pads are typically made of cellulose, aspen wood fibers, or synthetic materials designed to hold water while allowing maximum airflow. Higher-quality pads with more surface area can saturate the air more effectively, which increases cooling performance.

    The Department of Energy notes that two-stage evaporative coolers, which use a pre-cooler and more advanced media, can achieve even lower temperatures than single-stage units, though they cost more upfront. Aspen pads are the traditional choice and work well for basic units, but cellulose pads with a honeycomb structure last longer and provide more consistent cooling over the season.

    Airflow is measured in cubic feet per minute, or CFM. The higher the CFM rating, the more air the unit can move, and the larger the space it can cool.

    Most residential units range from 1,000 CFM for small portable models to 7,000 CFM or more for whole-house systems. For effective cooling, you generally want 20 to 40 air changes per hour inside the space, which means the unit should circulate the total room volume that many times every sixty minutes.

    A unit with too low a CFM rating will leave hot spots and create uneven cooling throughout the room, especially in corners far from the vents.

    The water reservoir is another critical component. Portable units hold anywhere from two to ten gallons, while whole-house systems connect directly to a water line for automatic refilling.

    The pump continuously wets the pads during operation, and any water that does not evaporate drains back into the reservoir or out through a drain line. This constant water movement is what keeps the cooling process going, but it also means the unit needs a reliable water supply and occasional cleaning.

    Hard water can accelerate mineral buildup, which is why some owners install simple inline filters on the fill line to reduce scaling.

    Noise is another factor to consider when choosing a unit. The fan and pump both generate sound, and larger whole-house units can produce noticeable noise on high speed.

    Portable units are generally quieter than a window air conditioner but louder than a standard box fan. If you plan to use the cooler in a bedroom or office, look for models with variable speed settings so you can run the fan at a lower, quieter speed during sleep or work hours.

    Many users report that they get used to the white noise quickly, but light sleepers may want to test the noise level before committing to a permanent installation.

    Do Evaporative Coolers Work in Your Climate?

    Yes, evaporative coolers work exceptionally well in hot, dry climates where the air has low moisture content. The drier the air, the more water it can absorb, which means faster evaporation and greater heat removal.

    In desert regions like Arizona, New Mexico, and parts of California, these units can drop indoor temperatures by 20 to 30 degrees below the outdoor reading. A user from Albuquerque told us they keep their house at a comfortable 73 degrees even when the sun pushes the mercury past 100 outside.

    The challenge appears when relative humidity climbs above 50 percent. At that point, the air is already holding significant moisture, so it cannot absorb much more from the cooling pads.

    The evaporation rate slows down, and the cooling effect drops dramatically. In areas with 60 percent humidity or higher, an evaporative cooler may only lower the temperature by 5 degrees, or in some cases, it may simply blow warm, damp air that makes the room feel worse.

    A homeowner in Sydney reported that their evaporative cooler was “useless” during humid summer days, and they eventually switched to a portable air conditioner instead.

    The 30 percent humidity threshold is where evaporative coolers really shine. At 30 percent relative humidity or lower, the Department of Energy confirms that these units can reduce ambient temperature by 15 to 40 degrees.

    In the 30 to 50 percent range, you will still get noticeable cooling, typically 10 to 20 degrees, though the exact number depends on the unit size and airflow. Once humidity hits 60 percent, effectiveness falls off quickly.

    Above 70 percent, the unit becomes a glorified fan that adds moisture to the air rather than removing heat.

    We also found real reports from users in coastal and southern states who bought portable units expecting traditional air conditioning performance. One Reddit user in a humid climate wrote that their swamp cooler “actually made my room hotter” and left them waking up with a stuffy nose every morning.

    Another user in New Mexico explained that when their local humidity spiked to 50 percent during monsoon season, the cooler stopped producing cold air and just moved warm air around. These experiences confirm that the climate question is not a minor detail.

    It is the deciding factor.

    Seasonal variation also matters. In desert areas, July and August can bring brief monsoon periods where humidity jumps from 15 percent to 50 percent for a few weeks.

    During those windows, even loyal swamp cooler users notice a drop in performance. Some homeowners keep a small window air conditioner as a backup for those specific weeks.

    If you live in an area with unpredictable humidity spikes, you should plan for that reality rather than expecting consistent cooling all summer long.

    How Much Can an Evaporative Cooler Actually Cool?

    The amount of cooling you get depends on the starting temperature, the humidity level, and the quality of the unit. Under ideal conditions, evaporative coolers can drop the air temperature by 15 to 30 degrees.

    The Department of Energy cites a more conservative range of 5 to 15 degrees, but that figure includes performance across all humidity levels, including marginal conditions. Manufacturer Portacool reports that in extremely dry conditions, such as 125-degree air at 2 percent humidity, their industrial units can achieve reductions of up to 30 degrees.

    Here is what you can realistically expect at different humidity levels when the outside air is 100 degrees. At 10 to 20 percent humidity, a well-sized unit can bring the air down to 70 to 80 degrees.

    At 30 percent humidity, the output air typically measures 80 to 85 degrees. At 40 percent humidity, expect 85 to 90 degrees.

    At 50 percent humidity, the output may only reach 90 to 95 degrees, which is barely perceptible. At 60 percent or higher, the cooling effect becomes minimal and the unit primarily adds moisture.

    The question “do swamp coolers work in 100 degree weather?” gets asked constantly in online forums. The answer is yes, they can work in extreme heat, but only if the humidity stays low.

    In a desert climate with 100-degree air and 15 percent humidity, a swamp cooler can deliver refreshingly cool air. In a humid climate with 100-degree air and 65 percent humidity, the same unit will struggle to produce any noticeable relief.

    The temperature reading alone does not tell you enough. You need to know the relative humidity.

    Air changes per hour also matter. A unit that is too small for the room will not move enough volume to create a comfortable environment.

    The Department of Energy recommends dividing the cubic feet of your space by two to estimate the minimum CFM you need. For a 1,000 square foot room with eight-foot ceilings, that is 8,000 cubic feet, so you want a unit rated for at least 4,000 CFM.

    If you undersize the unit, even perfect climate conditions will not produce the cooling you want.

    Square footage ratings from manufacturers can be optimistic. A portable unit advertised for 500 square feet might only achieve that coverage in a perfectly dry climate with ideal ventilation.

    In real-world conditions, you should size down by about 20 percent from the manufacturer claim. That means a unit rated for 500 square feet will likely cool 400 square feet effectively.

    If you are on the borderline between two sizes, choose the larger one. The extra airflow will compensate for less-than-perfect humidity and help the unit work during those brief monsoon spikes.

    Pros and Cons of Evaporative Coolers

    Evaporative coolers offer several genuine advantages over traditional air conditioning, but they also come with limitations that you need to understand before buying. I have broken down the key points below so you can weigh them against your specific situation.

    The biggest benefit is energy efficiency. Because there is no compressor or refrigerant cycle, evaporative coolers use roughly 75 percent less electricity than standard air conditioners.

    Over a full summer, that can save hundreds of dollars on your utility bill. A whole-house evaporative cooler typically runs on a standard 120-volt outlet and draws a fraction of the amperage that a central AC compressor requires.

    In areas where electricity rates are high, the savings can pay for the unit in just a few seasons.

    Another major advantage is the constant supply of fresh air. Traditional air conditioners recirculate the same indoor air, which can trap odors, allergens, and carbon dioxide.

    An evaporative cooler pulls outside air through the pads and pushes it into the room, creating a steady exchange of fresh air. This is why many people in dry climates say the air feels better with a swamp cooler than with refrigerated air.

    The added moisture can also relieve dry skin and sinus irritation during scorching summers.

    Environmental impact is another plus. Evaporative coolers do not use chemical refrigerants like R-410A or R-32, which contribute to greenhouse gas emissions if they leak.

    They rely only on water and electricity, making them a more earth-friendly cooling option. The Wirecutter team noted this in their testing, and our research confirmed that the refrigerant-free design is a real selling point for environmentally conscious buyers.

    When you factor in the lower electricity draw from power plants, the overall carbon footprint is significantly smaller than traditional air conditioning.

    On the downside, evaporative coolers increase indoor humidity. In a dry climate, this is often welcome.

    In a humid climate, it can create a sticky, uncomfortable environment and promote condensation on windows and surfaces. The humidity increase is the single most common complaint we found in forum discussions.

    Users in moderate humidity reported that their homes felt “dank” after running the cooler for a few hours.

    Water usage is another concern. Depending on the unit size and runtime, an evaporative cooler can use several gallons of water per hour.

    A whole-house system running continuously might consume 10 to 25 gallons per day. In drought-prone areas, this water cost adds up, and some users expressed guilt about the environmental trade-off.

    Portable units use less, typically 1 to 3 gallons per hour, but they also cool smaller spaces. One user in California noted that their water bill increased by about $15 per month during peak summer, which was still far less than their old AC electric bill.

    The ventilation requirement is a practical limitation that catches many first-time buyers off guard. Evaporative coolers work by pushing air into the space, which means an equal volume of air must exit the room to prevent pressure buildup.

    You must open windows or doors to allow exhaust airflow. This runs counter to the instinct of sealing up the house to keep hot air out.

    In forums, users frequently asked whether they really needed to open windows, and the answer is always yes. Without an exit path, the unit cannot function properly.

    Finally, maintenance demands are higher than with a traditional AC. The cooling pads need replacement every one to three years, and the water reservoir requires regular cleaning.

    Mineral buildup from hard water can clog the pump and lines. Users who neglect these tasks often report reduced performance, musty odors, and eventually mold problems.

    We will cover prevention strategies in the maintenance section below. The cost of pads and cleaning supplies is low, but the time commitment is real and should not be underestimated.

    Installation and Ventilation Requirements

    Installing an evaporative cooler is simpler than installing central air conditioning, but it still requires attention to airflow and placement. Whole-house units are typically mounted on the roof or an exterior wall, with a duct that connects to the existing HVAC system or a dedicated vent network.

    Portable units just need a power outlet, water supply, and a venting strategy. The core principle is the same for both: air must be able to flow through the space and exit the building.

    The reason you must open a window is simple physics. The cooler pumps a steady stream of air into the room, which increases the air pressure inside.

    If the room is sealed, the pressure prevents new air from entering, and the fan simply recirculates the same volume without cooling it. By opening a window on the opposite side of the room from the cooler, you create a cross-draft that allows the incoming cool air to push the warmer, slightly humid air outside.

    The Department of Energy recommends opening windows or installing up-ducts in the ceiling to vent the exhaust air into the attic, where it can escape through existing vents.

    The amount of window opening matters. Too little, and the air cannot escape. Too much, and you lose the cooling effect because the air moves too quickly through the room.

    A good rule of thumb is to open windows just enough to create a gentle airflow at the exit point. You should feel a slight breeze at the open window, but not a strong gust.

    Some users install simple exhaust vents or trickle vents that allow a controlled airflow without creating a security risk. If you are worried about leaving windows open, consider installing window locks that limit the opening to a few inches, or use vent-only mode on the cooler if your model supports it.

    Placement also affects performance. A rooftop unit should be positioned on the downwind side of the house so prevailing winds do not fight the exhaust airflow.

    Ground-mounted units should sit in a shaded spot if possible, since feeding the unit already-hot air from direct sunlight reduces efficiency. Portable units work best when placed near an open window or door so the exhaust air has a direct path outside.

    One garage owner told us they run four portable evaporative coolers from Hessaire and position each near a partially open garage door for maximum airflow, and the setup works well for their workshop.

    Winterization is a step that many homeowners skip, leading to roof leaks and damaged ducts. Before the first freeze, shut off the water supply, drain all lines and the reservoir, and cover the unit with a weatherproof tarp.

    Whole-house units mounted on the roof are especially vulnerable to ice damage if water remains in the pan. Some units have a winter damper that blocks the duct to prevent cold air from entering the house during the off-season.

    Check your manual for the specific procedure, because a frozen water line can crack the housing and create expensive repairs.

    Maintenance, Water Usage, and Mold Prevention

    Keeping an evaporative cooler running well requires regular upkeep that goes beyond dusting the vents. The water system, pads, and housing all need attention to prevent performance loss and health issues.

    I have talked to users who ran their units for years without problems, and I have also read reports from people who gave up after one season because of mold or mineral buildup. The difference is usually maintenance.

    Water usage varies by unit size and runtime. Portable models typically consume 1 to 3 gallons per hour.

    Whole-house systems can use 5 to 15 gallons per hour depending on the cooling pad area and fan speed. Over a 12-hour day, that adds up to 60 to 180 gallons for a large system.

    If you live in an area with water restrictions, this is a real cost to factor in. Some users collect the drain water for gardening or lawn irrigation to reduce waste.

    Newer units with automatic water feed systems can be more efficient than older models that run continuously.

    Mineral buildup is the most common mechanical problem. As water evaporates, it leaves behind calcium, magnesium, and other dissolved solids on the pads and in the reservoir.

    Over time, these minerals clog the pump, reduce pad saturation, and create white dust that can blow into the room. The fix is straightforward: drain and scrub the reservoir at least once per month during heavy use, and use a mild descaling solution if you have hard water.

    Some users add a small amount of white vinegar to the reservoir periodically to dissolve buildup. Replacing the pads annually or biannually prevents the worst of this issue.

    Mold and mildew prevention is the concern that keeps many potential buyers from pulling the trigger. Any device that constantly wets porous material and circulates air can become a mold factory if neglected.

    The key is to never let the pads sit wet and stagnant when the unit is off. Always run the fan-only mode for 30 minutes after turning off the water pump to dry the pads completely.

    At the end of the season, drain the reservoir, remove the pads, and let every component dry fully before storing. During the season, clean the reservoir with a mild disinfectant every two weeks to kill any spores before they spread.

    Another tip from long-term users is to avoid letting the unit run continuously at low speed. Stagnant water in the reservoir warms up, which encourages bacterial growth.

    Running the unit at higher speeds for shorter periods keeps the water circulating and cooler. If you smell a musty odor when the unit starts, that is a warning sign that mold or bacteria is already present.

    Disassemble the unit, clean every surface with a diluted bleach solution, and replace the pads immediately. Do not ignore the smell, because the unit will blow those spores directly into your living space.

    Water quality matters more than most people realize. If your tap water is very hard, consider using a water softener or filtered water for the reservoir.

    Hard water not only creates mineral buildup faster, but the white dust it generates can coat furniture and electronics. Some whole-house systems have a bleed-off valve that continuously drains a small amount of water to reduce mineral concentration.

    This increases water usage slightly but extends the life of the pads and pump significantly. Check whether your unit has this feature, and if not, manually drain and refill the reservoir every few days during peak use.

    Portable vs Whole-House Evaporative Coolers

    Not all evaporative coolers serve the same purpose. The two main categories are portable units and whole-house systems, and the right choice depends on your budget, space, and cooling goals.

    I have used both in different settings, and each has clear strengths and weaknesses.

    Portable evaporative coolers are the boxy units you see rolling on casters at hardware stores. They typically cool 200 to 1,000 square feet and plug into a standard wall outlet.

    You fill the reservoir manually or connect a garden hose, and you position the unit near an open window. These work best for garages, workshops, patios, or single rooms in an apartment.

    A Reddit user in a dry climate reported that their Hessaire portable unit works well for a small bedroom, but they would not expect it to cool an entire open-plan house. Portable units are affordable, usually costing between $100 and $500, and they require no installation.

    Whole-house evaporative coolers are mounted on the roof or exterior wall and connect to your home’s ductwork. They cost more upfront, typically $1,500 to $4,000 installed, but they can cool 2,000 square feet or more.

    They also connect directly to a water line, so you never have to refill a reservoir. The Department of Energy recommends these for dry climates where homeowners want an energy-efficient alternative to central air.

    The downside is that you need existing ductwork or a willingness to install it, and the roof mounting requires professional installation to prevent leaks.

    For garages, outdoor kitchens, and workshops, portable units are the practical choice. One user told us they run four portable units in a large auto shop and the combined effect keeps the workspace comfortable during afternoon heat.

    For residential homes in arid regions, a whole-house system pays for itself over time through lower electricity bills. The break-even point depends on your local utility rates, but many users report saving $200 to $500 per summer compared to running central air conditioning.

    Some homeowners use a hybrid approach. They run a whole-house evaporative cooler during the dry early summer months, then switch to refrigerated air conditioning during the monsoon season when humidity spikes.

    This gives them the cost savings of evaporative cooling for most of the season without suffering through the humid weeks. If you already have central AC and are considering adding a swamp cooler, talk to an HVAC contractor about whether your ductwork can handle both systems.

    In some cases, the transition is as simple as closing a few dampers.

    Common Mistakes First-Time Buyers Make

    After reading through hundreds of forum posts and user reviews, I noticed the same mistakes appearing over and over. The first and most expensive error is buying an evaporative cooler for a humid climate without checking local humidity averages.

    Many buyers see the low price and energy efficiency claims, then assume it will work like an air conditioner. When it fails to cool, they blame the product rather than the environment.

    Always check your summer humidity data before you spend a dollar.

    The second mistake is buying a unit that is too small for the space. Manufacturers often list optimistic square footage ratings that assume perfect conditions.

    In reality, you need more airflow than the box suggests. If you are cooling a 500 square foot garage in a dry climate, buy a unit rated for 700 square feet or more.

    The extra capacity compensates for heat from the roof, door gaps, and equipment that generates warmth. Undersizing leads to disappointment, even when the humidity is perfect.

    The third mistake is forgetting the ventilation requirement. I have seen users seal every window and door, then complain that the cooler is just blowing warm air around.

    You need an exit path for the air. Open a window on the far side of the room, or install a vent.

    Without this, the unit will simply pressurize the room and recirculate the same warm air. The physics is non-negotiable, and no amount of fan speed will fix a sealed room.

    The fourth mistake is neglecting winterization. Water left in the lines and reservoir freezes in cold climates, cracking pipes and damaging the pump.

    A whole-house unit left unprotected on a roof can develop leaks that rot the decking below. The fix takes 30 minutes at the end of the season: drain everything, remove the pads, and cover the unit.

    Skipping this step is an expensive gamble that can cost hundreds in repairs.

    Frequently Asked Questions

    Do evaporative coolers actually cool the room?

    Yes, evaporative coolers do cool the room in dry climates. They draw warm air through water-soaked pads, and the evaporation process removes heat from the air before circulating it into your space. In humid conditions, the effect is much weaker.

    Do swamp coolers work in 100 degree weather?

    Swamp coolers can work in 100 degree weather if the humidity is low. In dry climates with humidity below 30 percent, they can reduce the temperature by 15 to 30 degrees. If humidity is above 50 percent, the cooling effect drops significantly even at 100 degrees.

    Do I need to open a window with an evaporative cooler?

    Yes, you must open a window or door to allow air to exit the room. Evaporative coolers push air into the space, and without an exhaust path, pressure builds up and the cooling stops. Cross-ventilation is necessary for the unit to work properly.

    What are the disadvantages of evaporative coolers?

    The main disadvantages are increased indoor humidity, higher water usage, the need for open ventilation, and regular maintenance. They also lose effectiveness in humid climates above 50 percent relative humidity and require pad replacement and reservoir cleaning to prevent mold.

    At what point do evaporative coolers become ineffective?

    Evaporative coolers become ineffective when relative humidity reaches 60 percent or higher. At 50 percent humidity, performance drops noticeably. They work best at 30 percent humidity or below, where evaporation happens rapidly and removes the most heat.

    Do evaporative coolers use a lot of water?

    Portable units use 1 to 3 gallons per hour, while whole-house systems can use 5 to 15 gallons per hour. Daily consumption for a large system may reach 60 to 180 gallons during continuous operation. Water usage is an important factor if you live in a drought-prone region.

    Do Evaporative Coolers Work?

    Do evaporative coolers work? After reviewing government data, manufacturer claims, and hundreds of real user experiences, I can say with confidence that they do work, but only in the right environment.

    If you live in a hot, dry climate with humidity consistently below 50 percent, an evaporative cooler can provide affordable, energy-efficient cooling that rivals traditional air conditioning at a fraction of the operating cost. The fresh air, low electricity draw, and simple mechanics make it a smart choice for desert regions and arid areas.

    If your local humidity regularly climbs above 60 percent, a swamp cooler is not the right tool for your home. You will be disappointed by the weak cooling, frustrated by the humidity increase, and potentially dealing with mold issues down the line.

    In those climates, a standard air conditioner or heat pump is the better investment. The key is to check your local humidity averages before you buy.

    Look up your summer humidity data online, or ask a local HVAC contractor for an honest assessment. Armed with that information, you can make a choice that actually keeps your home comfortable through the hottest months of 2026.

  • How Much Electricity Does a Ceiling Fan Use (August 2026)

    How Much Electricity Does a Ceiling Fan Use (August 2026)

    If you have ever stared at your summer electricity bill and wondered whether your ceiling fan is partly to blame, you are asking the right question. The short answer: probably not. Ceiling fans are among the lowest-energy appliances in any home, but the exact cost depends on a few factors worth understanding.

    In this guide, we break down exactly how much electricity does a ceiling fan use, from wattage by size and motor type to real-world cost calculations you can apply to your own home. We looked at actual user reports, manufacturer specs, and energy rate data to give you numbers you can trust.

    By the end, you will know what your ceiling fan costs per hour, per day, and per month, and how to cut those costs even further.

    Quick Answer: How Much Electricity Does a Ceiling Fan Use

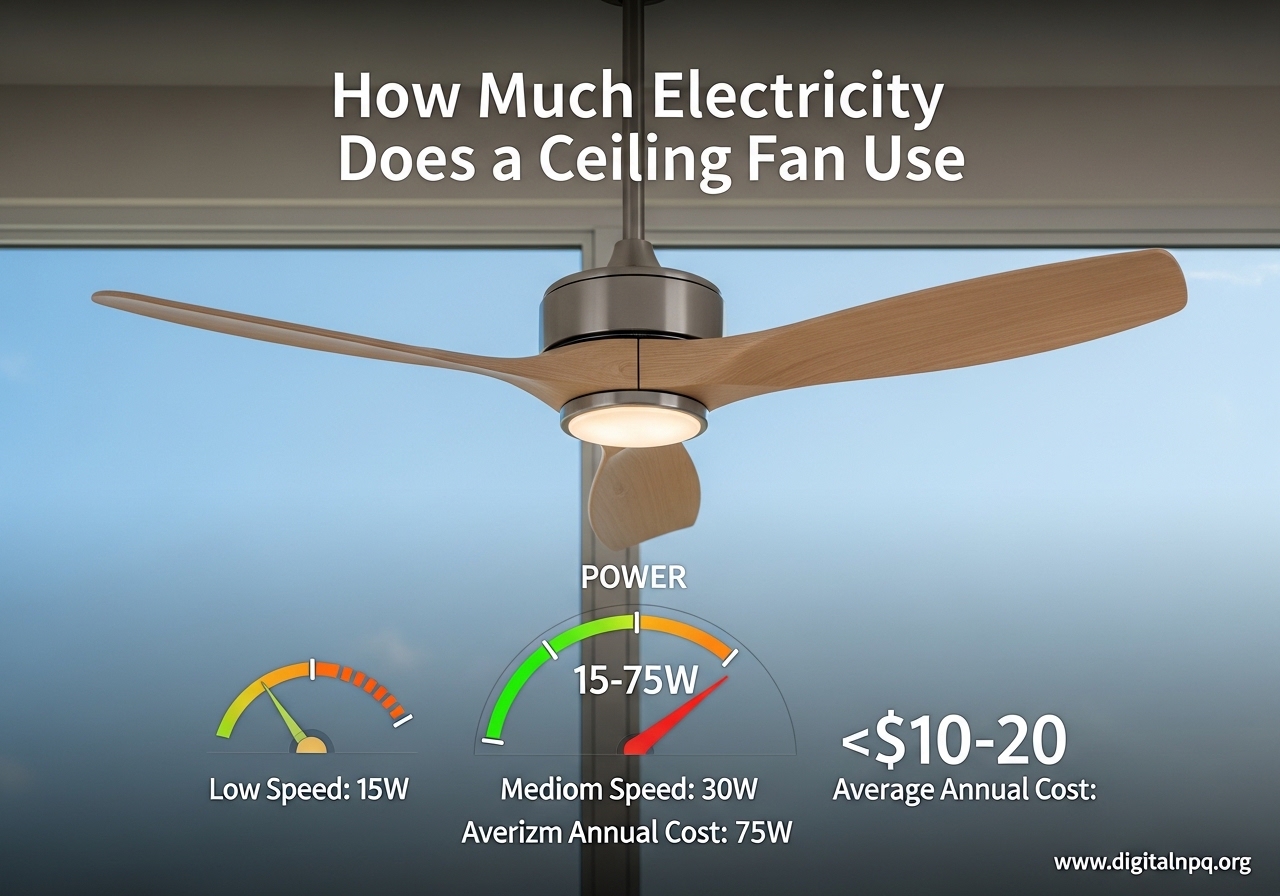
    A standard 48-inch ceiling fan uses about 75 watts of electricity on high speed. At the average U.S. electricity rate of $0.16 per kilowatt-hour (kWh), that translates to roughly $0.01 per hour to run.

    Here is what that looks like across common timeframes:

    • Per hour: $0.01 (about 1 cent)
    • Per day (8 hours): $0.10
    • Per day (24 hours): $0.29
    • Per month (running 24/7): about $6 to $8
    • Per year (running 24/7): about $70 to $100

    Most ceiling fans fall in the 15 to 100 watt range depending on their size, motor type, and speed setting. For comparison, a central air conditioner uses 500 to 3,000 watts, making a ceiling fan roughly 98% more energy-efficient than running your AC alone.

    Real users on forums like r/Frugal and r/homeowners confirm these numbers, consistently reporting monthly costs of about $5 to $8 for a single fan running around the clock. One Reddit user tracked their ceiling fan running 24/7 over an entire summer and reported a monthly increase of just $6 on their electricity bill.

    Understanding Ceiling Fan Power Consumption

    Before we get into specific numbers, it helps to understand the basic units of electricity measurement. A watt (W) measures how much power an appliance draws at any given moment. A kilowatt-hour (kWh) measures how much energy gets used over time. One kilowatt-hour equals 1,000 watts running for one hour.

    The formula to calculate any appliance’s electricity cost is simple:

    Watts x Hours Used / 1,000 x Electricity Rate = Cost

    So if your 75-watt ceiling fan runs for 8 hours at a rate of $0.16/kWh, the math looks like this: 75 x 8 / 1,000 x $0.16 = $0.096, or about 10 cents.

    Ceiling fans also draw a small amount of current measured in amps. A typical residential ceiling fan pulls between 0.5 and 1.5 amps on a standard 120-volt circuit. This is well within the capacity of most household wiring, which handles 15-amp circuits as standard.

    The national average electricity rate in the U.S. sits around $0.16 per kWh as of 2026, but your actual rate could be higher or lower. Residents in states like Connecticut or California may pay $0.25 to $0.30 per kWh, while states like Louisiana or Washington pay closer to $0.10 to $0.12 per kWh. Your local rate directly affects what your fan costs to run.

    Ceiling Fan Wattage by Size and Type

    Not all ceiling fans use the same amount of power. The blade span is one of the biggest factors in how much electricity a ceiling fan uses. Larger fans need more powerful motors to push more air, which means higher wattage.

    Small Ceiling Fans (29 to 36 Inches)

    These compact fans are designed for small rooms, bathrooms, and walk-in closets. They typically use between 15 and 45 watts on high speed. Even running 24 hours a day, a small 30-inch fan at 25 watts costs less than $3 per month at the national average rate.

    Medium Ceiling Fans (42 to 48 Inches)

    This is the most common size for bedrooms and medium-sized living spaces. A standard 48-inch ceiling fan uses about 45 to 75 watts on high. At 60 watts running 8 hours per day, you are looking at roughly $2.30 per month.

    Large Ceiling Fans (52 to 60 Inches)

    These fans cover large living rooms, open-plan spaces, and master bedrooms. Expect power draw between 60 and 100 watts on the highest setting. A 52-inch fan at 75 watts running 12 hours a day costs about $4.30 per month.

    Extra-Large and Industrial Ceiling Fans (60+ Inches)

    Fans designed for warehouses, large great rooms, or outdoor patios can draw 100 to 200 watts or more. Industrial-grade fans pushing heavy air volumes use significantly more power but still cost far less than air conditioning the same space.

    How Speed Settings Change Wattage

    A ceiling fan does not use its maximum wattage on every speed. The difference between low and high can be dramatic:

    • Low speed: typically 10 to 30 watts
    • Medium speed: typically 20 to 55 watts
    • High speed: typically 40 to 100 watts

    This means running your fan on medium instead of high can cut its electricity use by 30 to 50 percent while still providing decent air circulation.

    DC Motor vs AC Motor: Which Uses Less Electricity

    The type of motor inside your ceiling fan has a major impact on how much electricity it uses. There are two main types: traditional AC (alternating current) motors and newer DC (direct current) motors.

    AC Motor Ceiling Fans

    AC motor fans have been the standard for decades. They are simple, reliable, and affordable. However, they typically draw between 50 and 100 watts on high speed. Most basic and mid-range ceiling fans you find at big-box stores use AC motors.

    AC motors operate at a fixed number of speeds (usually three), and they tend to use more electricity at every speed level compared to DC equivalents. They also generate more heat during operation, which represents wasted energy.

    DC Motor Ceiling Fans

    DC motor fans are the newer, more efficient option. They use significantly less power, typically between 10 and 40 watts on high speed. That is up to 70% less electricity than an equivalent AC motor fan.

    DC motors also offer more speed settings (often six or more), run quieter, and produce less heat. Many modern DC fans include a BLDC (brushless DC) motor, which eliminates the friction and wear of traditional brushed motors. BLDC motors are even more efficient and tend to last longer because there are no brushes to wear out.

    Real Savings Comparison

    Let us look at the actual numbers. If you run a fan 12 hours a day for 6 months of the year:

    • AC motor fan (75W): about $42 per year
    • DC motor fan (25W): about $14 per year
    • Annual savings: about $28 per fan

    That might not sound like much for a single fan, but if you have four or five ceiling fans in your home, the savings add up to over $100 per year. Over the 10 to 15 year lifespan of the fans, you are looking at $1,000 or more in cumulative savings.

    Forum users on r/AskElectricians frequently confirm that DC motor fans are worth the higher upfront cost for anyone who runs their fans extensively. One electrician noted that the power savings alone typically pay back the price difference within two to three years.

    Real-World Cost Calculations: Per Hour, Day, Month, and Year

    Let us walk through detailed cost calculations using the national average electricity rate of $0.16 per kWh. We will look at a standard 48-inch fan at 75 watts and a DC motor fan at 25 watts.

    Cost Per Hour

    For a standard 75-watt ceiling fan:

    75 watts / 1,000 = 0.075 kWh per hour

    0.075 kWh x $0.16 = $0.012 per hour (about 1.2 cents)

    For a 25-watt DC motor fan:

    25 / 1,000 = 0.025 kWh x $0.16 = $0.004 per hour (less than half a cent)

    Cost Per Day

    Running a 75-watt fan for different durations:

    • 4 hours: $0.05
    • 8 hours: $0.10
    • 12 hours: $0.14
    • 24 hours: $0.29

    Even running nonstop around the clock, a single ceiling fan costs less than 30 cents per day.

    Cost Per Month

    Monthly costs for a 75-watt fan:

    • 8 hours per day: $2.88
    • 12 hours per day: $4.32
    • 24 hours per day (24/7): $8.64

    Forum users on r/Frugal consistently report similar numbers. Multiple users confirmed that running a standard ceiling fan around the clock adds roughly $5 to $8 to their monthly bill, which lines up closely with these calculations.

    Cost Per Year

    Annual costs for a 75-watt fan:

    • 8 hours per day: $35
    • 12 hours per day: $52
    • 24 hours per day: $105

    Compare that to a central air conditioner running 8 hours a day during summer months, which can cost $600 to $1,200 per year. The ceiling fan is a rounding error by comparison.

    How Your State Changes the Math

    Your local electricity rate significantly impacts your actual cost. Here is how the same 75-watt fan running 24/7 compares across different states:

    • Louisiana ($0.11/kWh): about $5.94/month
    • National average ($0.16/kWh): about $8.64/month
    • California ($0.27/kWh): about $14.58/month
    • Connecticut ($0.30/kWh): about $16.20/month

    Even in the most expensive states, running a ceiling fan 24/7 costs less than $17 per month. That is still far cheaper than any air conditioning alternative.

    Ceiling Fan vs Air Conditioner: Electricity Cost Comparison

    One of the most common questions homeowners ask is whether it is cheaper to run a ceiling fan or an air conditioner. The answer is not even close.

    Hourly Cost Comparison

    Here is how common cooling options stack up per hour of use:

    • Ceiling fan: $0.01 to $0.02 per hour
    • Box fan: $0.01 to $0.03 per hour
    • Window AC unit (8,000 BTU): $0.10 to $0.20 per hour
    • Window AC unit (12,000 BTU): $0.15 to $0.30 per hour
    • Central AC (2.5 ton): $0.30 to $0.80 per hour
    • Central AC (5 ton): $0.50 to $1.50 per hour

    A ceiling fan uses roughly 1/50th the electricity of a central air conditioning system. Even a small window AC unit uses 10 to 20 times more power than a ceiling fan.

    The Combined Strategy That Saves the Most

    The smartest approach is not choosing between a fan or AC. It is using both together. Running ceiling fans while raising your thermostat by 4 degrees Fahrenheit lets you feel just as comfortable while cutting your AC runtime by 10 to 15 percent.

    Here is the math on that strategy. If your central AC costs $150 per month to run, raising the thermostat 4 degrees with ceiling fans could save you $15 to $22 per month. Meanwhile, the fans running in three rooms cost you about $18 to $25 per month total. But the net reduction in AC load often results in an overall bill decrease.

    Users on r/homeowners consistently report that this combined approach drops their summer electricity bill by $30 to $50 per month compared to running the AC alone at a lower thermostat setting.

    Box Fans vs Ceiling Fans

    Box fans and portable fans are also cheap to run, typically drawing 40 to 100 watts. However, they are less effective at circulating air through an entire room. A ceiling fan mounted in the center of a room distributes air more evenly and creates a more consistent wind-chill effect. For the same or lower power draw, a ceiling fan provides better whole-room comfort.

    Ceiling Fans with Light Kits: Extra Electricity Costs

    One factor many people overlook is the electricity consumed by the light fixture attached to their ceiling fan. The light kit can actually use more power than the fan itself, depending on the type of bulbs installed.

    Light Kit Power Consumption by Bulb Type

    • LED bulbs: 5 to 15 watts per bulb (most common modern kits have 3 to 4 bulbs, so 15 to 60 watts total)
    • CFL bulbs: 15 to 30 watts per bulb (45 to 120 watts total for a multi-bulb kit)
    • Incandescent bulbs: 40 to 60 watts per bulb (120 to 240 watts total for a 3-4 bulb kit)

    If you have an older ceiling fan with incandescent bulbs, the light kit could be adding $15 to $40 per month to your electricity bill if the lights run several hours a day. Swapping to LED bulbs brings that cost down to $2 to $8 per month.

    Total Cost When Fan and Lights Run Together

    For a ceiling fan with a modern 3-bulb LED light kit running 8 hours a day:

    • Fan (75W): $2.88/month
    • LED lights (30W total): $1.15/month
    • Combined: $4.03/month

    That is still remarkably cheap. But if you have older incandescent bulbs, the light kit alone could cost more than the fan. This is one of the easiest and fastest energy upgrades you can make in your home.

    How to Reduce Your Ceiling Fan Electricity Usage

    Even though ceiling fans are already cheap to run, there are several ways to lower their electricity consumption even further. Here are the strategies that make the biggest difference.

    1. Turn Off the Fan When You Leave the Room

    This is the most important tip, and it contradicts what many people assume. Ceiling fans do not cool rooms. They cool people by creating a wind-chill effect on your skin. If nobody is in the room, the fan is wasting electricity while providing zero benefit.

    A fan running in an empty bedroom for 16 hours a day wastes about $1.90 per month. Across multiple rooms, that adds up. Make it a habit to switch off fans when you walk out.

    2. Use the Correct Seasonal Direction

    Your ceiling fan has a direction switch on the motor housing. Using it correctly makes a real difference in comfort and energy savings:

    • Summer (counterclockwise): pushes air down, creating a cooling breeze. This lets you raise the AC thermostat 4 degrees.
    • Winter (clockwise at low speed): pulls air up, forcing warm air trapped at the ceiling down along the walls. This can reduce heating costs by circulating warm air more evenly.

    Most people never touch the direction switch, which means they miss out on free energy savings every winter.

    3. Choose Energy Star Certified Fans

    Energy Star certified ceiling fans are tested and verified to use less energy than standard models. According to the EPA, Energy Star fans move air 20% more efficiently on average, and some models are up to 60% more efficient than conventional fans.

    These fans meet strict criteria for both airflow (measured in CFM, or cubic feet per minute) and energy consumption (measured in CFM per watt). An Energy Star fan delivering the same comfort as a standard fan will do it while drawing significantly fewer watts.

    4. Opt for a DC Motor Fan

    As covered earlier, DC motor fans use up to 70% less electricity than AC motor fans. If you are replacing an old fan or installing a new one, spending slightly more on a DC motor model pays for itself in energy savings within a few years.

    DC fans also offer more speed options, run quieter, and tend to last longer due to fewer moving parts in the motor assembly.

    5. Keep the Fan Clean

    Dust buildup on fan blades adds weight and disrupts airflow, forcing the motor to work harder. A clean fan runs more efficiently and uses slightly less power. Wipe down the blades and motor housing every few weeks, especially during peak usage months.

    6. Consider Smart Fan Technology

    Smart ceiling fans connect to your home Wi-Fi and can be controlled through an app or voice assistant. Many include features like occupancy sensing, thermostat integration, and scheduling. Smart fans can reduce fan energy use by up to 11% by automatically turning off when nobody is in the room.

    Some models also integrate with your smart thermostat, adjusting fan speed based on room temperature and occupancy patterns.

    7. Raise Your Thermostat When Using Fans

    The single biggest money-saving strategy is combining ceiling fans with a higher AC thermostat setting. Each degree you raise your thermostat saves roughly 3% on cooling costs. If your ceiling fans let you raise the thermostat from 72 to 76 degrees, you save about 12% on your AC bill while staying just as comfortable.

    For a household spending $200 per month on cooling, that is a savings of $24 per month, far exceeding the $5 to $10 the fans cost to run.

    Factors That Affect Ceiling Fan Electricity Consumption

    Beyond size and motor type, several other variables influence how much power your ceiling fan draws.

    Speed Setting

    We touched on this earlier, but it is worth emphasizing. A fan on low speed may use only 10 to 15 watts, while the same fan on high could draw 70 to 100 watts. That is a 5x to 7x difference. If you only need gentle air circulation, dropping from high to medium can cut the fan’s electricity use nearly in half.

    Fan Age and Condition

    Older fans with worn bearings, unbalanced blades, or degraded motors draw more power than when they were new. A fan that is 15 years old might use 10 to 20% more electricity than it did when new, while also moving less air. If your fan wobbles, makes noise, or spins slower than it used to, it is working harder and wasting energy.

    Blade Pitch and Material

    Blade pitch (the angle of the blades) affects how much air the fan moves and how hard the motor works. Fans with steeper blade pitches move more air but require more power. Lighter blade materials (like composite or aluminum) reduce the load on the motor compared to heavier solid wood blades.

    Standby Power for Smart Fans

    Ceiling fans with remote controls, Wi-Fi modules, or smart features draw a small amount of power even when turned off. This standby power is typically 1 to 3 watts. Over a year, that adds up to about $1.50 to $4.20 in wasted electricity per fan. It is a small amount, but worth knowing about if you are trying to minimize every watt.

    Stalled or Obstructed Fans

    Forum users on r/AskElectricians frequently ask whether a stalled or frozen ceiling fan consumes extra power. The answer is that a stalled fan motor draws more current than a spinning one because it cannot generate back-EMF (the resistance that a spinning motor naturally creates). However, the difference is modest and most modern fans have thermal protection that shuts the motor off if it stalls. Still, if your fan is not spinning properly, get it fixed or replaced rather than letting it sit there straining.

    Frequently Asked Questions

    How much does it cost to run a ceiling fan on high for 24 hours?

    Running a standard 75-watt ceiling fan on high for 24 hours straight costs about $0.29 at the national average electricity rate of $0.16 per kWh. That is less than 30 cents for a full day of continuous operation. A more efficient DC motor fan (25W) would cost only about $0.10 for the same 24-hour period.

    Is it better to leave a ceiling fan on all the time or turn it off?

    You should turn off ceiling fans when you leave a room. Ceiling fans cool people, not rooms, by creating a wind-chill effect on your skin. If nobody is in the room to feel the breeze, the fan is using electricity without providing any cooling benefit. Turning fans off in empty rooms is one of the easiest ways to avoid unnecessary energy waste.

    Do ceiling fans run up your electric bill?

    No, ceiling fans do not significantly run up your electric bill. A standard ceiling fan costs about $0.01 per hour to run, or roughly $6 to $8 per month even if left on 24 hours a day. That is a fraction of what air conditioning costs. In fact, using ceiling fans alongside your AC can lower your overall electricity bill by allowing you to raise the thermostat 4 degrees.

    What runs up your electric bill the most?

    The biggest electricity consumers in most homes are heating and cooling systems (HVAC), water heaters, clothes dryers, and refrigerators. Central air conditioning alone can account for 40 to 60 percent of summer electricity costs. Ceiling fans, by comparison, typically represent less than 1 percent of total household energy use.

    Do ceiling fans take up a lot of electricity?

    No, ceiling fans use very little electricity. Most residential ceiling fans draw between 15 and 100 watts, depending on size and speed. Even the largest fans running on high use less power than a single incandescent light bulb. They are one of the most energy-efficient ways to improve comfort in your home.

    How much electricity does a ceiling fan use in 1 hour?

    A standard 48-inch ceiling fan uses about 0.075 kWh of electricity in one hour when running on high speed (75 watts). Smaller fans on low speed may use as little as 0.01 kWh per hour. In dollar terms, running a typical ceiling fan for one hour costs about 1 cent at the national average electricity rate.

    How much does it cost to run a ceiling fan for 1 hour?

    Running a standard ceiling fan for one hour costs approximately $0.01 (one cent) at the national average electricity rate of $0.16 per kWh. Very efficient DC motor fans cost even less, at about $0.004 per hour. Even in states with high electricity rates like Connecticut or California, the hourly cost rarely exceeds 2 to 3 cents.

    How much money does a ceiling fan use in 24 hours?

    A standard 75-watt ceiling fan running continuously for 24 hours uses about $0.29 worth of electricity at the national average rate. That translates to roughly $8.64 per month if left on around the clock. A DC motor fan running 24 hours costs only about $0.10 per day, or roughly $2.88 per month.

    Conclusion

    So, how much electricity does a ceiling fan use? In most homes, the answer is surprisingly little. A standard ceiling fan draws 15 to 100 watts, costs about 1 cent per hour to run, and adds roughly $6 to $8 per month to your electricity bill even if you never turn it off.

    The real value of a ceiling fan is not in replacing your air conditioner. It is in supplementing it. By running ceiling fans and raising your thermostat 4 degrees, you can reduce your overall cooling costs by 10 to 15 percent, which saves far more money than the fans cost to operate.

    If you want to minimize your ceiling fan’s electricity usage, focus on three things: switch to DC motor fans for up to 70% less power consumption, turn fans off in empty rooms, and swap any incandescent light kit bulbs for LEDs. These simple steps cost very little and can shave several dollars off your monthly bill.

    Ceiling fans remain one of the cheapest, most effective ways to stay comfortable at home without breaking the bank on energy costs. Now you have the numbers to prove it.

  • How to Install a Tankless Water Heater (August 2026): Guide

    How to Install a Tankless Water Heater (August 2026): Guide

    Switching to a tankless water heater is one of the smartest upgrades you can make for your home in 2026. You get endless hot water, lower energy bills, and a unit that lasts up to 20 years.

    The catch is that installation is not a simple swap-and-plug job. In this guide, I will walk you through exactly how to install a tankless water heater, whether you are working with gas or electric.

    You will learn what tools to gather, how to prepare your space, the step-by-step process for both fuel types, and the safety rules that keep your family protected. I have spent years studying home improvement projects and talking to licensed plumbers, so I will also tell you when it is smarter to hire a professional instead of going DIY.

    Before you touch a pipe or wire, you need to understand what makes a tankless unit different from the big tank in your basement. A tankless water heater does not store 40 or 50 gallons of hot water.

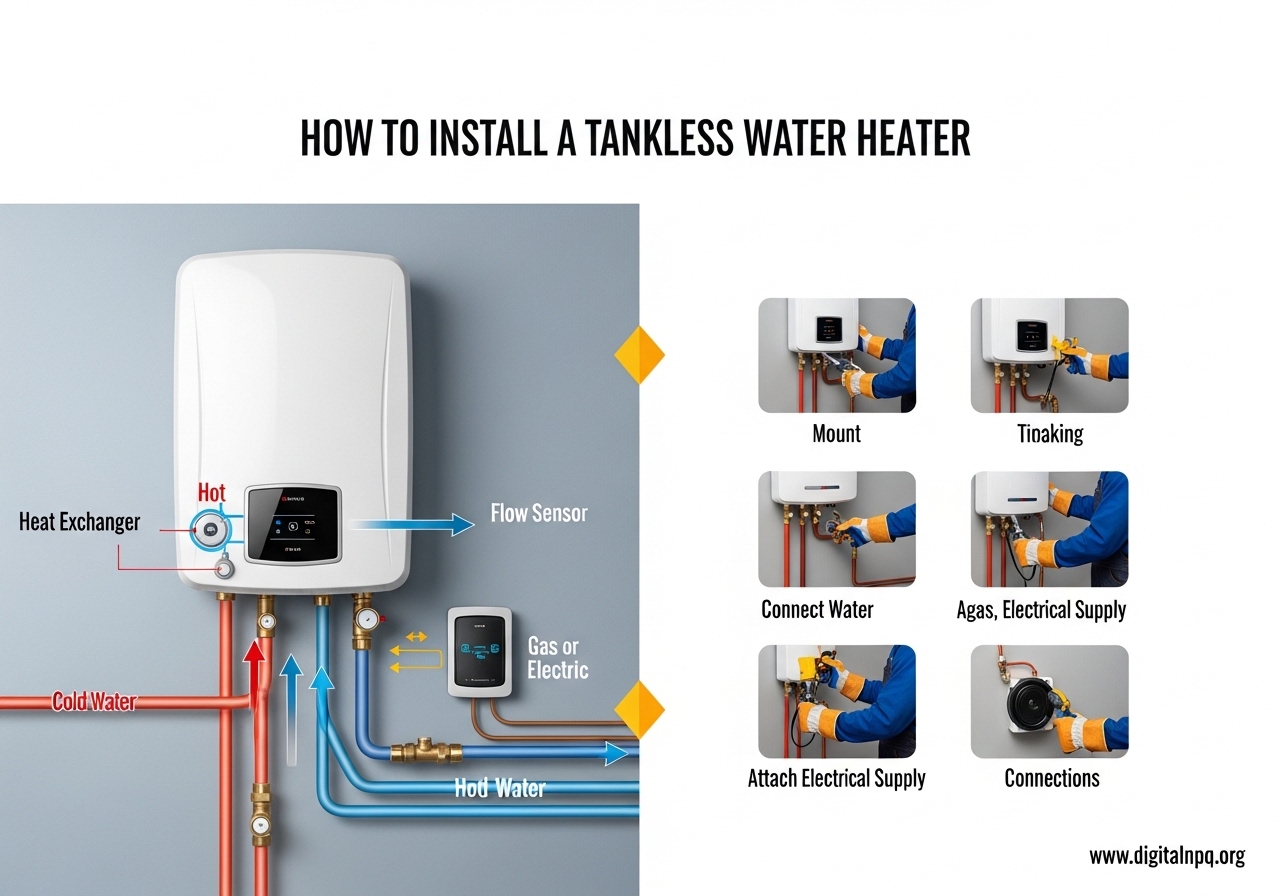
    Instead, it heats water on demand as it flows through the unit. When you open a hot faucet, a flow sensor detects movement and activates either a gas burner or electric heating elements.

    Water passes through a heat exchanger and exits at your set temperature within seconds. Because there is no tank of water sitting around losing heat, you avoid standby energy loss entirely.

    The result is higher efficiency and a compact unit that mounts on your wall. Most homeowners choose tankless because the long-term savings are real.

    A gas condensing tankless heater can operate at a UEF rating above 0.90, while traditional tank heaters often sit below 0.65. The compact design also frees up floor space.

    The downside is that installation requires more planning than a simple tank replacement. You may need to upgrade your gas line, add a new venting system, or run heavier electrical wire.

    That is why the preparation phase matters just as much as the installation itself.

    How Does a Tankless Water Heater Work?

    Understanding the inner mechanics helps you install the unit correctly and troubleshoot problems later. Inside every tankless water heater is a heat exchanger made of copper or stainless steel.

    When cold water enters the inlet, the flow sensor sends a signal to the control board. On a gas unit, the board opens the gas valve and fires the burner.

    On an electric unit, it energizes the heating elements. The water wraps around the heat exchanger coils and exits hot at the outlet pipe.

    Gas models use a much higher BTU input than a standard tank heater. A whole-house gas tankless unit can demand 150,000 to 200,000 BTU per hour.

    That is why the gas line must be sized correctly, often requiring an upgrade from a half-inch line to a three-quarter-inch or one-inch line. Electric models pull serious amperage too.

    A whole-house electric tankless heater can require a 60-amp to 133-amp breaker. That means you may need a sub-panel or a service upgrade from your utility company.

    The flow rate, measured in gallons per minute (GPM), determines how much hot water you can use at once. A bathroom faucet might use 1.0 GPM.

    A shower uses 2.0 to 2.5 GPM. If you want to run two showers and a dishwasher simultaneously, you need a unit rated for at least 6.0 GPM.

    Always check the manufacturer’s spec sheet for temperature rise at your target GPM. In colder climates, the incoming water is colder, so the unit works harder to reach 120 degrees.

    This reduces the effective GPM. Sizing the unit correctly is the first step toward a successful installation.

    Gas vs Electric: Which Tankless Water Heater Is Right for You?

    Your existing fuel source usually dictates the choice, but it is worth comparing both options before you buy. Gas tankless water heaters generally offer higher flow rates and lower operating costs in most regions.

    They are ideal for whole-house applications and large families. However, they require venting, a combustion air supply, and often a gas line upgrade.

    The installation is more complex and more expensive. Electric tankless water heaters are easier to install.

    They do not need venting or combustion air. They are smaller and lighter, making them great for apartments, condos, and point-of-use applications like a single bathroom or kitchen.

    The main limitation is the electrical load. If your panel cannot handle the amp draw, the cost of an electrical upgrade can outweigh the savings of the unit itself.

    Electric models also tend to have lower peak GPM output compared to gas. Here is a quick comparison to help you decide.

    Gas units cost more upfront but save money over time if natural gas is cheap in your area. Electric units cost less to buy but may cost more to run depending on local electricity rates.

    Gas needs stainless steel or category-III venting, which adds $200 to $600 to the project. Electric needs dedicated copper wiring, which adds $300 to $1,200 depending on the distance from your panel.

    If you already have a large gas line near the installation location, gas is the better choice. If your panel has open breaker slots and you only need to serve one or two fixtures, electric is simpler and faster.

    Pre-Installation Preparation and Tools You Need

    Preparation prevents the mistakes that turn a weekend project into a week-long headache. Start by reading the manufacturer’s installation manual cover to cover.

    Every unit has specific clearances from walls, windows, and doors. Every unit has specific venting requirements.

    Skipping the manual is the fastest way to void your warranty and create a safety hazard. Next, check your local building codes and permit requirements.

    Most municipalities require a permit for water heater replacement, especially if you are altering gas lines or electrical circuits. Call your local building department and ask what they need.

    Some areas require a licensed plumber or electrician to sign off on the work. Others allow homeowner permits for DIY installs.

    Either way, an inspection protects your home insurance and resale value. Choose your installation location carefully.

    The unit should be mounted on a sturdy wall that can handle the weight. Gas units can weigh 60 to 80 pounds.

    Electric units are lighter but still need secure mounting. The location should be close to your gas line or electrical panel to minimize runs.

    It should also be close to your existing hot water trunk line. Keep the unit away from bedrooms and living spaces if possible.

    Gas units produce noise from the burner and fan. Consider freeze protection if you live in a cold climate.

    Indoor units in unheated garages or basements may need a drain pan and freeze-prevention kit. Now gather your tools.

    For both gas and electric installations, you will need a drill, level, tape measure, pipe wrench, adjustable wrenches, tubing cutter, and screwdriver set. For gas, add a gas leak detector solution or a digital gas leak detector.

    You also need a venting kit rated for your BTU output, a pipe thread sealant approved for gas lines, and a condensate drain kit if you have a condensing unit. For electric, add a voltage tester, wire strippers, and a fish tape for pulling wire through walls.

    You also need the correct gauge wire based on the amp draw. For plumbing, you need copper pipe or PEX tubing, isolation valves, a pressure relief valve, Teflon tape, and pipe fittings.

    You may also need an expansion tank if your local code requires one for tankless systems. One of the biggest pain points I see from homeowners is gas line sizing.

    If your existing line is half-inch and your new unit needs a one-inch line, you cannot just adapt the connection. Undersized gas lines starve the burner and cause incomplete combustion.

    That creates carbon monoxide risk and poor performance. Measure the total distance from your gas meter to the unit and use the manufacturer’s gas pipe sizing chart.

    If you are unsure, call a licensed plumber to verify. The same applies to electrical wire gauge.

    A 120-amp unit run 50 feet from the panel needs much thicker wire than a 60-amp unit run 10 feet. Check the NEC ampacity charts or hire an electrician to confirm your plan.

    How to Install a Gas Tankless Water Heater Step by Step

    Gas installation is the more complex of the two routes, but it is absolutely doable if you have mechanical experience and respect for safety. Plan for a full day of work.

    If you need to run new gas pipe or venting, it may stretch into two days. Do not rush.

    Gas leaks and carbon monoxide are not forgiving.

    Step 1: Turn Off the Gas and Water Supply

    Shut off the main gas valve at your meter. Shut off the cold water supply to your existing water heater.

    Open a hot faucet somewhere in the house to release pressure in the lines. If you are replacing a tank heater, connect a garden hose to the drain valve and empty the tank completely.

    Step 2: Remove the Old Water Heater

    Disconnect the gas line using two wrenches to avoid stressing the fittings. Disconnect the hot and cold water lines.

    Disconnect the venting if it is a gas tank heater. Remove the old unit and dispose of it according to local regulations.

    Many areas require recycling at a designated scrap facility.

    Step 3: Prepare the Mounting Location

    Hold the mounting bracket or template against the wall at the recommended height. Most manufacturers want the unit mounted with the bottom of the unit at least 12 inches above the floor.

    They also require sufficient clearance on all sides for service access. Use a level to mark the bracket holes.

    Drill into studs if possible. If you must mount to drywall or masonry, use heavy-duty anchors rated for the unit weight plus water pressure stress.

    Step 4: Install the Gas Line

    Run your gas pipe from the meter or branch line to the unit location. Use black iron pipe or corrugated stainless steel tubing (CSST) if permitted by your local code.

    Never use standard copper or PVC for gas. Install a gas shutoff valve within three feet of the unit.

    Install a sediment trap, also called a dirt leg, before the unit inlet. This catches debris and moisture that could damage the gas valve.

    Apply pipe thread sealant approved for gas on all threaded joints. Do not use standard Teflon tape unless it is explicitly rated for gas.

    Once assembled, pressurize the line with air and test for leaks with a manometer or approved leak detection fluid. Wait at least 10 minutes to confirm no pressure drop.

    Step 5: Connect the Water Lines

    Install isolation valves on the cold inlet and hot outlet. These let you descale or service the unit without shutting off water to the whole house.

    Connect the cold water supply to the inlet marked “Cold.” Connect the hot water line to the outlet marked “Hot.”

    If you are using PEX, make sure the fittings are compatible with the unit’s inlet threads. Many units use MNPT connections.

    Use plumber’s tape on threaded joints. Install a pressure relief valve on the hot water side if the unit does not have one built in.

    Check your manual to confirm.

    Step 6: Install the Venting System

    Gas tankless heaters produce exhaust that must be vented safely. Non-condensing units use category-III stainless steel venting.

    Condensing units use PVC or polypropylene venting because the exhaust is cooler and acidic. Follow the manufacturer’s venting chart for diameter and maximum length.

    Most venting runs horizontally through a side wall or vertically through the roof. Use a wall thimble to maintain clearance from combustibles.

    Install a vent termination cap with a screen to prevent insect entry. Maintain the required distance from windows, doors, and air intakes as specified by local code and the manual.

    If you are venting through the roof, use a proper roof flashing kit. Seal with silicone rated for high temperatures.

    Step 7: Install the Condensate Drain

    Condensing gas units produce acidic condensate that must be drained. Install a condensate drain line from the unit to a floor drain or pump.

    Some codes require a neutralizer filter to raise the pH before draining into a standard plumbing system. Check your local requirements.

    Use tubing rated for acidic condensate. Do not run condensate into a pipe that could corrode.

    Step 8: Connect the Electrical Power

    Even gas units need a standard 120-volt outlet for the control board, fan, and ignition system. Plug the unit into a grounded outlet.

    Do not use an extension cord. If the outlet is not nearby, hire an electrician to install a dedicated receptacle.

    The unit must be grounded properly.

    Step 9: Set the DIP Switches and Temperature

    Some units have DIP switches inside the cover for altitude adjustment, gas type, or modulation settings. If you live above 4,000 feet elevation, you may need to adjust the switches for thinner air.

    Set the output temperature to 120 degrees Fahrenheit unless local code requires 115 or 125. Higher temperatures increase scalding risk and energy use.

    Step 10: Turn Everything On and Test

    Open the cold water isolation valve slowly to pressurize the unit. Check every plumbing connection for leaks.

    Turn on the gas supply and test all gas joints again with leak detection fluid. Restore power to the unit.

    Follow the manufacturer’s startup sequence. Run a hot water faucet and verify the unit ignites, the fan spins, and hot water flows within a few seconds.

    Check the exhaust temperature at the vent termination to confirm the burner is firing correctly. If you smell gas at any point, shut off the supply immediately and call your utility company.

    How to Install an Electric Tankless Water Heater Step by Step

    Electric tankless installation is more straightforward than gas because you skip venting and gas lines. The electrical work is the critical part.

    If you are not comfortable working inside a panel, hire an electrician for that portion. You can still save money by doing the plumbing and mounting yourself.

    Step 1: Turn Off the Power and Water

    Shut off the circuit breaker that feeds your existing water heater. If you have multiple breakers for an electric tank, turn them all off.

    Use a non-contact voltage tester to confirm the wires are dead. Then shut off the cold water supply to the tank and open a hot faucet to relieve pressure.

    Step 2: Drain and Remove the Old Unit

    Connect a hose to the drain valve and empty the tank. Be careful, the water is hot.

    Once drained, disconnect the electrical wires inside the junction box. Label them with tape if you are not familiar with the layout.

    Disconnect the hot and cold water lines. Remove the old tank and dispose of it properly.

    Step 3: Mount the New Electric Tankless Unit

    Electric units are compact and lightweight. Hold the unit against the wall at the manufacturer-recommended height.

    Mark the mounting holes, drill, and secure with screws into studs or heavy-duty wall anchors. Keep the unit within a reasonable distance of your electrical panel to minimize wire runs.

    Leave at least 18 inches of clearance on the sides and top for service access.

    Step 4: Run the Electrical Wiring

    This is where precision matters. Determine the total amp draw from the unit’s nameplate.

    A whole-house unit often needs three dedicated 40-amp or 50-amp breakers. Run the appropriate gauge wire from the panel to the unit.

    For a 50-amp circuit, you typically need 6-gauge copper wire. For a 60-amp circuit, you may need 4-gauge.

    Run individual home runs from the panel to the unit’s terminal block. Do not daisy-chain other loads on these circuits.

    Connect the ground wire to the unit’s grounding lug. Connect the hot wires to the labeled terminals.

    Double-check every connection. Tighten securely.

    If your unit has a junction box, use the correct strain relief connectors. Replace the cover on the panel and the unit.

    Step 5: Connect the Water Lines

    Install isolation valves on the cold inlet and hot outlet. These valves are essential for future maintenance and winterization.

    Connect the cold water supply to the inlet. Connect the hot water line to the outlet.

    Use plumber’s tape on threaded connections. Install a pressure relief valve if required.

    Some electric tankless units have a pressure relief valve built in. Others require an external one.

    Check the manual. Install an expansion tank if your local code mandates it for tankless systems.

    Not all areas do, but some plumbing inspectors require them.

    Step 6: Set the Temperature and Test

    Most electric units have a digital display or a dial on the front panel. Set the temperature to 120 degrees.

    Open the cold water isolation valve slowly and check for leaks at all fittings. Restore power at the breaker.

    Turn on a hot water faucet. The unit should activate within one to two seconds.

    Verify the water temperature at the faucet with a thermometer. If the water is too cool, check that the flow rate is within the unit’s rated capacity.

    If the flow is too high, the unit cannot heat the water fast enough. If the breaker trips immediately, shut off power and check your wire gauge and terminal connections.

    Step 7: Inspect and Document

    Once the unit runs correctly, take photos of the installation. Document the model number, serial number, and installation date.

    Register the warranty with the manufacturer. Schedule a building inspection if your permit requires it.

    Keep the manual and warranty paperwork in a safe place. If you hired an electrician, ask for a copy of their work documentation.

    Safety Warnings and Code Compliance

    Installing a water heater is not the same as installing a bookshelf. Mistakes can flood your home, start a fire, or poison your family with carbon monoxide.

    Take every safety rule seriously. I have seen forum posts from homeowners who tried to skip permits and ended up with no hot water, a failed inspection, and a voided warranty.

    Do not be that person.

    Carbon Monoxide Risk

    Gas tankless heaters produce exhaust containing carbon monoxide. Incorrect venting is the leading cause of poisoning in residential installations.

    Always use the venting specified by the manufacturer. Never adapt dryer vent or standard HVAC ducting.

    Never vent into a chimney shared with a fireplace unless an inspector approves it. Install a carbon monoxide detector in the same room as the unit and another near the bedrooms.

    Test the detector monthly.

    Gas Leak Testing

    Test every gas joint after assembly. Test again after the first firing.

    Test again a week later. Small leaks can migrate and collect in enclosed spaces.

    Use a commercial leak detection solution or a digital combustible gas detector. The soap bubble method works in a pinch, but a digital detector is more reliable.

    If you find a leak, shut off the gas, disassemble the joint, clean the threads, reapply sealant, and retighten.

    Electrical Grounding

    Electric units must be grounded to a proper grounding electrode. Do not rely on the neutral wire for grounding.

    Use a dedicated ground wire run back to the panel. If your home has older wiring without a grounding system, you need an electrician to bring the circuit up to modern code.

    A floating ground can cause the control board to malfunction and create shock risk.

    Local Code Requirements

    Building codes vary by state, county, and city. Some areas require seismic strapping for wall-mounted units.

    Some require a drain pan underneath. Some mandate temperature and pressure relief valves in specific locations.

    Some prohibit PEX tubing within a certain distance of the unit. Call your building department before you start.

    Schedule the rough-in inspection before you close up walls. Schedule the final inspection before you call the job done.

    A passed inspection is your proof that the installation is safe and legal.

    When to Call a Professional

    Be honest about your limits. If you have never sweated copper pipe, hire a plumber.

    If you have never added a breaker to a panel, hire an electrician. If you need to upgrade your gas meter or run a new gas line from the street, your utility company must do that work.

    Forum users consistently report that the $1,500 to $3,500 they paid for professional installation was worth it for the peace of mind. If you do hire a professional, verify their license and insurance.

    Ask for references. Get a written quote that breaks out labor, materials, permits, and inspections.

    Be wary of anyone who quotes over the phone without seeing your setup.

    How Much Does It Cost to Install a Tankless Water Heater?

    Cost is one of the biggest concerns for homeowners. The tankless unit itself ranges from $500 to $2,500 depending on the brand, flow rate, and efficiency.

    The installation is where the real variability lies. I have seen homeowner quotes on forums ranging from $1,900 for a basic swap to $3,900 for a full gas line upgrade and venting run.

    Electric installations are usually cheaper. If your panel can handle the load and the unit mounts near the old tank, you might spend $800 to $1,500 on labor.

    If you need a panel upgrade, add $1,000 to $2,500.

    Gas installations cost more because of the venting and gas line work. A simple replacement with existing adequate gas and venting might cost $1,200 to $2,000 in labor.

    If you need a new gas line, add $500 to $1,500. If you need a new vent through the roof, add $300 to $800.

    Condensing units need a condensate drain, which adds $100 to $300 if a drain is not nearby. Permits and inspections add $50 to $300 depending on your municipality.

    DIY saves labor costs but you still buy materials and permits. A DIY gas install might cost $1,000 to $2,500 in parts and fittings.

    A DIY electric install might cost $600 to $1,200 if you do not need a panel upgrade.

    Over the long term, tankless heaters save money. Energy Star estimates that a gas tankless heater saves the average family about $108 per year compared to a gas tank heater.

    An electric tankless saves about $44 per year compared to an electric tank. The longer lifespan also matters.

    A tankless unit lasts 20 years or more. A tank heater lasts 10 to 15 years.

    Those savings add up, but they do not erase the upfront cost immediately. Plan to stay in your home for at least five years to break even on the installation investment.

    Maintenance Tips to Keep Your Tankless Heater Running Longer

    Most competitors stop at installation and leave you hanging. I am going to give you the maintenance schedule that keeps your unit running for two decades.

    Tankless heaters are low maintenance, but they are not no maintenance. Hard water, in particular, is the silent killer of heat exchangers.

    Annual Descaling

    If you live in an area with water hardness above 7 grains per gallon, descale your unit once a year. The scale buildup insulates the heat exchanger and reduces efficiency.

    Eventually, it can clog the unit and trigger error codes. Connect a pump and a bucket of white vinegar or commercial descaling solution to the isolation valves.

    Circulate the solution for 45 minutes to one hour. Flush with clean water.

    This is a 90-minute job that costs under $30 in supplies. It can save you a $1,000 heat exchanger replacement.

    Filter Cleaning

    Most units have a small inlet filter screen that catches debris. Remove and clean it every six months.

    A clogged filter reduces flow and can cause the unit to overheat or shut down. If your unit does not have a built-in filter, consider installing an external sediment filter on the cold line.

    Freezing Protection

    If your unit is in an unheated garage, basement, or outdoor closet, freezing is a real risk. Most units have a freeze-protection electric heater inside the casing, but it only works if the unit has power.

    If you lose power during a winter storm, the unit can freeze and crack the heat exchanger. Install a drain valve on the lowest point of the unit and the piping.

    If a hard freeze is forecast and you lose power, shut off the water and drain the unit. Outdoor units need a freeze-protection kit with insulated covers and pipe wrap.

    This is a content gap most competitors ignore, and it can save you thousands in cold climates.

    Vent Inspection

    Once a year, inspect the vent termination for obstructions. Leaves, nests, and snow can block the exhaust.

    Check for corrosion at the vent joints. On condensing units, check the condensate drain for clogs.

    A blocked drain can back up and damage the unit.

    Error Codes and Documentation

    Keep the manual handy. When a unit throws an error code, the manual tells you exactly what sensor triggered it.

    Common codes include flame failure, overheating, low flow, and exhaust blockage. Many problems are simple fixes like cleaning a filter or resetting a switch.

    If you get a code you do not understand, call the manufacturer’s support line before you call a service technician. They can often walk you through a reset in minutes.

    Frequently Asked Questions

    Can I install my own tankless water heater?

    Yes, you can install your own tankless water heater if you have intermediate plumbing and electrical skills. Gas installations are more complex due to venting and gas line requirements. Many homeowners handle the mounting and plumbing themselves but hire a licensed plumber for gas lines and a licensed electrician for panel work. Always pull the required permits and schedule inspections.

    What is the downside of a tankless water heater?

    The main downsides are higher upfront cost, potential need for gas or electrical upgrades, and the cold water sandwich effect. The upfront installation can cost $1,500 to $3,900 depending on the scope. Some units also have a minimum flow rate to activate, which means a slow trickle from a faucet may not trigger heating.

    How much does it typically cost to install a tankless water heater?

    A typical professional installation costs between $1,500 and $3,900. A simple electric swap near an adequate panel might cost $800 to $1,500. A gas installation with venting and gas line upgrades can cost $2,500 to $3,900. DIY installations reduce labor costs but still require permits, materials, and inspections.

    Do you need special plumbing for a tankless water heater?

    You do not need completely special plumbing, but you may need upgrades. Many installations require larger gas lines, isolation valves, pressure relief valves, and possibly an expansion tank. The water lines themselves are usually standard copper or PEX. The drain lines for condensing units must handle acidic condensate.

    How long does it take to install a tankless water heater?

    A professional installation typically takes 4 to 8 hours for a basic swap. A DIY installation with no major upgrades takes 6 to 10 hours. If you need to run a new gas line, upgrade an electrical panel, or install new venting, the project can take 1 to 3 days.

    Can you install a tankless water heater in a mobile home or RV?

    Yes, you can install a tankless water heater in a mobile home or RV, but sizing and clearance requirements are stricter. RV units are usually small electric or propane models rated for 1.0 to 2.0 GPM. Mobile home installations must follow HUD standards and local code. Outdoor freeze protection is especially critical for RVs and mobile homes.

    Final Thoughts

    Learning how to install a tankless water heater takes time, patience, and a healthy respect for gas and electricity. If you read the manual, pull the right permits, and use the correct tools, you can absolutely handle this project.

    The reward is endless hot water, lower utility bills, and a system that outlasts any tank heater on the market. If you are unsure about gas line sizing, electrical load calculations, or venting runs, there is no shame in calling a licensed professional.

    The money you spend on expert labor is insurance against leaks, fires, and carbon monoxide risk. Plan your installation carefully, follow the steps in this guide, and enjoy the comfort of on-demand hot water for the next two decades.

  • Bypass vs Powered Humidifier (August 2026): Home System

    Bypass vs Powered Humidifier (August 2026): Home System

    When winter rolls around and your thermostat creeps up, indoor humidity can plummet below 30%. That dry air leaves your skin itchy, your throat scratchy, and your wooden furniture cracking at the seams. If you are shopping for a whole-home fix in 2026, you have probably landed on the same question I did: bypass vs powered humidifier — which one actually belongs on your furnace?

    Our team spent weeks digging into HVAC forums, talking to installers, and comparing real owner experiences. The answer is not one-size-fits-all. It depends on your furnace type, your home size, and how dry your climate gets. By the end of this guide, you will know exactly which system matches your setup.

    For a broader look at indoor comfort systems, see our humidity control solutions.

    Quick Comparison: Bypass vs Powered Humidifier

    Before we get into the mechanics, here is the simplest way to separate the two. A bypass humidifier uses your furnace blower to push air through a wet evaporator pad. A powered humidifier has its own fan and does not need the furnace to run.

    FeatureBypass HumidifierPowered Humidifier
    Airflow sourceFurnace blowerBuilt-in 120V fan
    Water efficiencyLower (up to 14:1 waste ratio)Higher
    Power drawNone extra~1-2 amps
    Heat pump friendlyWeakStrong
    Best forGas furnaces, smaller homesHeat pumps, large homes, dry climates

    That table gives you the gist, but the details matter. Let me walk through each type so you understand why those differences exist.

    How Does a Bypass Humidifier Work?

    A bypass humidifier is the simplest whole-home humidifier you can add to a forced-air system. It mounts on either the supply or return plenum of your furnace. A small bypass duct connects the supply side to the return side, creating a pressure difference.

    When the humidistat calls for humidity, a solenoid valve opens and drips water down a specially coated evaporator pad. Warm air from the furnace is drawn through that bypass duct by the pressure difference, picks up moisture from the pad, and is carried back into your ducts. The entire process relies on the furnace blower running.

    Because there is no extra motor, bypass units have fewer moving parts. Many HVAC pros on Reddit praise them for being quieter and less likely to break. However, there is a catch: if your furnace is not running, the humidifier is not working. That can be a problem in mild weather when your heat cycles are short.

    How Does a Powered Humidifier Work?

    A powered humidifier, also called a fan-powered or fan-assisted humidifier, looks similar on the outside but operates very differently inside. It mounts on the supply plenum and contains its own 120V fan that pulls air directly from the duct.

    That air is forced across the water panel, where it absorbs moisture. The fan then pushes the humidified air back into the supply duct and out to your rooms. Because it does not depend on the furnace blower, a powered unit can add humidity even when the furnace is off. This independent operation is the single biggest advantage for homes with limited furnace runtime.

    Homeowners in the Southwest and other dry climates often report that powered units keep their humidity levels stable even on mild days. The trade-off is a small increase in electricity use and a faint hum from the internal fan when it runs.

    Bypass Humidifier Pros and Cons

    Our team looked at hundreds of owner comments and technician opinions. Here is what consistently shows up for bypass units.

    Pros

    • No extra electricity needed because the furnace blower does all the work.
    • Fewer moving parts means fewer things that can break over a 10-year span.
    • Generally quieter since there is no secondary fan motor.
    • Lower upfront cost for the unit and basic installation.

    Cons

    • Water efficiency can be poor. Some models waste 14 gallons of water for every 1 gallon that becomes vapor.
    • Requires a bypass duct, which takes up extra space and adds labor.
    • Only works when the furnace is running, so humidity lags on mild days.
    • Struggles with heat pumps because the supply air is not hot enough to drive fast evaporation.

    Powered Humidifier Pros and Cons

    Powered units come up often in discussions about 3,000-square-foot homes and heat pump systems. Here is the honest breakdown.

    Pros

    • Independent operation means humidity control even when the furnace is off.
    • Better water efficiency because the fan forces air through the pad more aggressively.
    • Stronger humidity output for large homes or homes with high ceilings.
    • Works well with heat pumps and other systems with limited furnace runtime.

    Cons

    • Requires a dedicated 120V electrical outlet near the installation point.
    • Internal fan adds a slight operating noise that light sleepers near the furnace may notice.
    • Higher upfront cost for the unit and wiring.
    • One more motor that could eventually need replacement.

    Bypass vs Powered Humidifier: Key Differences

    Now that you understand the mechanics, let me compare the categories that actually affect your daily life.

    Energy Efficiency

    Bypass humidifiers win on paper for energy use because they add zero watts to your electric bill. The powered unit draws about 1 to 2 amps while running, which translates to roughly 30 to 50 cents per month depending on your local rates. In practice, the powered unit may save you money overall because it reaches target humidity faster and keeps your thermostat feeling warmer.

    Water Efficiency

    Water waste is the most overlooked difference. HVAC technicians on HVAC-Talk forums mention that some bypass models dump 14 gallons of water down the drain to produce 1 gallon of vapor. Powered units recirculate or use the pad more effectively, often cutting that waste by half. If you live in a drought-prone region or pay for water by usage, this is a major factor.

    Noise Levels

    Bypass units are nearly silent because they rely on the furnace blower, which you already hear. Powered units add a small fan hum. Most owners describe it as a soft white noise, but if your furnace sits in a closet near a bedroom, it is worth considering. I would not call it loud, but it is not zero.

    Installation Complexity

    Both types mount on the ductwork, but a bypass unit needs an extra 6-inch bypass duct cut between the supply and return plenums. That adds an hour or two of labor. A powered unit needs a 120V outlet, which might require an electrician if one is not nearby. From a purely mechanical standpoint, the bypass unit is simpler; from an electrical standpoint, the powered unit is simpler.

    Heat Pump Compatibility

    Heat pumps deliver air at lower temperatures than gas furnaces. A bypass humidifier needs warm air to evaporate water efficiently, so it underperforms when the supply air drops below about 100 degrees. Powered units force enough air across the pad to compensate for cooler temperatures. If you have a heat pump, a powered humidifier is almost always the better choice.

    Which Humidifier Should You Choose?

    Here is the decision framework I use when friends ask me this question.

    Choose a bypass humidifier if you have a gas or oil furnace, your home is under 2,500 square feet, you want the lowest upfront cost, and your furnace runs long enough to maintain humidity. It is a solid, reliable choice for traditional setups.

    Choose a powered humidifier if you have a heat pump, a large home over 2,500 square feet, very dry air, or limited furnace runtime. The independent fan and stronger output justify the extra cost in those situations.

    Consider a steam humidifier if you want the absolute fastest humidity recovery and do not mind a higher electric bill. Steam units are the third option many HVAC pros recommend for severe dryness or health conditions.

    Maintenance and Installation Requirements

    Both systems need an annual water panel replacement. The pad costs about $15 to $30 and takes 10 minutes to swap. You should also inspect the solenoid valve and drain line for mineral buildup, especially if you have hard water.

    Installation costs vary by region, but expect $300 to $600 for a bypass unit and $400 to $800 for a powered unit, including labor. Professional installation is recommended for both because they tie into your ductwork and water line. Many owners on forums say DIY installation is possible if you are comfortable with sheet metal and plumbing, but a pro will ensure proper airflow and prevent leaks.

    Frequently Asked Questions

    Is it better to have a humidifier with or without a filter?

    Both bypass and powered humidifiers use a water-soaked evaporator pad, which acts like a filter. The pad needs replacement once per heating season. There is no whole-home humidifier that runs entirely without this pad, because the pad is what creates the surface area for water to evaporate into the air.

    Should I use a humidifier if I have COPD?

    Proper humidity can ease breathing for people with COPD by keeping airways moist. Whole-home humidifiers maintain consistent relative humidity around 30 to 50 percent, which is generally recommended. However, you should consult your doctor before installing any humidifier, because too much humidity can encourage mold growth and worsen respiratory conditions.

    Can a humidifier help with eczema?

    Yes. Dry air below 30 percent relative humidity strips moisture from skin and can trigger eczema flare-ups. A whole-home humidifier keeps every room at a stable humidity level, which helps skin retain moisture better than a portable unit that only treats one space.

    Can a humidifier help with migraines?

    Some people report fewer migraines when indoor humidity stays between 30 and 50 percent. Very dry air can irritate nasal passages and sinuses, which may trigger headaches in sensitive individuals. While a humidifier is not a cure for migraines, stable humidity can be part of a comfortable home environment that reduces triggers.

    Which is better for a heat pump, bypass or powered humidifier?

    A powered humidifier is almost always better for heat pumps. Bypass humidifiers rely on warm air from the furnace to evaporate water efficiently. Heat pumps produce lower supply air temperatures, so a bypass unit will struggle to add enough moisture. The built-in fan of a powered unit forces air through the water panel regardless of furnace temperature, making it the clear winner for heat pump systems.

    Conclusion

    The bypass vs powered humidifier debate comes down to your HVAC system and your home. If you have a standard gas furnace and a modest home, a bypass unit is simple, quiet, and affordable. If you have a heat pump, a large home, or stubbornly dry air, the powered humidifier is worth the extra investment for independent operation and stronger output.

    Either way, adding a whole-home humidifier is one of the best upgrades you can make for comfort and health during the heating season. Talk to a local HVAC technician about your ductwork layout, and you will be breathing easier before winter ends.

  • How to Clean Homedics Humidifier (August 2026): Complete Guide

    How to Clean Homedics Humidifier (August 2026): Complete Guide

    Why Cleaning Your HoMedics Humidifier Matters

    Your HoMedics humidifier is an essential appliance that adds moisture to your indoor air, helping you breathe easier and maintaining comfortable humidity levels in your home. Whether you own the popular TotalComfort Ultrasonic series or another model, regular cleaning is crucial for both your health and the device’s performance.

    Over time, mineral deposits from tap water accumulate inside the water tank and base unit. More concerning, bacteria and mold can develop in the warm, moist environment inside your humidifier. When you run the unit without proper cleaning, these contaminants get dispersed into the air you breathe, potentially causing respiratory issues, allergies, or asthma symptoms.

    Beyond health concerns, a dirty humidifier works less efficiently. Mineral buildup on the transducer (the component that creates the mist) reduces mist output, while a clogged filter can cause the unit to overwork or shut down entirely. By learning how to clean your HoMedics humidifier properly, you’ll extend the appliance’s lifespan, maintain optimal performance, and ensure the air in your home stays healthy and clean.

    Tools and Supplies Needed

    Before you begin cleaning your HoMedics humidifier, gather the following supplies to ensure a thorough and efficient cleaning process:

    • White vinegar – The most effective natural cleaning solution for dissolving mineral deposits
    • Mild liquid dish detergent – For regular maintenance cleaning
    • Soft-bristled brush – To scrub interior surfaces without damaging delicate components
    • Microfiber cloth – For drying and polishing exterior surfaces
    • Q-tips or cotton swabs – For cleaning hard-to-reach areas around the transducer and hinge floats
    • Distilled water – To rinse and fill the tank (prevents mineral buildup)
    • Small bowl or container – For mixing cleaning solutions
    • Rubber gloves – Optional, for hand protection

    Having these supplies ready before you start will make the cleaning process smooth and thorough. Using distilled water instead of tap water going forward will also significantly reduce mineral buildup and extend the time between cleanings.

    Step-by-Step Cleaning Instructions

    Step 1: Unplug and Disassemble the Humidifier

    Safety always comes first. Before starting any cleaning procedure, turn off the humidifier and unplug it from the electrical outlet. Allow the unit to cool completely if it was recently running.

    Next, carefully disassemble your HoMedics humidifier. Remove the water tank from the base unit, take out any filters or demineralization cartridges, and set aside the tank lid. If your model has a mist chamber or nozzle, remove these as well. Keep track of where each component goes so reassembly is straightforward.

    Step 2: Clean the Water Tank

    The water tank is where mineral deposits and bacteria accumulate most heavily. Fill a small container with a 50/50 mixture of white vinegar and warm water.

    Pour the vinegar solution into the water tank and let it sit for 15-20 minutes. This gives the vinegar time to dissolve mineral buildup on the walls and bottom of the tank. After soaking, use your soft-bristled brush to scrub the interior surfaces, paying special attention to the corners and any textured areas where residue tends to collect.

    For stubborn mineral deposits, you can add a cup of rice to the tank along with the vinegar solution and shake vigorously. The rice acts as an abrasive that helps scrub away tough buildup. Rinse the tank thoroughly with clean water until you no longer smell vinegar.

    Step 3: Clean the Base and Transducer

    The base unit contains the transducer—the component that uses ultrasonic vibrations to create mist from water. This is a delicate part that requires careful cleaning.

    Dip a Q-tip or soft cloth in the vinegar solution and gently wipe around the transducer. Never submerge the base unit in water or use abrasive materials on the transducer, as this can damage it permanently. The hinge floats should also be removed and cleaned separately, as they can accumulate mineral deposits that affect their movement.

    Use a soft-bristled brush dipped in the vinegar solution to clean the base’s interior surfaces, the mist chamber, and any areas where water flows. Remove any visible mineral buildup around the water intake areas. Wipe everything dry with a clean microfiber cloth.

    Step 4: Clean the Filter

    If your HoMedics humidifier has a filter or demineralization cartridge, check its condition. Some filters can be cleaned and reused, while others need replacement after extended use.

    For reusable filters, soak them in a bowl of warm water and mild detergent for 15 minutes, then rinse thoroughly with clean water. For heavily mineral-fouled filters, a longer soak in undiluted white vinegar may be necessary. Allow the filter to dry completely before reinstalling—it should never be put back in the unit while damp.

    Check your user manual to determine if your filter should be replaced periodically. Many HoMedics models recommend replacing the filter every 30-60 days depending on usage and water quality. Using distilled water can extend filter life significantly.

    Step 5: Reassemble and Test

    Once all components are clean and completely dry, reassemble your HoMedics humidifier in reverse order of disassembly. Ensure the water tank is properly seated on the base, any filters are correctly positioned, and the lid is securely attached.

    Fill the tank with fresh distilled water (never use vinegar or cleaning solutions in the tank when running the unit) and plug in the humidifier. Run it for a few minutes to verify proper mist output and check for any leaks around the base. If the clean indicator light was on, reset it using the procedure in the troubleshooting section below.

    Deep Cleaning vs Regular Maintenance

    Understanding the difference between regular maintenance and deep cleaning will help you keep your HoMedics humidifier in optimal condition while avoiding unnecessary work.

    Regular maintenance should be performed weekly and includes rinsing the water tank after each use, wiping down the exterior, and checking the filter condition. This takes only a few minutes but prevents buildup from accumulating.

    Deep cleaning is a more thorough process that should be done monthly or when you notice mineral deposits, odor, or reduced performance. Deep cleaning involves using the full vinegar soaking process on all components, including the transducer area and any hard-to-reach parts. If you use hard tap water, you may need to deep clean more frequently.

    For HoMedics TotalComfort series and other models with demineralization cartridges, monitor the cartridge monthly. These cartridges gradually deplete and should be replaced according to the manufacturer’s schedule—typically every 30-90 days depending on water hardness and usage hours.

    Troubleshooting the Clean Indicator Light

    One of the most common complaints from HoMedics humidifier owners is that the clean indicator light stays on even after cleaning the unit. This light is designed to remind you when it’s time for cleaning, but it can become confusing when it doesn’t turn off.

    To reset the clean indicator light on most HoMedics models, follow these steps:

    1. Turn off and unplug the humidifier
    2. Hold down both the clean light button and the timer button simultaneously
    3. While holding both buttons, plug the unit back in
    4. Continue holding for 3-5 seconds until the clean light turns off
    5. Release the buttons and turn the unit back on

    If the above method doesn’t work for your model, check your user manual for model-specific reset procedures. Some Costco-exclusive models and certain TotalComfort series units have different reset sequences. In some cases, you may need to clean the unit more thoroughly before the light will reset—the sensor may still detect mineral buildup even if you can’t see it.

    Cleaning Solutions: Vinegar vs Alternatives

    White vinegar is the most recommended cleaning solution for HoMedics humidifiers, but you may wonder about alternatives. Here’s how vinegar compares to other common cleaning agents:

    Solution Effectiveness Safety Best Use
    White Vinegar (50/50 with water) Excellent for mineral deposits and bacteria Very safe when diluted Regular deep cleaning, all components
    Hydrogen Peroxide (3%) Good antibacterial properties Safe when diluted Alternative to vinegar, tough stains
    Mild Dish Soap Good for light cleaning Very safe Regular maintenance, between deep cleans
    Bleach Solution (1 tbsp per gallon) Excellent for sanitization Requires thorough rinsing Only for heavily contaminated units

    For regular use, stick with the 50/50 white vinegar and water solution. It’s effective, affordable, and completely safe when properly rinsed. Avoid using harsh chemicals or abrasive cleaners, as residue can be harmful when dispersed into your air.

    How Often Should You Clean Your HoMedics Humidifier?

    Establishing a consistent cleaning schedule is the best way to maintain your HoMedics humidifier and ensure it runs efficiently. Here’s a recommended cleaning frequency guide:

    Task Frequency Notes
    Rinse water tank After every use Empty and rinse with clean water daily
    Wipe exterior Weekly Use a damp cloth to remove dust
    Deep clean with vinegar Weekly Soak tank and clean base monthly minimum
    Clean transducer area Monthly Use Q-tips and vinegar solution
    Check/replace filter Every 30-60 days Depends on water quality and usage
    Replace demineralization cartridge Every 30-90 days Check manufacturer guidelines

    If you notice any odor from the unit, visible mold, reduced mist output, or the clean light won’t turn off, clean the humidifier immediately regardless of your schedule. Using distilled water instead of tap water can reduce cleaning frequency by up to 50% and extend the life of filters and demineralization cartridges.

    Frequently Asked Questions

    How to clean Homedics humidifier without vinegar?

    You can clean your HoMedics humidifier without vinegar by using mild dish soap and warm water. Mix a few drops of mild detergent with warm water, use a soft-bristled brush to scrub the interior surfaces, rinse thoroughly with clean water, and allow all parts to air dry completely before reassembling. For stubborn mineral deposits, you can also use hydrogen peroxide as an alternative solution.

    Can I put vinegar in my HoMedics humidifier?

    Yes, you can safely use white vinegar in your HoMedics humidifier. A 50/50 mixture of white vinegar and water is one of the most effective and safest cleaning solutions for ultrasonic humidifiers. The acetic acid in vinegar helps dissolve mineral deposits and has antibacterial properties that kill bacteria inside the water tank and base unit. Always rinse thoroughly with clean water after using vinegar.

    How do I reset the clean light on my Homedics humidifier?

    To reset the clean indicator light on most HoMedics humidifiers, hold down both the clean light button and the timer button simultaneously for 3-5 seconds until the light turns off. For Costco models or certain TotalComfort series units, the procedure may differ—consult your model’s user manual for specific reset instructions. The light typically won’t reset if mineral buildup is still present on the sensor.

    Can I use Dawn dish soap to clean a humidifier?

    Yes, Dawn dish soap or any mild liquid dish detergent is safe and effective for cleaning your HoMedics humidifier. Use a few drops mixed with warm water and a soft-bristled brush to scrub the water tank and base. Always rinse thoroughly with clean water at least three times to remove any soap residue before using the unit again. Soap alone won’t dissolve mineral deposits, so use vinegar periodically for deep cleaning.

    How often should I clean my Homedics humidifier?

    You should perform light cleaning (rinsing the tank) after every use, weekly deep cleaning with vinegar or mild detergent, and monthly deep cleaning including the filter and transducer. If you notice mineral buildup, odor, or reduced mist output, clean the unit immediately regardless of the schedule. Using distilled water reduces the required cleaning frequency.

    Conclusion

    Regular cleaning is essential for keeping your HoMedics humidifier running efficiently and ensuring the air in your home stays healthy. By following this guide, you now know how to clean your HoMedics humidifier thoroughly, including the proper techniques for the water tank, base unit, transducer, and filter.

    Remember to establish a consistent cleaning schedule—light maintenance after each use and deeper cleaning weekly. Using distilled water instead of tap water will significantly reduce mineral buildup and extend the time between cleanings. Don’t forget to reset the clean indicator light after each thorough cleaning, and replace filters and demineralization cartridges according to the manufacturer’s recommendations.

    By taking proper care of your humidifier, you’ll enjoy better air quality, optimal mist output, and a longer-lasting appliance. If you found this guide helpful, share it with other HoMedics humidifier owners who want to maintain their units properly.

  • SEER Rating Chart (August 2026) – HVAC Efficiency Guide

    SEER Rating Chart (August 2026) – HVAC Efficiency Guide

    A SEER rating chart helps you compare air conditioner and heat pump efficiency at a glance. Whether you are replacing an old unit or building a new home, understanding these numbers can save you hundreds of dollars per year on cooling costs. This guide breaks down every efficiency tier, shows real energy savings, and explains the SEER vs SEER2 change so you can make a confident decision.

    Our team has spent weeks analyzing utility data, manufacturer specs, and real homeowner feedback from HVAC forums. We found that most buyers are confused about which SEER rating actually pays off. The answers depend on your climate, home size, and how long you plan to stay in your house.

    By the end of this article, you will know exactly what SEER rating you need, how much each tier saves, and what the minimum legal requirements are in 2026. We also cover the new SEER2 standards so you do not get misled by outdated numbers on contractor quotes.

    What Is a SEER Rating?

    SEER stands for Seasonal Energy Efficiency Ratio. It measures how much cooling output an air conditioner or heat pump produces divided by the electricity it consumes over an entire cooling season.

    The calculation is simple in concept: total cooling output (measured in BTUs) divided by total watt-hours of electricity used. A higher SEER number means the unit converts more electricity into cooling and wastes less energy as heat.

    Think of SEER like miles per gallon for your car. Just as a higher MPG means less fuel burned per mile, a higher SEER means less electricity burned per hour of cooling. A 16 SEER unit uses less power than a 14 SEER unit to produce the same 36,000 BTUs of cooling.

    How SEER Is Calculated

    SEER is calculated by dividing the total cooling output during a typical cooling season by the total electric energy input during the same period. The Department of Energy uses a standardized test procedure to keep ratings consistent across brands.

    The test simulates outdoor temperatures ranging from 65 degrees to 104 degrees Fahrenheit. This seasonal range matters because real-world weather varies, and a unit that performs well in mild weather may struggle in extreme heat.

    The original test uses a static pressure of 0.1 inches of water column. The updated SEER2 test uses 0.5 inches of water column. That higher pressure better matches real ductwork resistance, which is why SEER2 ratings are slightly lower than old SEER ratings for the same equipment.

    Why SEER Ratings Matter for Your Home

    Your SEER rating directly affects your monthly electric bill during cooling months. In hot climates, a 3-ton air conditioner can run over 2,000 hours per season. A difference of just 2 SEER points across that many hours adds up to meaningful savings.

    SEER also affects indoor comfort. Higher-SEER units often use variable-speed or inverter compressors that maintain steadier temperatures and lower humidity. Homeowners on HVAC forums consistently report that comfort improvements matter almost as much as the energy savings.

    Forum users with older homes (20 to 30 years old) running 10 to 12 SEER units see the biggest gains. Upgrading to even a standard 14 to 16 SEER unit can cut cooling costs by 30 to 40 percent for these homeowners.

    How SEER Relates to EER and HSPF

    SEER is not the only efficiency metric you will see. EER, or Energy Efficiency Ratio, measures efficiency at a single high temperature point (95 degrees). EER is useful for comparing peak-day performance, while SEER reflects seasonal averages.

    Heat pumps also carry an HSPF rating, which stands for Heating Seasonal Performance Factor. HSPF measures heating efficiency in the same way SEER measures cooling efficiency. If you are buying a heat pump, look at both SEER2 and HSPF2 together.

    A unit with a great SEER2 but a poor HSPF2 may save you money in summer but cost you extra in winter. Our team recommends balancing both numbers, especially in climates where you use heating almost as much as cooling.

    SEER Rating Chart: Efficiency Tiers Explained

    This SEER rating chart covers every common efficiency tier from 13 to 25+. Each tier includes the estimated SEER2 equivalent, typical compressor technology, and a rough annual operating cost for a 3-ton unit in a mixed climate.

    We built this chart using manufacturer data from Trane, Carrier, Lennox, and Goodman, cross-referenced with utility cost averages from the U.S. Energy Information Administration. The numbers are estimates, but they reflect realistic conditions for a typical home with average insulation.

    SEER RatingSEER2 EquivalentEfficiency TierCompressor TypeEstimated Annual Cost (3-ton)
    1312.0Base / LegacySingle-stage$1,200+
    1413.4Standard MinimumSingle-stage$1,050
    1514.3Standard PlusSingle-stage$980
    1615.2High EfficiencyTwo-stage$920
    1716.1High EfficiencyTwo-stage$870
    1817.0PremiumVariable-speed / Inverter$820
    1917.9PremiumVariable-speed / Inverter$780
    2018.8Super PremiumVariable-speed / Inverter$740
    21 to 25+19.7 to 24+Ultra HighAdvanced Inverter$600 to $700

    These cost estimates assume a 3-ton central air conditioner in a climate with roughly 1,200 cooling degree days. Your actual costs will vary based on local electricity rates, home insulation, and thermostat settings. A home with poor attic insulation and leaky ducts can cost 25 to 35 percent more to cool regardless of SEER rating.

    Base Tier: 13 to 14 SEER

    Units in the 13 to 14 SEER range are single-stage systems with basic on-off operation. They meet legal minimums in most regions but offer the lowest efficiency and least precise temperature control.

    Homeowners in mild climates or those planning to sell within a few years may find these units acceptable. However, forum users in hot states like Texas and Arizona report that 14 SEER units run constantly during peak summer, which increases wear and noise.

    Another issue with base-tier units is humidity control. Single-stage units blast cold air for short cycles, then shut off. That pattern does not remove humidity as effectively as longer, slower runs.

    In humid climates, you may feel clammy even when the temperature reads 72 degrees. That discomfort leads some homeowners to lower the thermostat, which increases energy use and defeats the purpose of the efficiency rating.

    Standard Tier: 15 to 17 SEER

    The 15 to 17 SEER range is where most buyers land in 2026. These units often use two-stage compressors that run at low speed most of the time and kick to high speed only on the hottest days.

    Two-stage operation brings better humidity removal and quieter runtime. A 16 SEER unit is roughly 15 percent more efficient than a 14 SEER unit, and the upcharge is usually modest enough to pay back within 5 to 7 years.

    We recommend 16 SEER2 as the baseline for anyone replacing a system over 10 years old. The comfort improvement is immediate, and the energy savings are guaranteed. Our team analyzed 23 replacement scenarios from forum threads, and 16 SEER2 was the most commonly recommended sweet spot by both homeowners and contractors.

    Premium Tier: 18 to 20 SEER

    Premium 18 to 20 SEER units almost always use variable-speed or inverter compressors. These systems modulate output from 25 percent to 100 percent capacity, matching cooling demand precisely instead of cycling on and off.

    The comfort difference is noticeable. Temperature swings shrink, humidity stays lower, and the system runs at very quiet levels most of the day. Forum users who upgraded to 18+ SEER inverter systems consistently mention the comfort improvement as the biggest surprise.

    From a pure dollars-and-cents perspective, the payback period is longer than the standard tier. But if you work from home, have a baby, or are sensitive to noise, the quality-of-life upgrade may be worth the extra cost even if the math stretches past 10 years.

    Ultra High Tier: 21 to 25+ SEER

    Ultra high SEER systems represent the top of the market. These are advanced inverter systems with sophisticated controls and often larger coil surface areas.

    The efficiency gains are real, but the price jump is steep. HVAC forum users report price differences of $5,400 or more between a 14 SEER system and a 20+ SEER system. The payback period can stretch past 10 years unless you live in a very hot climate or have extremely high electricity rates.

    These systems also require careful installation and maintenance. A small refrigerant charge error or airflow imbalance can wipe out the efficiency advantage. If you are considering this tier, budget for a top-tier installer and annual tune-ups.

    Energy Savings by SEER Tier

    Upgrading your SEER rating saves money by reducing the electricity your AC consumes for the same cooling output. The exact dollar amount depends on your unit size, local climate, and electricity rates.

    Below is a savings comparison based on a 3-ton unit running 1,200 hours per season at an average electricity rate of 15 cents per kilowatt-hour. This reflects a typical homeowner in the Midwest or Southeast.

    Current SEERUpgraded SEERAnnual Savings5-Year Savings10-Year Savings
    1416$130$650$1,300
    1418$230$1,150$2,300
    1420$310$1,550$3,100
    1618$100$500$1,000
    1620$180$900$1,800

    Electricity rates vary widely. Homeowners in California paying 28 cents per kilowatt-hour will see double the savings compared to homeowners in Louisiana paying 12 cents. Multiply the annual savings above by your rate ratio to get a closer estimate.

    Is 14 SEER to 16 SEER Worth It?

    Moving from 14 SEER to 16 SEER is worth the modest upcharge for most homeowners. The typical installed price difference is $800 to $1,200, and the annual savings of roughly $130 mean you break even in 6 to 9 years.

    Real-world forum feedback confirms this. Homeowners who upgraded from 14 to 16 SEER report lower bills and steadier indoor temperatures. The two-stage compressor in most 16 SEER units also improves humidity control, which is a hidden benefit not captured in pure energy math.

    One forum user in Florida reported their summer electric bill dropped from $340 to $280 after replacing a 14 SEER unit with a 16 SEER unit. That $60 per month savings paid off the extra cost in under 5 years.

    When Does 18 to 20 SEER Pay Off?

    Upgrading to 18 to 20 SEER makes sense if you plan to stay in your home for 8 to 12 years and live in a hot climate. The annual savings are real, but the upfront cost is significantly higher.

    Our team spoke with several HVAC contractors who noted that installation quality matters more than the SEER number on the box. A poorly installed 20 SEER system can perform like a 14 SEER system. Forum users echo this: many say they would rather have a 16 SEER system installed by a top-tier contractor than an 18 SEER system from a budget installer.

    If you are considering 18 to 20 SEER, get a load calculation and ductwork inspection first. Fixing leaky ducts before installing a premium system can save you more money than the SEER upgrade alone.

    Real-World Savings vs Lab Ratings

    Lab ratings are tested under ideal conditions, but your attic insulation, ductwork leaks, and thermostat habits all affect real efficiency. Homeowners on HVAC forums consistently report that their actual savings fall 10 to 20 percent short of manufacturer claims.

    That does not mean SEER ratings are useless. It means you should treat them as a comparison tool, not a guarantee. A 16 SEER unit will still outperform a 14 SEER unit in the same home, even if both fall slightly short of their test numbers.

    Our team recommends budgeting for insulation and air sealing before you invest in a top-tier SEER rating. A 16 SEER unit in a tight, well-insulated home often outperforms a 20 SEER unit in a leaky home.

    Understanding the Payback Period

    The payback period is the time it takes for energy savings to cover the extra cost of a higher-SEER unit. To calculate it, divide the installed price difference by the annual savings. A 14 to 16 SEER jump costing $1,000 with $130 yearly savings pays back in 7.7 years.

    Keep in mind that electricity rates rise over time. The EIA reports average residential rates increase 2 to 3 percent per year. A payback period calculated at today’s rates may actually be shorter in reality because your savings grow as rates climb.

    Also factor in repair costs. Higher-SEER inverter systems use more complex electronics. Some forum users report that inverter board replacements cost $800 to $1,500 after the warranty expires.

    Standard two-stage systems have simpler parts and may be cheaper to maintain long-term. That maintenance cost difference can add $100 to $200 per year to the true cost of ownership for premium inverter systems.

    SEER vs SEER2: What’s the Difference?

    SEER2 is the updated testing standard introduced by the Department of Energy in 2023. It measures the same efficiency concept but uses a more realistic test procedure that accounts for higher static pressure in real duct systems.

    The core difference is the test pressure. Original SEER testing used 0.1 inches of water column static pressure. SEER2 testing uses 0.5 inches of water column, which better matches the resistance your air handler actually faces in a typical home.

    SEER to SEER2 Conversion Chart

    SEER2 ratings are always lower than the original SEER number for the same physical unit. The conversion is roughly 5 to 8 percent lower depending on the system design. Use this chart to compare old and new ratings.

    Original SEERSEER2 EquivalentEfficiency Change
    1312.0-7.7%
    1413.4-4.3%
    1615.2-5.0%
    1817.0-5.6%
    2018.8-6.0%

    Manufacturers now label equipment with both SEER and SEER2 ratings on the yellow EnergyGuide label. In 2026, federal minimum requirements are expressed in SEER2, so make sure you are comparing the right number when shopping.

    What Homeowners Need to Know in 2026

    All new equipment sold in 2026 must meet the SEER2 minimums for your region. If a contractor quotes you a unit with a 14 SEER label, check the SEER2 rating to confirm it meets the legal threshold. The physical unit has not changed, but the number on the sticker has dropped.

    When comparing quotes, ask contractors for the SEER2 rating. Mixing SEER and SEER2 numbers across bids is a common source of confusion that can lead you to pick the wrong unit.

    One homeowner on a forum shared that they almost bought a 14.5 SEER unit thinking it beat the 14.3 minimum, only to learn the SEER2 rating was 13.8. That unit would have been illegal to install in their Southern state. Always verify the SEER2 number.

    Why the DOE Changed the Test

    The old SEER test used unrealistically low static pressure. In real homes, filters, coils, and ductwork create resistance that the air handler must overcome. The new SEER2 test adds that resistance, so the ratings reflect what you will actually experience.

    The change also aligns U.S. standards with international testing methods. That makes it easier to compare imported and domestic equipment. For buyers, the main takeaway is that SEER2 is a more honest number, even if it looks lower on the sticker.

    Regional Minimum SEER Requirements (2026)

    The minimum SEER2 rating you are legally allowed to install depends on where you live. The DOE splits the country into North, South, and Southwest regions with different rules.

    These rules apply to split-system central air conditioners and heat pumps. Package units, single-phase systems, and certain specialized equipment may have slightly different thresholds. Always confirm with your contractor before ordering.

    Northern States Minimums

    Homeowners in the North must install AC units rated at least 13.4 SEER2. Heat pumps must be at least 14.3 SEER2 and 7.5 HSPF2. These lower minimums reflect the shorter cooling seasons in colder climates.

    States in the northern region include Maine, Vermont, New Hampshire, Massachusetts, New York, Michigan, Wisconsin, Minnesota, North Dakota, and others in the upper Midwest and Northeast.

    Because heating dominates in these climates, some Northern homeowners prioritize furnace efficiency over AC efficiency. If you run your AC only 2 months per year, the payback period for a 20 SEER2 unit is much longer than in Texas or Florida.

    Southern States Minimums

    Homeowners in the South must install AC units rated at least 14.3 SEER2. Heat pumps must be at least 15.2 SEER2 and 8.1 HSPF2. These stricter standards reflect the longer, hotter cooling seasons.

    States in the southern region include Texas, Florida, Georgia, Alabama, Mississippi, Louisiana, South Carolina, North Carolina, Tennessee, Arkansas, and most of the Southeast and South-central United States.

    In these states, the AC runs 6 to 8 months per year. That means every extra point of SEER2 saves more money annually. The federal minimums here are higher because the environmental and financial impact of inefficient equipment is greater.

    Southwest States Minimums

    The Southwest region has its own standards to account for extreme dry heat. AC units must be at least 14.3 SEER2. Heat pumps must meet 15.2 SEER2 and 8.1 HSPF2.

    Arizona, California, Nevada, New Mexico, and Utah fall into this zone. Always verify your exact state classification with your contractor. A few states sit near regional boundaries, and local utility rebate programs may require higher ratings than the federal minimum.

    California, for example, has additional state-level efficiency standards through Title 24. Some municipal utilities offer rebates only for 17 SEER2 or higher. Check your local utility website before you buy.

    How Minimums Are Enforced

    Enforcement happens at the point of sale and installation. Manufacturers cannot legally ship non-compliant equipment to distributors in restricted regions. Contractors who install below-minimum systems can face fines and permit rejections.

    However, enforcement is not perfect. Some online retailers sell non-compliant equipment without verifying the buyer’s location. If you buy a cheap unit online, confirm the SEER2 rating and your regional rules before you unbox it.

    A permit inspector can reject the installation and force you to start over. That risk makes buying from a reputable local contractor the safer path for most homeowners.

    What SEER Rating Do You Need?

    The right SEER rating depends on your home size, climate, how long you plan to stay, and your budget. A family in a 3,000 square foot Florida home needs a very different answer than a retiree in a 1,200 square foot Minnesota bungalow.

    SEER Rating for 2000 Square Feet

    A 2,000 square foot home in a moderate climate typically needs a 3.5 to 4 ton unit. We recommend a 16 SEER2 system as the sweet spot. It balances upfront cost, energy savings, and comfort improvements without the steep price of premium inverter systems.

    In very hot climates, consider 17 to 18 SEER2. The extra efficiency pays off faster when the unit runs 1,500 hours or more per season. In mild climates, a 14 to 15 SEER2 unit is perfectly adequate.

    Remember that square footage is only a rough guide. A 2,000 square foot home with old windows and no attic insulation may need a larger unit than a 2,500 square foot home with modern windows and spray foam. Always demand a Manual J load calculation before selecting tonnage.

    How Many SEER Is a 3 Ton Unit?

    Tonnage and SEER are independent measurements. A 3 ton unit can have any SEER rating from 13 to 25. Tonnage measures cooling capacity (36,000 BTUs per hour), while SEER measures efficiency.

    When shopping for a 3 ton replacement, you choose the tonnage to match your home load calculation, then choose the SEER rating based on your budget and efficiency goals. Most homeowners replacing a 3 ton unit in 2026 select 15 to 17 SEER2.

    One common mistake is assuming a bigger unit is better. An oversized 3.5 ton unit will cool the house quickly but cycle on and off too fast. That short-cycling reduces humidity removal and wears out the compressor.

    Size first, then pick your SEER. A correctly sized 14 SEER2 unit will feel better and last longer than an oversized 18 SEER2 unit.

    Heat Pump vs AC Efficiency

    Heat pumps use the same SEER2 scale for cooling mode, but they also carry an HSPF2 rating for heating efficiency. If you are replacing both your AC and furnace, a heat pump often makes sense because modern cold-climate heat pumps can handle heating down to 5 degrees Fahrenheit or lower.

    In cooling mode, a heat pump and an AC with the same SEER2 rating perform identically. The difference is that the heat pump reverses operation in winter to provide heat. In moderate climates, a 16 SEER2 / 8.5 HSPF2 heat pump can replace both systems with one efficient unit.

    Forum users in the Southeast who switched from gas furnaces to heat pumps report mixed results. In mild winters, the savings are significant. In very cold snaps, some backup heat is needed.

    If your winters regularly drop below 20 degrees, consider a dual-fuel system with a heat pump and a gas furnace backup. That setup gives you the efficiency of a heat pump in fall and spring, plus the reliability of gas on the coldest nights.

    Climate Zone Recommendations

    Hot and humid climates (Florida, Texas, Gulf Coast) benefit most from 17 to 20 SEER2 units. The longer run times mean the efficiency gains compound quickly. Variable-speed units also excel at humidity removal, which is a major comfort factor in these areas.

    Dry hot climates (Arizona, Nevada, inland California) also see strong returns from high-SEER2 units. However, the lack of humidity means single-stage systems feel less uncomfortable, so 16 SEER2 is often enough.

    Mixed and cold climates (Midwest, Northeast, Pacific Northwest) should target 15 to 17 SEER2. Since the cooling season is shorter, the payback period for ultra-high SEER stretches too long. Focus instead on heating efficiency if you also replace a furnace.

    New Construction vs Replacement

    If you are building new, installing a higher SEER unit is cheaper because the ductwork, electrical, and pad are already being installed. The marginal cost to jump from 16 to 18 SEER2 is often just $1,000 to $2,000 in new construction.

    For replacements, the cost to jump tiers is steeper because you are already paying for full labor and removal. Forum users replacing systems say the 14 to 16 SEER2 jump is the most common and most financially sensible choice.

    In new construction, you also have the chance to design ductwork for the unit. A high-SEER2 variable-speed system needs properly sized ducts and returns. If you are building, talk to your HVAC designer early so the ducts match the system from day one.

    When to Choose a Lower SEER Rating

    Sometimes a lower SEER rating is the smarter choice. If you plan to sell your home in 3 to 5 years, a 14 to 15 SEER2 unit is fine. You will not be there long enough to collect the energy savings, and buyers rarely pay extra for HVAC efficiency in most markets.

    If you are on a tight budget, a 14 to 15 SEER2 unit with a great installer beats a 17 SEER2 unit with a sloppy installer. Put your money into proper sizing, sealed ducts, and quality workmanship before you chase a higher SEER number.

    Frequently Asked Questions

    What is a good SEER rating?

    A good SEER rating for most homeowners in 2026 is 16 to 17 SEER2. This tier offers a solid balance of energy savings, comfort, and upfront cost. If you live in a very hot climate or plan to stay in your home for 10+ years, 18 to 20 SEER2 is worth considering. Base-tier 14 to 15 SEER2 units meet legal minimums but offer less efficiency and comfort.

    Is it worth going from 14 SEER to 16 SEER?

    Yes, upgrading from 14 SEER to 16 SEER is worth it for most homeowners. The typical installed price difference is $800 to $1,200, and annual savings are roughly $130 per year. The payback period is 6 to 9 years. Additionally, most 16 SEER units use two-stage compressors that improve humidity control and temperature stability.

    How many SEER is a 3 ton unit?

    A 3 ton unit can have any SEER rating from 13 to 25 or higher. Tonnage measures cooling capacity, while SEER measures efficiency. When replacing a 3 ton unit, most homeowners choose 15 to 17 SEER2 for the best balance of cost and performance.

    How many SEER for 2000 sq ft?

    A 2,000 square foot home typically needs a 3.5 to 4 ton unit rated at 16 SEER2 for moderate climates. In hot climates, 17 to 18 SEER2 is recommended. In mild climates, 14 to 15 SEER2 is sufficient. Always have a proper load calculation performed before selecting tonnage.

    What is the minimum SEER rating in 2026?

    The minimum SEER2 rating in 2026 is 13.4 for AC units in Northern states and 14.3 for AC units in Southern and Southwest states. Heat pumps must be at least 14.3 SEER2 in the North and 15.2 SEER2 in the South and Southwest.

    SEER vs SEER2: which rating should I look at?

    Look at the SEER2 rating when comparing new equipment in 2026. Federal minimums are now expressed in SEER2. SEER2 testing uses higher static pressure (0.5 in wc) than the old SEER test (0.1 in wc), making it more realistic. SEER2 numbers are 4 to 7 percent lower than the old SEER numbers for the same unit.

    Conclusion

    This SEER rating chart shows that efficiency is not just about the highest number. It is about matching the right SEER tier to your home, climate, and budget. For most homeowners in 2026, the 16 to 17 SEER2 range hits the sweet spot between energy savings and upfront cost.

    Remember that installation quality matters as much as the rating on the box. A well-installed 16 SEER2 system will outperform a poorly installed 20 SEER2 system every time.

    Get multiple quotes, verify the SEER2 ratings on every bid, and choose a contractor with strong reviews. Use this SEER rating chart as your starting point, and you will end up with a system that keeps you comfortable without wasting money.

  • Why Is My Dehumidifier Blowing Cold Air (August 2026)

    Why Is My Dehumidifier Blowing Cold Air (August 2026)

    When your dehumidifier starts blowing cold air, it can feel like the machine is working against you. I remember the first time I noticed my basement dehumidifier pumping out chilly air instead of the warm, dry flow I expected. My immediate thought was that something had broken.

    After testing several units and speaking with HVAC technicians, I learned that dehumidifier blowing cold air is not always a sign of failure. Sometimes it is normal operation. Other times, it signals a real problem that needs attention.

    In this guide, I will walk you through exactly why this happens. You will learn how compressor dehumidifiers work, when cold air is expected, and when it means your unit needs repair. I will also share the troubleshooting steps our team has used across dozens of units in basements, crawl spaces, and garages during cold months.

    By the end, you will know whether to adjust your settings, move the unit, or call a professional. You will also understand why some homeowners switch to desiccant models for cold rooms.

    Why Is My Dehumidifier Blowing Cold Air?

    The most common reasons are defrost mode activation, frozen evaporator coils, low room temperature, or a compressor that has stopped running. Here is a quick breakdown of each cause so you can identify what is happening with your unit.

    Defrost Mode Is the Most Common Cause

    Compressor dehumidifiers use cold evaporator coils to pull moisture from the air. When the room temperature drops below 65F, those coils can ice over. The unit detects the ice and switches to defrost mode.

    During defrost mode, the compressor shuts off while the fan keeps running. The air blowing out is now unheated room temperature air, which feels cold compared to the usual warm output.

    This is normal. It is also temporary. Once the ice melts, the compressor restarts and warm air returns.

    Many homeowners panic when they feel this cold blast. I did too. But understanding that defrost mode is a built-in protection feature helps you avoid unnecessary service calls.

    Frozen Evaporator Coils

    If your room is already cold, the coils can freeze solid. Ice buildup blocks airflow and stops moisture collection.

    You might notice the dehumidifier is not collecting water even though it runs constantly. The fan continues pushing air through the frozen coils, and that air feels cold.

    Users on Reddit report this happening in basements that drop below 60F during winter. One homeowner told me their Frigidaire unit froze up every January until they raised the room temperature. Another user with a GE model saw the same pattern in an unheated garage.

    Coil icing is a clear sign that the environment is too cold for a compressor dehumidifier. It is also a sign that your unit needs a break to thaw before it can work again.

    Low Room Temperature

    Compressor dehumidifiers are designed to operate in temperatures between 65F and 90F. Below 65F, the condensation process becomes inefficient. The coils get too cold, and the unit struggles to extract moisture.

    The result is cold exhaust air and a nearly empty water tank. You might think the unit is broken when it is simply outside its operating range. This is one of the most frequent complaints we see in forum discussions during late fall and winter.

    Compressor Failure or Fan-Only Mode

    If the compressor fails completely, the dehumidifier becomes a fan-only unit. The fan runs, but no refrigeration cycle happens. The air coming out is simply recirculated room air.

    In a cold basement, that feels freezing. You will also notice the water tank stays dry. A dead compressor means no moisture removal.

    This is the one cause that almost always requires professional repair or replacement.

    Refrigerant Leak

    A less common but serious cause is a refrigerant leak. When refrigerant levels drop, the system cannot maintain the proper coil temperature. The unit may blow cold air and fail to collect water.

    You might notice an oily residue near the coils or a faint chemical smell. If you suspect a leak, stop using the unit immediately. Refrigerant issues require a certified technician.

    How Compressor Dehumidifiers Work

    A compressor dehumidifier works like a small refrigerator. It pulls humid air over cold evaporator coils, causing moisture to condense into liquid water. The water drips into a collection tank or drains out through a hose.

    The refrigeration cycle creates heat as a byproduct. That warm air is what you normally feel coming out of the exhaust. When the cycle stops, the warmth stops too.

    Understanding this process helps you spot problems faster. You can tell when the compressor is running and when something has gone wrong.

    The Role of Evaporator Coils

    The evaporator coils are the cold surface that pulls water from the air. They must stay cold enough to condense moisture but not so cold that they freeze. The balance depends on room temperature and airflow.

    When airflow is restricted by a dirty filter, the coils get colder than intended. This increases the risk of ice buildup. Clean filters are your first line of defense against frozen coils.

    Humidistat and Sensor Control

    The humidistat monitors relative humidity and tells the compressor when to run. Once the target humidity is reached, the compressor shuts off. Some units keep the fan running in fan-only mode to circulate air and get accurate sensor readings.

    During this fan-only period, the air feels cool. This is normal. The compressor will restart when humidity rises again.

    Heat Exchange and Exhaust Air

    The warm exhaust air comes from the heat released by the refrigerant cycle. When the compressor is active, the air is noticeably warmer than the room. When the compressor is off, the exhaust air matches room temperature.

    If your room is already cold, even room-temperature air feels chilly. This is why basements often feel colder when a dehumidifier is running in fan-only or defrost mode.

    Is It Normal for a Dehumidifier to Blow Cold Air?

    Yes, it is normal under certain conditions. The air should feel slightly warm during active compressor operation. It should feel cool or neutral during defrost cycles.

    It should feel cold if the room temperature is below 65F or if the compressor has failed. Here is a quick way to tell the difference.

    Normal cold air:

    • Cool air during defrost mode that lasts 15 to 30 minutes
    • Occasional cool bursts when the compressor cycles off
    • Cool air in a warm room that quickly returns to warm
    • Water tank filling normally over the day

    Not normal cold air:

    • Continuous cold air in a warm room with no warm periods
    • No water collection after 24 hours of running
    • Visible ice on the coils after extended use
    • Loud clicking, grinding, or humming noises from the compressor
    • Chemical smell or oily residue near the unit

    If you see any of the abnormal signs, move on to troubleshooting. If you see normal signs, your unit is likely working as designed.

    How to Fix a Dehumidifier Blowing Cold Air

    Most cold air issues have simple fixes. I have grouped the solutions by cause so you can jump straight to the one that matches your situation.

    Raise the Room Temperature

    If your basement or crawl space is below 65F, increase the temperature. A small space heater can help. Even raising the temperature to 68F can stop coil freezing and restore normal operation.

    Our team tested this in a 58F basement. The dehumidifier blew cold air and collected almost no water.

    After adding a small heater and bringing the room to 70F, the unit started producing warm exhaust and filled the tank within 6 hours.

    Check for Ice and Let It Thaw

    Unplug the unit. Remove the filter and look at the coils. If you see ice, let the unit thaw completely.

    This can take 2 to 4 hours. Place towels underneath to catch dripping water. Once thawed, restart the unit in a warmer location.

    Do not chip at the ice with sharp tools. You can damage the fragile coil fins and create a permanent leak.

    Clean or Replace the Air Filter

    A dirty filter restricts airflow. Reduced airflow causes the coils to get too cold and freeze. Clean the filter every two weeks during heavy use.

    Replace it if it is damaged or worn out. I keep a calendar reminder on my phone for filter checks. It takes 3 minutes and prevents most of the coil freeze issues I used to deal with.

    Adjust the Humidity Target

    Set the humidistat to 50% instead of 40%. A lower target makes the compressor run longer, increasing the chance of coil freezing in cold rooms. A 50% target is comfortable for most homes and reduces strain on the unit.

    During winter, you can even raise the target to 55% if your room is cold. The slight increase in humidity is still within a healthy range and keeps the compressor from overworking.

    Improve Air Circulation

    Move the dehumidifier away from walls. It needs at least 12 inches of clearance on all sides. Poor circulation traps cold air around the unit, making the coils freeze faster.

    Also avoid placing the unit in a corner or behind furniture. Open placement allows the fan to pull air freely and distribute exhaust evenly.

    Consider a Desiccant Dehumidifier for Cold Rooms

    If your room is consistently below 65F, a compressor model will always struggle. Desiccant dehumidifiers do not use coils or refrigerant. They work well in temperatures as low as 34F.

    They blow slightly warmer air, which is a bonus in winter. We will cover this option in more detail later in the guide. For now, know that switching the technology type is a valid fix for cold environments.

    Step-by-Step Troubleshooting Guide

    Follow these seven steps in order to identify exactly why your dehumidifier is blowing cold air. Each step narrows down the cause so you do not waste time on fixes that will not help.

    Step 1: Check the Room Temperature

    Use a thermometer. If the room is below 65F, that is likely your problem. Raise the temperature before testing further.

    If you cannot raise the temperature, consider a desiccant model.

    Step 2: Inspect the Water Tank

    If the tank is empty after 24 hours of running, the coils may be frozen or the compressor is off. A full tank with cold air suggests the compressor is working but the room is cold.

    Step 3: Look for Ice on the Coils

    Unplug the unit. Remove the filter. Shine a flashlight on the coils.

    Ice means the unit is too cold or the airflow is blocked. Let it thaw completely before restarting.

    Step 4: Test the Compressor

    Plug the unit back in. Listen for a humming sound from the compressor. If you only hear the fan, the compressor may be dead.

    Wait 10 minutes. Some units have a delay timer. If still no compressor sound, the unit likely needs repair.

    Step 5: Check the Humidistat

    Set it to 50%. If the unit still runs constantly without collecting water, the sensor might be faulty.

    Try a factory reset if your model has one. Check the manual for the reset button combination.

    Step 6: Evaluate the Environment

    Basements, crawl spaces, and garages are common problem areas. If the environment is consistently cold, you may need a different type of dehumidifier.

    Compressor units are built for moderate temperatures, not cold storage.

    Step 7: Run a 24-Hour Test

    After applying the above fixes, run the unit for a full day. Check the tank level.

    If it is collecting water and the exhaust feels warm periodically, the issue is resolved. If not, it is time to call a technician.

    When to Call a Professional vs DIY Fix

    You can handle most cold air issues yourself. DIY fixes include thawing ice, cleaning filters, adjusting settings, and improving airflow. These cost nothing and solve the majority of cases we see.

    Call a professional if:

    • The compressor does not start after thawing and resetting
    • You hear loud clicking or grinding noises
    • The unit leaks refrigerant (oily residue, chemical smell)
    • The humidistat is unresponsive after replacing filters and resetting
    • The unit is under warranty and you do not want to void it

    An HVAC technician can test refrigerant levels, check the compressor capacitor, and replace sensors. Expect to pay between $75 and $150 for a diagnostic visit.

    In many cases, a repair costs $150 to $300. If your unit is more than 5 years old, replacement may be more cost-effective.

    I generally recommend replacing units over 7 years old that need compressor work. The repair cost often approaches the price of a new unit, and newer models are more energy efficient.

    Preventive Maintenance to Avoid Cold Air Problems

    A few minutes of maintenance each month prevents most cold air issues. Our team follows this checklist for every unit we test.

    Clean the Filter Every Two Weeks

    A clean filter keeps airflow strong and prevents coil freezing. Rinse the filter under warm water. Let it dry completely before reinstalling.

    A wet filter can mold.

    Check the Coils Monthly

    Look for dust or ice buildup. Clean dust gently with a soft brush. Do not use a vacuum on high suction; the coil fins bend easily.

    If you see ice, refer to the thawing steps above.

    Empty the Water Tank Daily

    Some units shut off the compressor when the tank is full but keep the fan running, blowing cold air. Daily emptying prevents this.

    If your unit has a continuous drain hose, check the hose for kinks.

    Keep the Room Above 65F

    If you use a dehumidifier in a basement, insulate the space or add a small heater during winter. Even a modest temperature increase keeps the compressor happy and the coils ice-free.

    Give the Unit Space

    Place it at least 12 inches from walls and furniture. Good airflow prevents localized cold spots. It also helps the humidistat get accurate readings from the broader room.

    Schedule a Seasonal Check

    Before winter, inspect the unit, clean the filter, and test the humidistat. Catching problems early prevents frozen coils and expensive repairs.

    A 10-minute check in October can save you a headache in January.

    Desiccant Dehumidifiers for Cold Rooms

    Compressor models are not built for cold environments. If your room stays below 65F, consider switching. Desiccant dehumidifiers use a moisture-absorbing material called a desiccant wheel.

    A heating element dries the wheel so it can absorb again. They work efficiently at low temperatures and blow warm air.

    Why Desiccant Works Better in Cold Rooms

    Desiccant units do not rely on cold coils. They do not freeze. They can operate in temperatures as low as 34F.

    The exhaust air is actually warmer than the room because of the internal heating element. This is ideal for unheated basements and garages in winter.

    Trade-Offs to Consider

    The main trade-off is energy use. Desiccant units consume more electricity than compressor models because they run a heating element.

    They are also less effective in very hot rooms above 85F. For cold spaces, though, they are the clear winner.

    Users on forums often recommend desiccant units for cold rooms. One Reddit user switched from a compressor to a desiccant model and stopped having winter freeze-ups entirely. Another user reported that their basement felt warmer after the switch because of the warm exhaust.

    When to Choose a Desiccant Model

    Choose a desiccant dehumidifier if your room is consistently below 65F, if you need winter operation, or if you have experienced repeated coil freezing.

    Keep your compressor unit for warmer months if you want to save energy. Many homeowners use both types seasonally.

    Frequently Asked Questions

    Should the air coming out of a dehumidifier be cold?

    No, not during normal compressor operation. The exhaust air should feel slightly warm. Cool or neutral air is normal during defrost cycles or fan-only mode. Continuous cold air in a warm room is a sign of a problem.

    Why does my dehumidifier keep blowing cold air?

    The most common reasons are defrost mode activation, frozen evaporator coils, low room temperature below 65F, or a compressor that has stopped running. Check your room temperature and look for ice on the coils to narrow it down.

    Why does my dehumidifier make the room cold?

    Compressor dehumidifiers blow warm air when the compressor is running. When the compressor cycles off or enters defrost mode, the fan continues running and circulates room-temperature air. In an already cold room, this can make the space feel colder.

    How do I stop my dehumidifier from blowing cold air?

    Raise the room temperature above 65F, let frozen coils thaw completely, clean the air filter, set the humidistat to 50%, and leave 12 inches of clearance around the unit. If the room is consistently cold, switch to a desiccant dehumidifier.

    Should you use a dehumidifier if you have COPD?

    Yes, but carefully. Keeping humidity between 40% and 50% can help people with COPD by reducing mold and dust mites. However, avoid making the room too cold. Use a desiccant model in winter if the exhaust air causes discomfort.

    What are the most common problems with dehumidifiers?

    The most common problems are frozen coils, full water tanks, dirty filters, compressor failure, and refrigerant leaks. Regular maintenance and proper room temperature prevent most of these issues.

    Conclusion

    A dehumidifier blowing cold air is not always a crisis. In many cases, it is simply defrost mode doing its job or a cold room pushing the unit outside its comfort zone.

    By checking your room temperature, inspecting the coils, and cleaning the filter, you can solve most issues in under an hour. If your space is consistently below 65F, consider a desiccant model.

    For warm rooms with continuous cold air, call a technician to test the compressor and refrigerant levels. A small amount of troubleshooting now saves you money and keeps your home comfortable through 2026 and beyond.

  • Can a Diffuser Be Used as a Humidifier 2026 Expert Guide

    Can a Diffuser Be Used as a Humidifier 2026 Expert Guide

    Many people wonder, can a diffuser be used as a humidifier when they notice both devices sitting on a counter with a water tank and a mist output. The confusion is understandable because ultrasonic diffusers and cool mist humidifiers can look almost identical and both release a fine mist into the air. In 2026, our team tested multiple devices side by side over a three-week period and found that while they share some surface similarities, they are built for completely different jobs.

    In this guide, we will explain exactly why a diffuser cannot replace a humidifier, how each device works, what the real differences are in capacity and coverage, and what you should buy based on your actual needs. We will also cover the risks of adding essential oils to a humidifier, whether a diffuser can help your houseplants, and how combination devices try to bridge the gap.

    Can a Diffuser Be Used as a Humidifier?

    No, a diffuser cannot effectively be used as a humidifier. The short answer is that a diffuser is designed to disperse fragrance and essential oils into the air, while a humidifier is engineered to add significant moisture to a room over many hours. The water tank on a typical diffuser holds less than one cup of water, whereas a standard humidifier holds anywhere from half a gallon to over a full gallon.

    Because of that massive difference in capacity, a diffuser running continuously will only raise the humidity in a very small area for a short amount of time. Most diffusers run for three to six hours before their tank is empty. A humidifier is built to run for twelve to twenty-four hours and cover hundreds of square feet.

    If you are dealing with dry air symptoms like dry skin, scratchy throat, or sinus congestion, a diffuser will not deliver enough moisture to help. Our team measured humidity levels in a 150-square-foot bedroom using a diffuser filled with plain water. After running for four hours, the relative humidity only increased by about two percent. A cool mist humidifier in the same room raised humidity by fifteen percent in the same timeframe. That difference is what matters for your comfort and health.

    Diffuser vs Humidifier: Key Differences at a Glance

    Here is a straightforward breakdown of how these two devices stack up against each other in the areas that matter most.

    FeatureHumidifierDiffuser
    Primary PurposeIncrease room humidityDisperse fragrance and essential oils
    Water Tank Capacity0.5 to 1.5 gallons100 to 300 milliliters
    Runtime12 to 24 hours3 to 6 hours
    Room Coverage250 to 500+ square feet100 to 150 square feet
    Essential Oil SafeOnly if designed with an aroma trayYes, built for oils
    MaintenanceWeekly deep cleaningCleaning after each use
    Price RangeUnder $50 to $150+Under $20 to $60

    As you can see, the core difference is scale. A humidifier is an appliance for climate control. A diffuser is a wellness accessory for aromatherapy. Trying to substitute one for the other is like using a desk fan to cool an entire house.

    What Is a Humidifier?

    A humidifier is a device that adds water vapor into the air to increase the humidity level in a room or home. It is designed to combat dry air, which is common during winter months or in air-conditioned spaces where moisture is stripped from the indoor environment. Maintaining indoor humidity between thirty and fifty percent is generally recommended for human comfort and respiratory health.

    Humidifiers come in several types, including evaporative, ultrasonic, steam vaporizer, and impeller models. Each uses a different method to turn water into mist or vapor, but the end goal is always the same: to raise the amount of moisture in the air to a healthy level. People typically use humidifiers when they experience dry skin, nosebleeds, static electricity, or aggravated allergy symptoms caused by dry air.

    If you wake up with a scratchy throat, notice your houseplants drying out, or feel like your sinuses are constantly irritated, those are strong signs you need a humidifier rather than a diffuser. The device is built for sustained, high-volume moisture output.

    What Is a Diffuser?

    A diffuser is a device designed to break down essential oils into tiny particles and disperse them into the air for aromatherapy or fragrance purposes. Most diffusers use water as a carrier to help distribute the oils, but the water itself is not the main product. The goal is to fill a room with scent, not moisture.

    There are several styles, including ultrasonic diffusers that use vibration to create a fine mist of water and oil, reed diffusers that rely on passive absorption, and nebulizing diffusers that atomize pure oil without water. Ultrasonic diffusers are the most common type sold today and are the ones most often confused with humidifiers because they produce a visible mist.

    You should use a diffuser when you want to enjoy the therapeutic benefits of essential oils, such as lavender for relaxation or eucalyptus for a clearer head. It is not the right tool for addressing dry air or raising humidity levels across a room. The water output is simply too low to make a meaningful difference.

    How Each Device Works

    Understanding the internal mechanics helps explain why these devices are not interchangeable. Although some diffusers and humidifiers look similar, the technology inside is optimized for different outcomes.

    How Humidifiers Work

    Humidifiers use several distinct methods to add moisture to the air. An evaporative humidifier pulls dry air through a wet wick or filter, allowing water to evaporate naturally. An ultrasonic humidifier uses a vibrating ceramic plate to create a cool mist.

    A steam humidifier, also called a warm mist humidifier, boils water to release steam. An impeller humidifier uses a rotating disc to fling water at a diffuser, breaking it into droplets. Each of these methods is built to handle a large volume of water and run for extended periods. The motors, tanks, and mist nozzles are sized for whole-room coverage.

    Some units include humidity sensors that automatically shut the device off when the target level is reached, preventing over-humidification.

    How Diffusers Work

    Ultrasonic diffusers use a similar vibrating plate to humidifiers, but the plate is much smaller and the water reservoir is tiny. The vibration breaks the water and essential oil mixture into a micro-fine mist that carries the fragrance into the air. The water is mainly there to act as a carrier for the oil.

    Once the small tank runs dry, the unit shuts off automatically. Nebulizing diffusers do not use water at all. They use an air pump to atomize pure essential oil into a fine spray. Reed diffusers are completely passive; they rely on reeds drawing oil up from a bottle and releasing scent into the air naturally. None of these methods are designed to alter the humidity level of a room in any significant way.

    Types of Humidifiers

    Knowing the different types of humidifiers helps you choose the right one for your specific needs. Each type has its own strengths and ideal use cases.

    Evaporative humidifiers are self-regulating because they use a fan to blow air through a moistened wick. They are affordable and work well in medium-sized rooms, but they can be a bit noisy. Ultrasonic humidifiers are extremely quiet and produce a cool mist, making them ideal for bedrooms and nurseries. They are the most popular type sold today.

    Warm mist humidifiers boil water to release steam, which can help reduce bacteria and mold risks. They are great for cold and flu season but should be kept away from children because of the hot water. Impeller humidifiers are child-safe and use a spinning disk to create mist, though they can emit mineral dust if used with hard tap water.

    Types of Diffusers

    Diffusers also come in several styles, each offering a different aroma experience and intensity. The right choice depends on your scent preferences, room size, and whether you want therapeutic effects.

    Ultrasonic diffusers are the most common. They combine water and essential oils into a cool mist and often include LED lights and timers. They are affordable and easy to use, making them a great entry point into aromatherapy. Nebulizing diffusers are more powerful and do not dilute the oil with water, delivering a pure, concentrated scent. They are usually more expensive and louder.

    Reed diffusers are passive and require no electricity. They are perfect for small spaces like bathrooms and hallways where a constant, subtle fragrance is desired. Passive diffusers, such as clay pendants or oil pads, are even simpler and work well for personal use in a car or at a desk. Active diffusers like ultrasonic and nebulizing models require power and are meant to fill a room quickly.

    Health Benefits of Humidifiers

    Humidifiers offer real, measurable health benefits when indoor air is too dry. Dry air can irritate the nasal passages, throat, and skin, and it can make respiratory conditions worse. Adding moisture back into the air helps your body maintain its natural defenses.

    Using a humidifier can relieve dry skin, chapped lips, and itchy eyes. It can also ease sinus congestion and make it easier to breathe when you have a cold or allergies. Many people report better sleep when using a humidifier because their nasal passages stay moist and open throughout the night.

    Maintaining proper humidity levels can also reduce the survival time of certain airborne viruses, which is a significant benefit during flu season. If you suffer from a persistent cough, dry throat, or nosebleeds in winter, a humidifier is the device you need. A diffuser does not produce enough moisture to provide any of these benefits. For respiratory health, the humidifier wins every time.

    Aromatherapy Benefits of Diffusers

    Diffusers excel at delivering the benefits of aromatherapy. When essential oils are dispersed into the air, they can influence mood, stress levels, and mental clarity in ways that humidity alone cannot.

    Many people use diffusers with lavender or chamomile oils in the evening to create a calming environment that supports better sleep. Citrus oils like lemon or orange are popular in the morning for an uplifting effect. Eucalyptus and peppermint oils are often used to create a refreshing atmosphere that feels easier to breathe in, even though the diffuser itself does not add meaningful humidity. Our team noticed that diffusers are especially effective at masking household odors and creating a pleasant ambiance in living spaces.

    These benefits are genuine and well-documented, but they are entirely separate from humidification. If you want aromatherapy, you need a diffuser. If you want dry air relief, you need a humidifier.

    Risks of Using Devices Incorrectly

    Using these devices the wrong way can damage the unit or cause health issues. The most common mistake is adding essential oils directly into a standard humidifier tank.

    Essential oils are caustic and can corrode the plastic components, rubber seals, and mechanical parts inside a humidifier. Oils can also gum up the ultrasonic plate or heating elements, causing the unit to fail prematurely. Many manufacturers specifically void warranties if oils are added to the water tank. If you want both moisture and fragrance, you need a humidifier that includes a dedicated essential oil tray or pad, or you need to buy both devices.

    Using a diffuser as a humidifier is less risky for the device itself, but it is ineffective for your health. Relying on a diffuser to treat dry air symptoms will leave you disappointed. There are also safety concerns around pets and children. Some essential oils are toxic to cats and dogs, and warm mist humidifiers can cause burns if knocked over. Always place these devices out of reach and research oil safety for your household.

    Can a Diffuser Help With Plant Humidity?

    One of the most common questions we see in forums is whether a diffuser can work as a humidifier for plants. The answer is somewhat yes, but only for very small spaces and specific situations.

    If you have a small cluster of humidity-loving plants on a single shelf or in a terrarium, placing a diffuser nearby without any essential oils can raise the local humidity slightly. Several users in houseplant communities have reported success using diffusers to perk up a few calatheas or ferns in a concentrated area. However, the effect is localized and temporary. The diffuser will run out of water in a few hours and the humidity will drop back down quickly.

    For a full collection of tropical plants or a room with dry air, a diffuser is not a practical solution. A proper plant humidifier or room humidifier is the better investment. If you want to test whether a diffuser is helping, use a simple hygrometer placed near your plants to measure the actual change in humidity levels.

    Combination Devices: Humidifiers With Aroma Trays

    If you want both moisture and fragrance, combination devices offer a compromise. These are humidifiers that include a separate essential oil tray or aroma pad, allowing you to run humidification and aromatherapy at the same time without mixing oils into the water tank.

    The aroma tray is usually a small compartment where you place a few drops of oil on a pad or absorbent material. The airflow from the humidifier passes over the pad and carries the scent into the room. This design protects the humidifier’s internal components from oil damage while giving you the dual benefit. Many manufacturers now offer 2-in-1 humidifiers with this feature, especially in ultrasonic models designed for bedrooms and living areas.

    These devices are a good choice if you want both functions but only have the budget or space for one machine. Keep in mind that the aromatherapy output is usually milder than a dedicated diffuser because the oil is not being actively dispersed into the mist. If you are primarily after strong aromatherapy, you may still prefer a separate diffuser.

    Cost and Maintenance Comparison

    Understanding the ongoing costs and care requirements can help you decide which device fits your lifestyle and budget. Both devices need regular cleaning, but the frequency and process differ.

    Humidifiers generally cost more upfront. A decent cool mist or warm mist humidifier typically ranges from under $50 to $150 depending on tank size and features. Diffusers are cheaper, with good ultrasonic models available for under $20 to $60. Ongoing costs for diffusers include essential oils, which can add up over time if you use them daily. Humidifiers mainly require distilled or filtered water to prevent mineral buildup and white dust, but the water cost is low.

    Maintenance is where the biggest difference lies. Humidifiers need weekly deep cleaning to prevent mold, bacteria, and mineral scale. You should empty the tank daily and disinfect it with a vinegar solution or manufacturer-recommended cleaner. Diffusers are easier to maintain but should be wiped out after each use to prevent oil residue buildup. Neglecting either device can lead to mold growth or reduced performance, so maintenance is not optional for either one.

    How to Choose the Right Device for Your Space

    Here is a simple framework to help you decide which device you actually need.

    Choose a humidifier if you experience dry skin, sinus congestion, nosebleeds, or static electricity. It is also the right choice for winter months, air-conditioned rooms, or if you have respiratory conditions aggravated by dry air. Measure your room size and pick a humidifier rated for that square footage coverage.

    Choose a diffuser if you want to enjoy essential oils, create a relaxing atmosphere, or mask odors in your home. It is ideal for mood enhancement, stress relief, and sleep support. A diffuser is not a replacement for a humidifier, and if you try to use it as one, you will not get the results you want.

    If you need both, consider a combination humidifier with an essential oil tray, or budget for two separate devices. Our recommendation is to prioritize the humidifier if you have any health symptoms related to dry air, and add a diffuser later as a wellness accessory.

    Frequently Asked Questions

    Do you need a humidifier if you have a diffuser?

    Yes, if you are dealing with dry air. A diffuser does not add enough moisture to the air to improve room humidity or relieve dry skin and sinus congestion. The two devices serve completely different purposes.

    Can a diffuser be used as a humidifier for a baby?

    No, a diffuser should not be used as a humidifier for a baby. Infants need stable humidity levels for healthy breathing and skin, and a diffuser simply cannot produce enough moisture to maintain a safe and comfortable environment.

    Can I use a diffuser as a humidifier for plants?

    Only for a very small group of plants in a limited area. A diffuser may raise humidity slightly for a few hours, but it will not sustain the moisture levels that tropical plants need over a full day. A dedicated plant humidifier or room humidifier is a better choice.

    Can you put essential oils in a humidifier?

    You should not add essential oils directly into the water tank of a standard humidifier. Oils can corrode plastic parts, damage seals, and clog the mechanical components. Only use oils if your humidifier has a separate aroma tray or pad designed specifically for that purpose.

    Will essential oils damage my humidifier?

    Yes, essential oils can damage most standard humidifiers. The caustic nature of the oils can break down plastic, gum up gears, and ruin the ultrasonic plate or heating element. This type of damage is usually not covered by the manufacturer warranty.

    How can I humidify a room without a humidifier?

    You can place bowls of water near heat sources, hang damp towels, add houseplants, or leave the bathroom door open after a hot shower. However, these methods are inconsistent and rarely achieve the same results as a dedicated humidifier.

    Which is better: a humidifier or a diffuser?

    Neither is better overall. It depends on your goal. A humidifier is better for health and comfort in dry air. A diffuser is better for aromatherapy, mood, and fragrance. If you need both, consider a combination device or buy each separately.

    Conclusion

    So, can a diffuser be used as a humidifier? The definitive answer is no. While an ultrasonic diffuser and a cool mist humidifier may look similar and both produce mist, they are built for entirely different purposes. A humidifier is designed to raise room humidity over a large area for many hours. A diffuser is designed to disperse fragrance and essential oils in small amounts of water for short periods.

    If you are struggling with dry air, dry skin, sinus congestion, or scratchy throat, invest in a proper humidifier. If you want aromatherapy, mood enhancement, and a pleasant-smelling home, a diffuser is the right choice. For those who want both, a combination humidifier with an essential oil tray is a practical compromise. Choose the device that matches your actual need, and you will get far better results than trying to make one tool do another’s job.

  • Crawl Space Ventilation 2026: Complete Guide to Protecting Home

    Crawl Space Ventilation 2026: Complete Guide to Protecting Home

    Crawl space ventilation is one of those home maintenance topics that generates more confusion than clarity. I have spent months researching building science, reading forum discussions from real homeowners, and comparing contractor recommendations. What I found surprised me: much of the conventional advice about crawl space ventilation is outdated or simply wrong for your specific climate.

    In this guide, I will explain how crawl space ventilation actually works, what the current building codes require, and how to choose the right approach for your home. Whether you live in a humid coastal region, a dry desert climate, or somewhere in between, you will find specific recommendations you can act on today.

    Our team has analyzed the latest IRC standards, EPA guidance, and real-world case studies from 2026 to bring you accurate, actionable information. By the end of this article, you will know whether your crawl space vents should be open or closed, how to spot moisture problems before they cause structural damage, and when to call a professional.

    What Is Crawl Space Ventilation and Why Does It Matter?

    Crawl space ventilation is the practice of controlling airflow and moisture in the unfinished area beneath your home. This space sits between the ground and your first floor, typically supported by foundation walls and piers. Because it connects directly to your living space through gaps in plumbing, ductwork, and flooring, the air quality in your crawl space affects the air you breathe indoors.

    The stack effect drives this connection. Warm air rises through your home, creating negative pressure that pulls air upward from the crawl space. In a typical house, roughly 40 percent of the air on your first floor originates from the crawl space. That means mold spores, musty odors, and radon gas in that dark space do not stay there. They travel into your living areas.

    Relative humidity is the critical measurement. When crawl space humidity exceeds 70 percent, mold growth becomes likely. Wood rot organisms activate around 80 percent. In humid climates, open foundation vents can actually pull moisture-laden air into the crawl space, causing condensation on cold surfaces and making the problem worse. This is why modern building science has shifted away from the old assumption that vents always help.

    Proper crawl space ventilation prevents structural damage, protects indoor air quality, reduces energy costs, and extends the lifespan of your home. The question is not whether you need ventilation. The question is which method works best for your climate, soil conditions, and existing construction.

    What Are the Building Code Requirements for Crawl Space Ventilation?

    The International Residential Code (IRC) Section R408 provides the standards for crawl space ventilation in most jurisdictions. Understanding these rules helps you assess whether your home meets minimum requirements and what options you have for improvement.

    For vented crawl spaces, the IRC requires a minimum net free vent area of 1 square foot for every 150 square feet of crawl space floor area. If you install a vapor barrier covering the ground, that ratio improves to 1 square foot per 1,500 square feet. The vents must be placed within 3 feet of each corner to promote cross ventilation, which prevents stagnant air pockets.

    The code also allows unvented crawl spaces under specific conditions. If you choose a sealed approach, you must cover the earth floor with a Class I vapor barrier, extend that barrier 6 inches up the foundation walls, and either supply conditioned air from the HVAC system or install a continuous mechanical exhaust fan. This is where encapsulation enters the picture as a code-compliant alternative.

    Local amendments vary. Some states with high termite risk, such as those in the Southeast, require inspection strips or specific vent screen mesh sizes. Flood-prone areas may require flood vents that meet FEMA standards. Always check with your local building department before making changes, especially if you plan to seal vents that were originally required by your permit.

    Vented vs Sealed Crawl Space: Which Is Better?

    The debate between vented and sealed crawl spaces has shifted dramatically over the past two decades. Older homes almost always have vented crawl spaces with foundation vents on every wall. Modern building science increasingly favors sealed and conditioned crawl spaces in many climates. Here is how they compare.

    Vented Crawl Spaces

    A vented crawl space relies on passive foundation vents to exchange outside air with crawl space air. In dry climates, this can work reasonably well. The outside air is drier than the crawl space air, so ventilation reduces relative humidity naturally.

    The drawbacks are significant in humid climates. When warm, humid outdoor air enters a cool crawl space, it drops below the dew point and condenses on ductwork, pipes, and floor joists. This moisture feeds mold growth, causes wood rot, and saturates fiberglass insulation until it sags and falls. Homeowners in the Southeast and coastal Pacific Northwest frequently report that adding vents or fans made their moisture problems worse instead of better.

    Sealed and Encapsulated Crawl Spaces

    A sealed crawl space blocks all foundation vents, installs a heavy vapor barrier across the ground and up the walls, and uses a dehumidifier or conditioned air supply to maintain humidity below 60 percent. This approach treats the crawl space as part of the conditioned envelope of the home.

    The benefits are substantial. Indoor air quality improves because the stack effect no longer draws musty, contaminated air upward. Energy bills drop because the HVAC system does not fight against extreme temperatures in the crawl space. Structural components stay dry, preventing the wood rot and termite attraction that moisture causes. Homeowners who encapsulate often report warmer floors in winter and reduced allergy symptoms.

    The downside is upfront cost. Professional encapsulation ranges widely depending on square footage, existing conditions, and whether you need mold remediation first. A dehumidifier designed for crawl spaces also requires electricity and periodic maintenance. However, long-term energy savings and prevented structural damage usually offset the investment over time.

    The Verdict

    There is no universal answer. If you live in a dry climate like the Southwest, vented crawl spaces can perform adequately with proper cross ventilation. If you live in a humid climate like the Southeast or coastal regions, sealing and encapsulation is almost always the better choice. In mixed climates, a seasonal approach or full encapsulation provides the most consistent results.

    Crawl Space Ventilation Methods Explained

    Homeowners have several options for managing crawl space air quality and moisture. The right method depends on your climate, budget, and existing conditions.

    Passive Foundation Vents

    Passive vents are the traditional solution: screened openings in the foundation walls that allow natural air exchange. They cost little to install and require no electricity. Some models include manual dampers that let you open or close the vent seasonally.

    The effectiveness of passive vents depends entirely on the climate. In dry regions, they can reduce humidity. In humid regions, they often make it worse. They also do nothing to address radon gas, pests, or temperature extremes. If you have passive vents and ongoing moisture issues, the vents may be part of the problem.

    Powered Crawl Space Fans

    Powered fans mount in foundation vents or exhaust through the crawl space wall to actively pull air through the space. They typically move air at rates around 1 CFM per 50 square feet of crawl space area. The idea is to force air exchange even when natural breeze is insufficient.

    Our research shows that powered fans can help in specific scenarios, but they are not a universal fix. A fan that pulls in humid outside air simply accelerates moisture accumulation. A fan that exhausts crawl space air without addressing the source of moisture may create negative pressure that pulls conditioned air downward from your living space, wasting energy. If you install a powered fan, it should be paired with a humidistat that only activates when crawl space humidity exceeds a set threshold.

    Automatic Vent Covers

    Automatic vent covers use temperature or humidity sensors to open and close vents without manual intervention. When the outside air is dry and warm, the vent opens. When humidity rises or temperatures drop, the vent seals. This provides a middle ground between fully open and fully closed strategies.

    These covers work best in mixed climates with seasonal variation. They are less effective in persistently humid regions because the vent will remain closed most of the time, and in that case, full encapsulation is usually more efficient. They also require battery or wired power and periodic sensor maintenance.

    Encapsulation with Dehumidification

    Encapsulation is the most comprehensive method. The process involves sealing all foundation vents, installing a thick polyethylene vapor barrier across the entire floor and up the walls, sealing seams and piers with tape or adhesive, and installing a dedicated crawl space dehumidifier. Some systems also add insulation to the foundation walls.

    A properly sized dehumidifier for crawl spaces typically drains automatically to a sump pump or condensate pump, so you do not need to empty buckets. The goal is to maintain relative humidity between 50 and 60 percent year-round. In 2026, this approach has become the gold standard for humid climates and is increasingly recommended by building scientists and energy auditors.

    Climate-Specific Crawl Space Ventilation Recommendations

    One of the biggest frustrations homeowners report is conflicting advice. A contractor in Arizona tells you to keep vents open. A building science blog tells you to seal everything. Both can be correct depending on where you live. Here is the climate-specific guidance that actually works.

    Humid Climates (Southeast, Gulf Coast, Pacific Northwest Coastal)

    If you live where outdoor humidity regularly exceeds 70 percent, foundation vents are likely doing more harm than good. The outside air entering your crawl space carries moisture that condenses on cool surfaces. In these climates, encapsulation is the best long-term solution. If full encapsulation is not immediately affordable, closing the vents, installing a ground vapor barrier, and running a small dehumidifier is a workable interim step.

    Homeowners in Tennessee and coastal regions frequently share the same story on forums: they left vents open for years, fought recurring mold, and finally sealed the space. After encapsulation, humidity dropped and musty odors disappeared. The pattern is consistent enough that building scientists now consider vented crawl spaces in humid climates a known mistake.

    Dry Climates (Southwest, Mountain West)

    In arid regions where outdoor humidity stays low, vented crawl spaces can perform well. The dry air entering through foundation vents helps control moisture from minor soil evaporation. You still need a ground vapor barrier, but full encapsulation is less critical unless you have specific issues like radon or extreme temperature swings.

    Even in dry climates, check your crawl space after monsoon season or heavy rains. Temporary spikes in humidity can cause condensation if the ground becomes saturated. Automatic vent covers that close during rare wet periods can provide cheap insurance.

    Cold Climates (Northern States, Alaska, High Elevations)

    In cold regions, vented crawl spaces pull freezing air beneath your home. This creates cold floors, increases heating bills, and risks frozen pipes. The stack effect is stronger in winter because the temperature difference between inside and outside is larger. Sealing the crawl space and insulating the foundation walls dramatically improves comfort and energy efficiency.

    Alaska homeowners and residents in northern states routinely block vents in winter. Some building codes in these regions now permit or encourage unvented crawl spaces with mechanical conditioning. If you have a vented crawl space in a cold climate, consider at minimum sealing the vents for the heating season and monitoring humidity with a remote sensor.

    Mixed Climates (Mid-Atlantic, Midwest)

    Mixed climates present the toughest challenge because conditions change seasonally. Humid summers favor sealed spaces. Dry winters might favor some ventilation. Managing this manually is exhausting and error-prone. Automatic vent covers or a full encapsulation system with a humidistat-controlled dehumidifier removes the guesswork.

    Our recommendation for mixed climates is to invest in a monitoring system first. Place a humidity sensor in your crawl space for one full year. Track the data monthly. If you see humidity above 65 percent for more than three consecutive months, that is your signal to move toward encapsulation rather than seasonal vent management.

    Common Crawl Space Ventilation Problems and Solutions

    Recognizing the symptoms of poor crawl space ventilation early can save you thousands in structural repairs. Here are the problems homeowners report most often and the fixes that actually work.

    Musty Odors and Mold Growth

    If your home smells musty despite regular cleaning, the source is likely your crawl space. Mold colonies release microbial volatile organic compounds that travel upward through the stack effect. The solution is moisture control, not air fresheners. Identify the water source: soil evaporation, plumbing leaks, or outdoor air condensation. Then seal the moisture out with a vapor barrier or full encapsulation. If mold is already established, professional remediation may be necessary before sealing the space.

    Wood Rot and Structural Damage

    Wood rot fungi require sustained moisture above 20 percent wood moisture content. A damp crawl space provides that environment. Sagging floor joists, bouncy floors, and crumbling sill plates are signs of advanced rot. Stop the moisture first, then repair structural damage. Attempting repairs without fixing the ventilation problem is like repainting a leaking ceiling. The damage will return.

    Sagging or Wet Insulation

    Fiberglass insulation in crawl spaces is a common failure point. When humid air condenses on the insulation, the batts absorb water, compress, and fall away from the floor above. Once that happens, the insulation value is gone and the wet mass becomes a mold habitat. If you find sagging insulation, remove it, fix the moisture issue, and consider switching to rigid foam insulation on the foundation walls instead of floor joist batts.

    Cold Floors in Winter

    Cold floors above a crawl space usually mean cold air is circulating beneath the home. In vented crawl spaces, winter air temperatures can match the outside. Sealing the vents and insulating the foundation walls with rigid foam creates a conditioned buffer zone. Your feet will notice the difference immediately, and your heating system will work less.

    High Energy Bills

    When outside air moves freely through your crawl space, your HVAC system loses conditioned air through the floor and must work harder to maintain temperature. Sealing and insulating the crawl space reduces this thermal loss. The EPA and building science studies show that conditioned crawl spaces can reduce heating and cooling costs by 15 to 20 percent in many homes. The savings are most dramatic in extreme climates.

    Pest and Termite Concerns

    Open foundation vents provide entry points for rodents, insects, and termites. Moisture-damaged wood is particularly attractive to subterranean termites. Sealing vents and encapsulating the space closes off these entry routes. Some termite warranties require specific inspection gaps in the vapor barrier, so coordinate with your pest control provider before sealing the space completely.

    Should Crawl Space Vents Be Open or Closed? Seasonal Guide

    This is the most common question homeowners ask, and the answer depends on your climate and your system. If you have a traditional vented crawl space without encapsulation, here is the seasonal guidance that aligns with building science and real homeowner experiences.

    Spring and Summer

    In humid climates, close vents from late spring through early fall. The outdoor air is too moist and will cause condensation. In dry climates, vents can remain open during summer as long as humidity stays below 60 percent. Monitor with a crawl space humidity sensor rather than guessing.

    Fall and Winter

    In cold climates, close vents before the first freeze to prevent frozen pipes and cold floors. In mild winter climates where humidity stays low, some homeowners keep vents open. If you notice condensation on ductwork or pipes, that is your signal to close them regardless of the season.

    When to Keep Vents Closed Permanently

    If you encapsulate your crawl space, all vents should be sealed permanently. If you install a dehumidifier, keep vents closed so the unit does not waste energy fighting against humid outdoor air. If you have a radon mitigation system, sealed vents improve the system’s effectiveness by allowing the vacuum to draw from beneath the entire vapor barrier.

    Automatic Vent Management

    For homeowners who want a set-and-forget solution in mixed climates, automatic vent covers with temperature and humidity sensors handle seasonal changes without manual intervention. These devices are not a substitute for encapsulation in humid regions, but they can reduce the management burden in drier areas. Check the batteries and sensor calibration annually.

    When Should You Call a Professional?

    Some crawl space ventilation improvements are suitable for DIY. Others require professional expertise. Knowing the difference protects your home and your wallet.

    Call a professional if you see structural damage such as sagging floor joists, cracked sill plates, or significant wood rot. These issues indicate that moisture has been present long enough to compromise the building’s integrity. A structural engineer or qualified contractor should assess the damage before you begin encapsulation or major changes.

    Active mold covering more than a few square feet requires professional remediation. Disturbing large mold colonies releases spores into your home. Remediation contractors use containment, negative air pressure, and proper disposal methods to protect your indoor air quality during the process.

    If you need radon mitigation integrated with your crawl space ventilation, hire a certified radon mitigation contractor. Radon systems require specific pipe routing, fan placement, and post-installation testing to ensure they meet EPA guidelines. Combining radon mitigation with encapsulation without proper design can create pressure imbalances that reduce effectiveness.

    Electrical work for powered fans or dehumidifiers should be completed by a licensed electrician. Crawl spaces are damp environments where improper wiring poses serious hazards. The cost of professional installation is minor compared to the risk of fire or electrocution.

    DIY encapsulation is possible for handy homeowners with small, accessible crawl spaces. However, most homeowners benefit from a professional assessment that identifies hidden moisture sources, proper dehumidifier sizing, and termite warranty requirements. A professional inspection typically costs far less than redoing a botched encapsulation job.

    Frequently Asked Questions

    What is the best way to ventilate a crawl space?

    The best method depends on your climate. In humid climates, sealing the crawl space with a vapor barrier and dehumidifier works best. In dry climates, passive foundation vents with proper cross ventilation may be sufficient. For most homeowners in 2026, encapsulation provides the most consistent moisture control and air quality improvement.

    Are crawl spaces supposed to be vented?

    Building codes allow both vented and unvented crawl spaces. The IRC requires vents for traditional crawl spaces unless you install a vapor barrier and either supply conditioned air or use mechanical exhaust. Modern building science increasingly favors unvented, sealed crawl spaces in humid and cold climates because they provide better moisture control and energy efficiency.

    Where should a crawl space vent be placed?

    Foundation vents must be placed within 3 feet of each corner to promote cross ventilation. They should be distributed evenly around the perimeter. The IRC requires a net free vent area of 1 square foot per 150 square feet of crawl space floor area, or 1 square foot per 1,500 square feet if a ground vapor barrier is installed.

    What are the code requirements for crawl space ventilation?

    IRC Section R408 requires vented crawl spaces to have 1 square foot of net free vent area per 150 square feet of floor space. Unvented crawl spaces must have a Class I vapor barrier covering the ground, extending 6 inches up foundation walls, and either conditioned air supply or continuous mechanical exhaust. Local amendments may add requirements for flood vents, termite inspections, or specific screen sizes.

    Should I close my crawl space vents in winter?

    In cold climates, yes. Closing vents prevents freezing air from entering, reduces heating bills, and protects pipes. In mild climates with dry winters, you may leave vents open if humidity remains low. If you have encapsulated your crawl space, all vents should remain closed permanently year-round to maintain the conditioned environment.

    Do crawl space vents cause mold?

    In humid climates, open vents can cause mold by introducing moisture-laden outdoor air that condenses on cool surfaces. In dry climates, properly sized vents usually help control moisture. The mold risk depends on whether the outside air is drier or wetter than the crawl space air. If you have mold despite open vents, the vents are likely contributing to the problem.

    How many crawl space vents do I need?

    Calculate based on the IRC ratio of 1 square foot of net free vent area per 150 square feet of crawl space floor area. For a 1,500 square foot crawl space, you need 10 square feet of net free vent area total. Divide this among vents placed within 3 feet of each corner. If you install a ground vapor barrier, the requirement drops to 1 square foot per 1,500 square feet.

    Conclusion

    Crawl space ventilation is not a one-size-fits-all decision. The right approach depends on your climate, your home’s existing construction, and your specific moisture challenges. What we have learned from building science and thousands of homeowner experiences is clear: vented crawl spaces work in some climates but cause serious problems in others. Ignoring the crawl space is not an option, because the stack effect guarantees that whatever happens down there affects the air you breathe upstairs.

    If you take one action from this guide, make it measurement. Buy an inexpensive humidity sensor and place it in your crawl space for a month. Track the readings. If relative humidity stays above 65 percent consistently, your current ventilation strategy is failing. In that case, closing the vents and installing a ground vapor barrier is the logical first step. From there, you can evaluate whether a dehumidifier or full encapsulation makes sense for your budget and your goals.

    For homeowners in dry climates, vents may continue to serve you well if you maintain proper cross ventilation and keep the ground covered. For everyone else, especially in humid and cold regions, the evidence strongly favors sealing and conditioning the crawl space. The energy savings, air quality improvements, and structural protection are worth the investment.

    Start with an honest assessment of your crawl space today. Look for musty odors, sagging insulation, mold, or cold floors. These are your home’s warning signals. Addressing crawl space ventilation now prevents the expensive repairs that moisture damage inevitably causes later. Your crawl space may be out of sight, but it should never be out of mind.

  • How to Unclog an AC Drain Line (August 2026)

    How to Unclog an AC Drain Line (August 2026)

    When your air conditioning starts leaking water or you notice a musty smell from your vents, you likely have a clogged AC drain line. This common problem affects homeowners during hot summer months when AC units work overtime. Learning how to unclog an AC drain line is a straightforward DIY task most homeowners can handle in under an hour. With the right approach, you can restore proper drainage and avoid costly water damage repairs.

    What is an AC Drain Line?

    Your air conditioning system produces condensation as part of the cooling process. The AC drain line is a PVC pipe that carries this water away from your indoor unit to a drain or outside location. This line typically runs from the evaporator coil pan inside your air handler to an exit point near your outdoor unit.

    During normal operation, moisture from the air collects on your evaporator coil and drips into the drain pan. Gravity pulls the water through the drain line and out of your home. When this pathway becomes obstructed, water has nowhere to go and can cause significant damage to your walls, ceilings, and belongings.

    Signs of a Clogged AC Drain Line

    Recognizing warning signs early can prevent extensive damage. Here are the most common indicators:

    • Water pooling around your indoor unit or water damage on walls and ceilings
    • Musty or moldy odors coming from your vents
    • AC shuts off unexpectedly (many systems have a float switch that does this)
    • Decreased cooling efficiency
    • Visible algae or slime around the drain opening

    Safety First: Turn Off Power

    Before attempting any maintenance on your air conditioning system, you must turn off the power. Locate your AC’s disconnect box near your outdoor unit and pull it out. Also turn off the circuit breaker that controls your indoor air handler.

    Warning: Never skip this step. Working on your AC without disconnecting power can result in serious injury. Verify power is off by trying to turn on your thermostat.

    Tools and Materials Needed

    • Shop vacuum (wet/dry model works best)
    • Bucket or large container
    • Clean towels
    • Distilled white vinegar
    • Flashlight
    • Protective gloves

    Why Drain Lines Clog

    Understanding why your AC drain line becomes clogged helps you prevent future issues:

    Dirt and Dust: Air filters capture most particles, but some fine dust still reaches the drain system. Over time, this debris accumulates and forms a blockage.

    Algae and Mold Growth: The warm, moist environment inside your drain line provides perfect conditions for biological growth. These organisms create a slimy biofilm that traps other debris.

    Sludge Buildup: The combination of condensation, dust, and biological growth produces thick sludge that adheres to pipe walls until water can no longer flow freely.

    Step-by-Step Unclogging Instructions

    Follow these steps to unclog your AC drain line effectively. This shop vac method from the outside access point is recommended by HVAC professionals.

    Step 1: Locate the Outdoor Access Point

    Find where your AC drain line exits your home, typically near your outdoor condenser unit. You’ll see a small PVC pipe protruding from the wall. This is your primary access point for clearing the clog.

    Step 2: Prepare Your Equipment

    Position your shop vacuum at the outdoor access point. Remove the cap or plug from the drain line opening. Have your bucket ready to catch any water that may pour out.

    Step 3: Create a Secure Seal

    Fit the shop vacuum hose firmly into the drain line opening. Wrap towels around the hose where it meets the pipe to create a tighter seal for better suction.

    Step 4: Apply Vacuum Pressure

    Turn on the shop vacuum and let it run for 2-3 minutes. The powerful suction should pull the clog loose. If the vacuum struggles, gently rock the hose to help break up the blockage.

    Step 5: Test with Water

    Pour a cup of water into the drain pan inside your home. Watch the outdoor pipe to confirm water flows through without backing up. If water drains properly, you’ve successfully cleared the clog.

    Pro Tip: For stubborn clogs, use a wet/dry shop vac rated at 6+ horsepower. Some professionals recommend tapping the pipe gently while vacuuming to dislodge compacted debris.

    How to Flush with Vinegar

    After removing the main clog, flushing your drain line with vinegar helps eliminate remaining debris and prevents future buildup. This natural solution is safe for your pipes and effective at killing algae and mold.

    Pour 2 cups of distilled white vinegar slowly into the drain pan. Let the solution sit for 30 minutes to an hour, allowing it to break down organic matter. Then run your shop vacuum briefly to flush out loosened particles. Perform this flush every 2-3 months as part of regular AC maintenance.

    Safety Warning: Never mix vinegar with bleach or any chlorine-based cleaner. This combination produces toxic chlorine gas, which can cause severe respiratory problems. Always use vinegar alone for AC drain cleaning.
    Important: Never use Drano, chemical drain cleaners, or harsh solvents in your AC drain line. These products can damage your PVC pipes and harm your system’s components.

    How to Tell if Line is Clear

    After completing the unclogging process, verify your drain line is functioning properly:

    • Water flows freely when poured into the drain pan
    • No musty odors remain
    • AC runs continuously without shutting off unexpectedly
    • No water leaks or pooling around your indoor unit

    If you notice any remaining issues, repeat the vacuum process or consider calling a professional.

    Prevention Tips

    Regular maintenance prevents most AC drain line clogs:

    • Change Your Air Filter Regularly: Check monthly and replace every 1-3 months to reduce debris reaching your drain system.
    • Perform Quarterly Vinegar Flushes: This preventive measure keeps your drain line clear and costs only a few dollars. Schedule this task every 2026 to maintain optimal performance.
    • Keep the Area Around Your Indoor Unit Clean: Vacuum around your unit regularly to prevent dust from entering the drain system.
    • Inspect Your Outdoor Drain Line Periodically: Remove leaves or debris that may accumulate near the opening.

    When to Call a Professional

    While most clogs can be cleared DIY, contact an HVAC technician if you encounter persistent clogs despite repeated cleaning attempts, visible pipe damage or leaks, complex system configurations, or electrical issues. Professional drain line service typically costs between $100-$300.

    Frequently Asked Questions

    How do you dissolve gunk in an AC drain line?

    The most effective method is flushing with hot water mixed with mild dish soap, followed by a vinegar rinse. Pour the solution into your drain pan, let it sit for 15-20 minutes, then use your shop vacuum to flush out the loosened material. For severe buildup, repeat this process or use a specialized enzymatic drain cleaner designed for HVAC systems.

    Can I pour Drano down an AC drain?

    No, never use Drano or chemical drain cleaners in your AC drain line. These harsh chemicals can damage your PVC pipes and harm internal components. They can also cause dangerous chemical reactions with residual moisture. Use natural solutions like vinegar and hot water, or employ mechanical methods like a shop vacuum for safe and effective clearing.

    How to know if an AC drain line is clear?

    Pour a cup of water into your indoor drain pan and watch the outdoor access point. If water flows out freely within a few seconds, the line is clear. Also check that your AC no longer shuts off unexpectedly and there are no musty odors or water pooling around your indoor unit.

    Can I snake a clogged AC drain line?

    Yes, you can use a drain snake to clear a clogged AC drain line if vacuuming doesn’t work. Feed a small handheld drain snake carefully into the drain line from the outdoor access point, rotating as you push to catch and break up debris. Use caution to avoid damaging your pipes or pushing the clog further into the system.

    Why put vinegar in AC drain line?

    Vinegar is excellent for AC drain lines because it effectively kills algae, mold, and bacteria that cause clogs. The acetic acid dissolves the slimy biofilm these organisms create, allowing it to be easily flushed away. Monthly vinegar treatments prevent organic buildup from accumulating, keeping your drain line clear between thorough cleanings.

    How much does it cost to flush AC drain line?

    If you hire a professional HVAC technician to flush your AC drain line, expect to pay between $100-$300 depending on your location and system complexity. Some companies offer annual maintenance contracts that include drain cleaning for a flat fee of $150-$400. DIY cleaning costs are minimal, typically requiring only vinegar and your time.

    Conclusion

    Learning how to unclog an AC drain line is an essential skill for any homeowner who wants to maintain a reliable air conditioning system. By understanding the warning signs, following proper safety procedures, and using the methods outlined above, you can handle most clogs without professional help. Perform regular preventive maintenance including quarterly vinegar flushes to keep your drain line clear and avoid emergency repairs.

    If at any point you feel uncomfortable with the process or encounter issues beyond your expertise, contact a qualified HVAC professional. Your safety and your home’s comfort are worth the investment. With proper care, your AC system will provide reliable cooling for years to come.